Quick Start: Projects, Entities & Causal Events
Welcome to the InkWeave documentation!
This is a demonstration article written in Markdown. When you switch languages at the top of the page, Starlight will automatically redirect you to the corresponding English or Simplified Chinese version.
First, let’s select Create New Book
Section titled “First, let’s select Create New Book”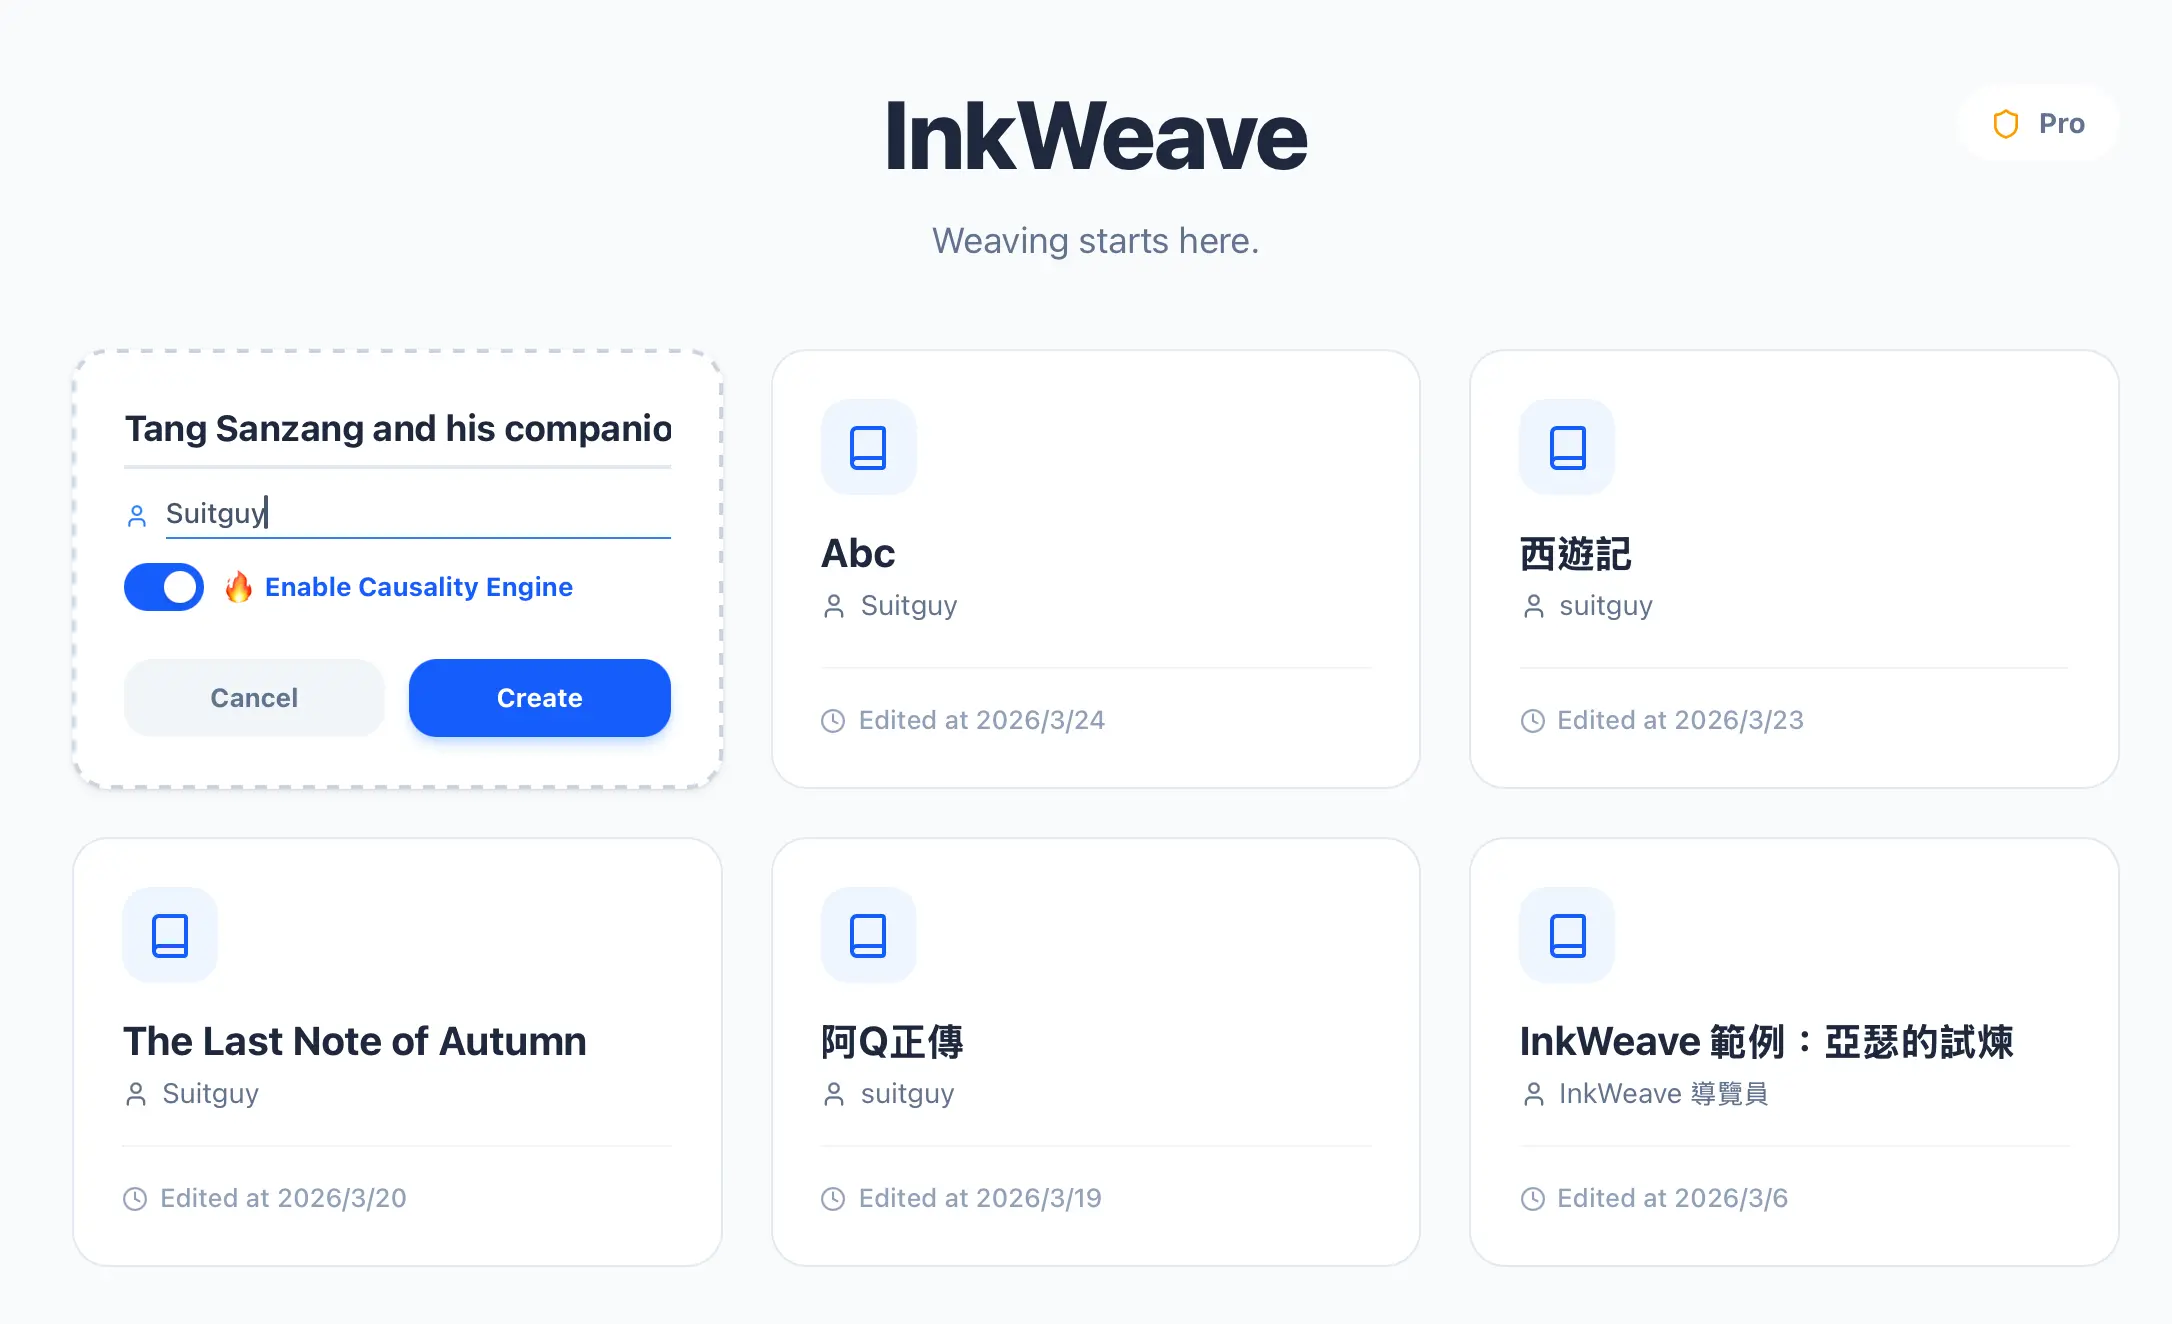
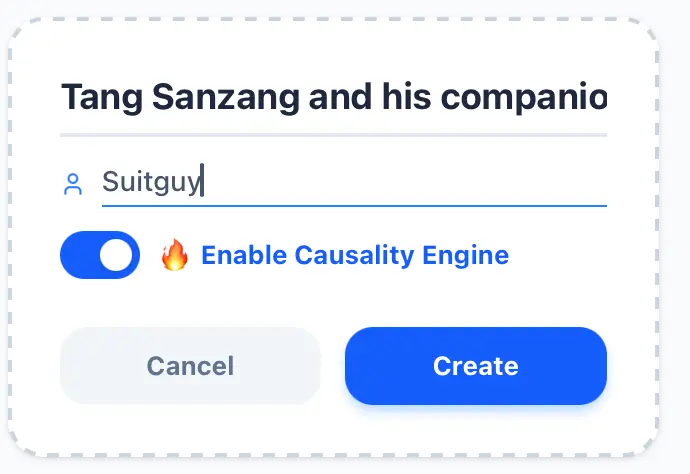
Then we enter the book title and author name, and turn on the Causality Engine
Section titled “Then we enter the book title and author name, and turn on the Causality Engine”You can choose not to turn on the Causality Engine, but for the sake of this tutorial, let’s turn it on first. Then, hit the create button and you will enter the Project Screen.
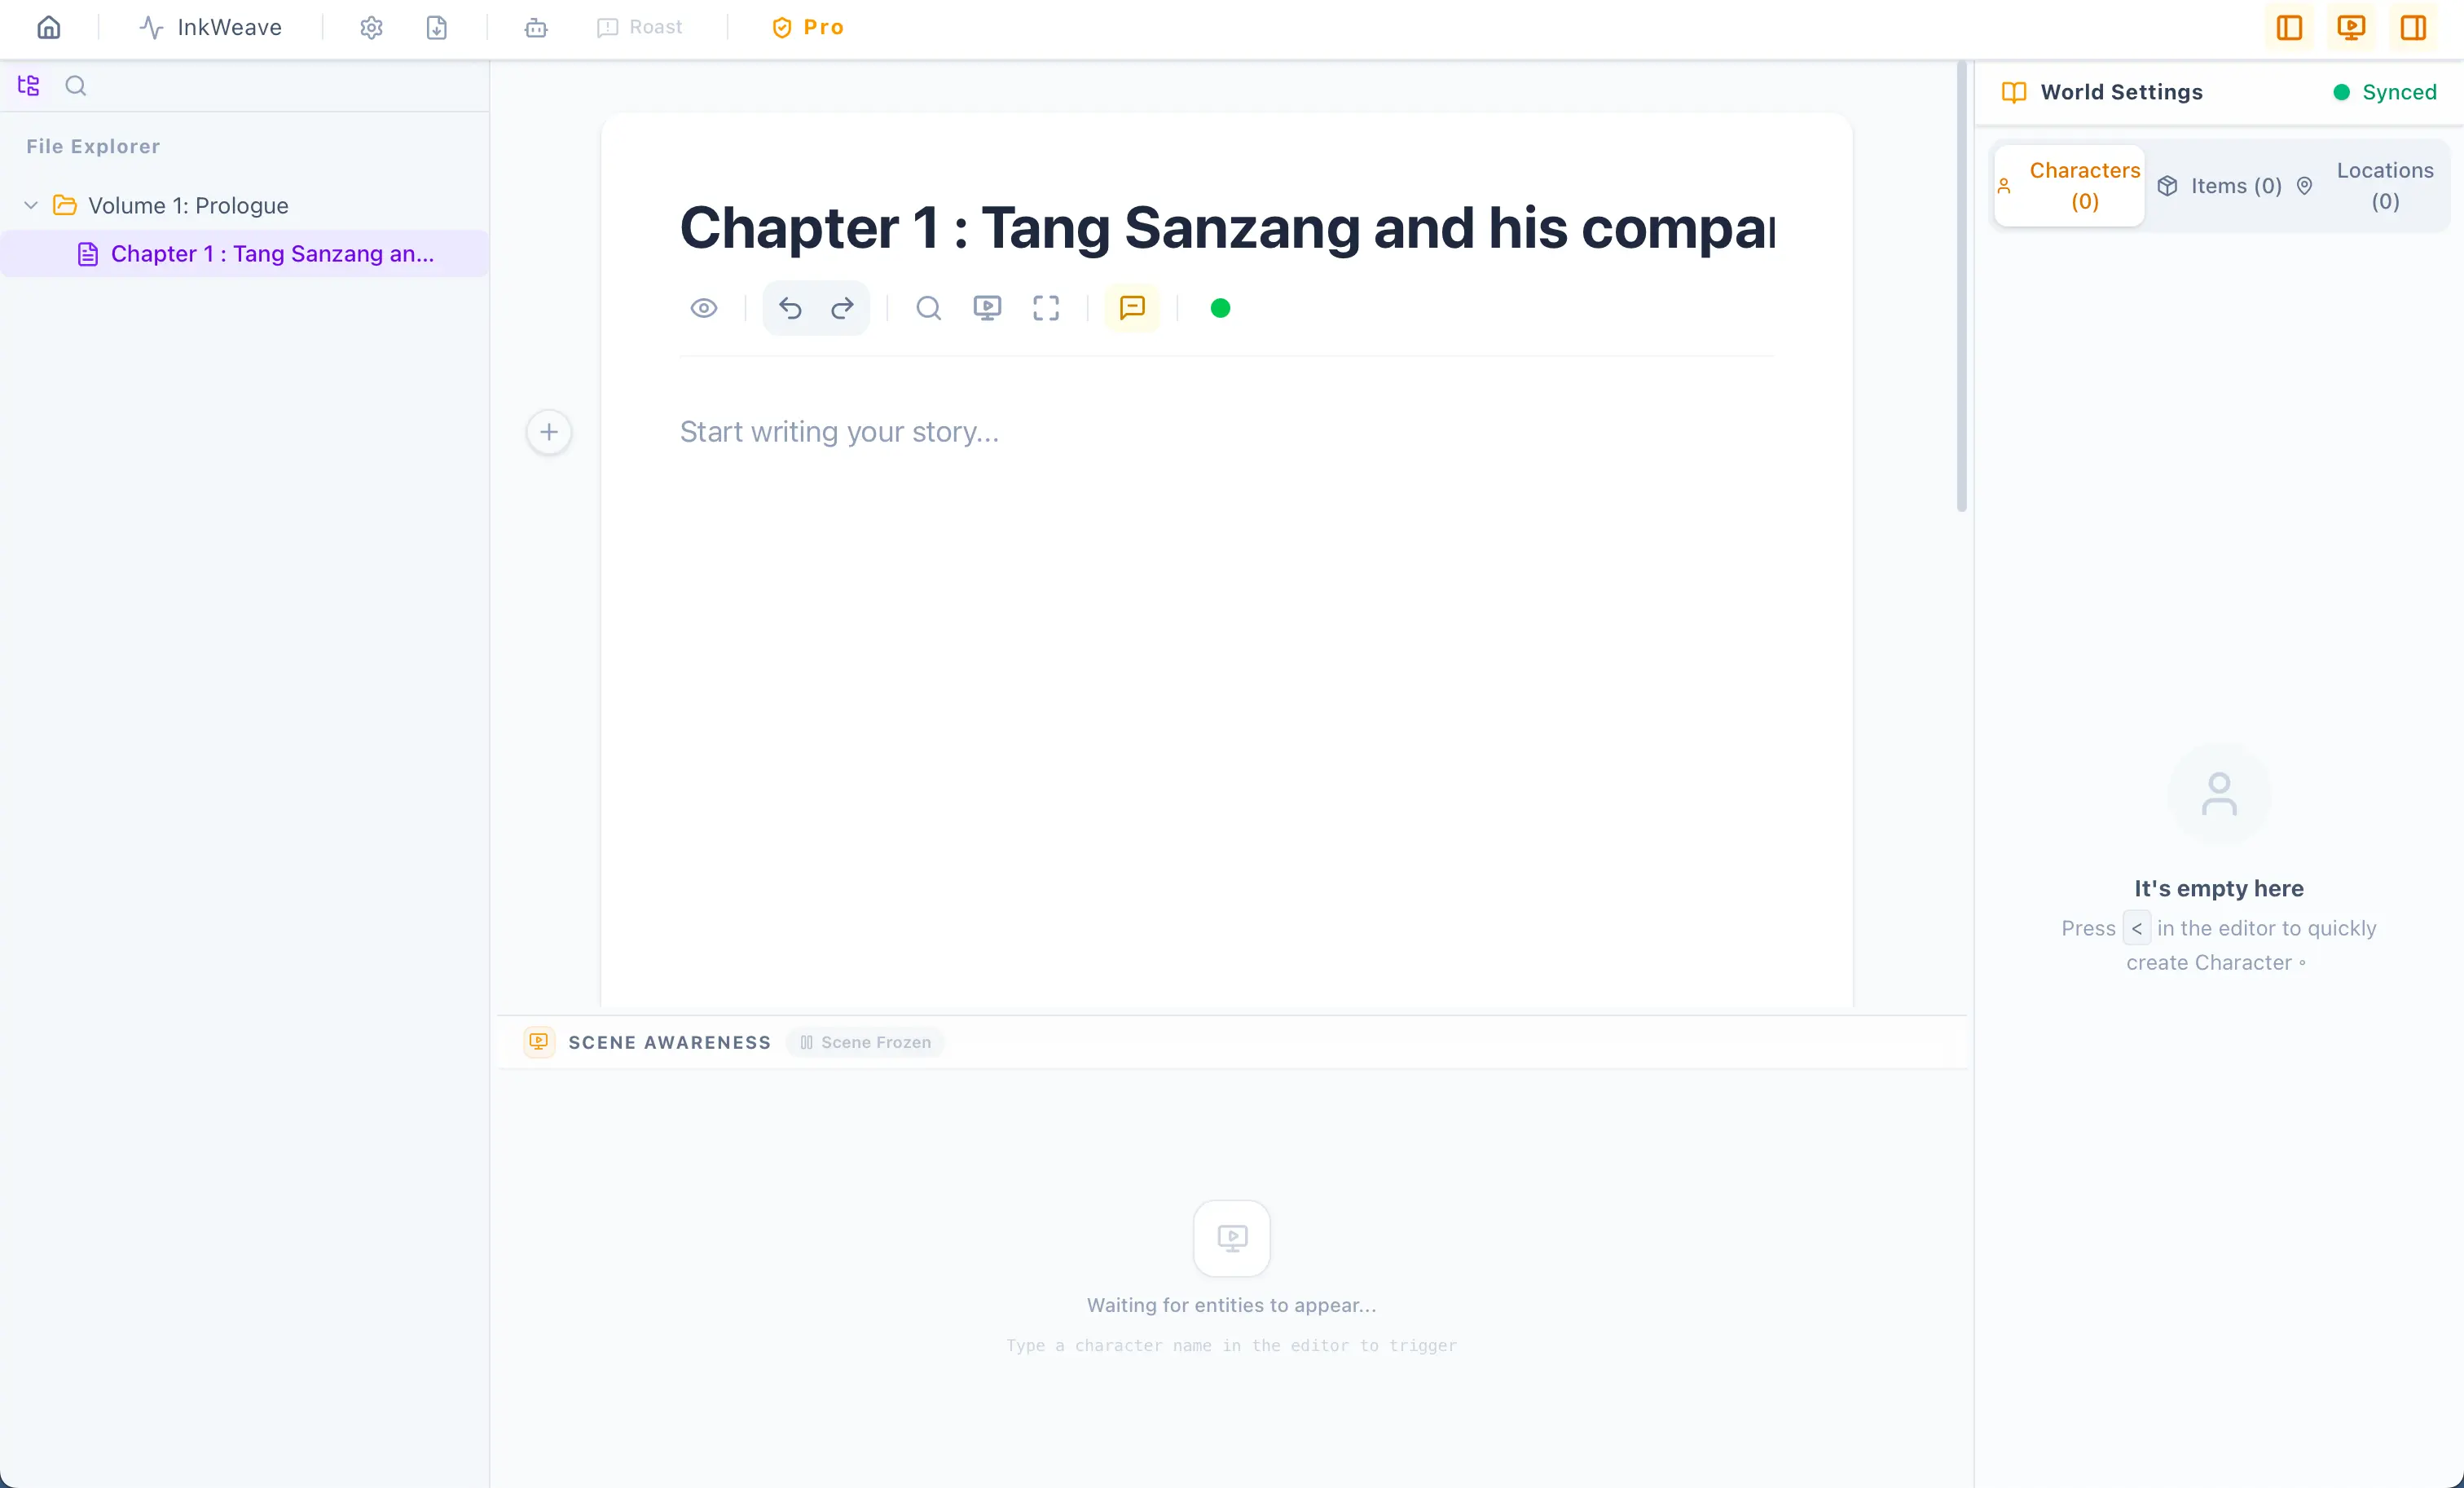
Seeing a blank project screen means our project setup is successful, and we can start writing next.

Hover your mouse to the right of Volume 1 Prologue, there is a + button
Section titled “Hover your mouse to the right of Volume 1 Prologue, there is a + button”After entering the chapter name, press Enter to add a new chapter, and a new editor block will appear, as shown in the image below:
Next, we enter a piece of text
Section titled “Next, we enter a piece of text”The text content includes characters, items, locations, etc… as shown in the image below:

Let’s use the mouse to create a character for the selected text. Click the options that appear after highlighting with your mouse. The options include Create Character, Create Item, Create Location, and Notes. Since the text content is a character, we choose to create a character. Then, the text we entered also has other characters, locations, and items, right! So we will create all of them, and they will be highlighted in different colors. This is a feature of the full version. Of course, it’s best if you can enter more complete information, and even better if you add pictures, as shown in the image below:
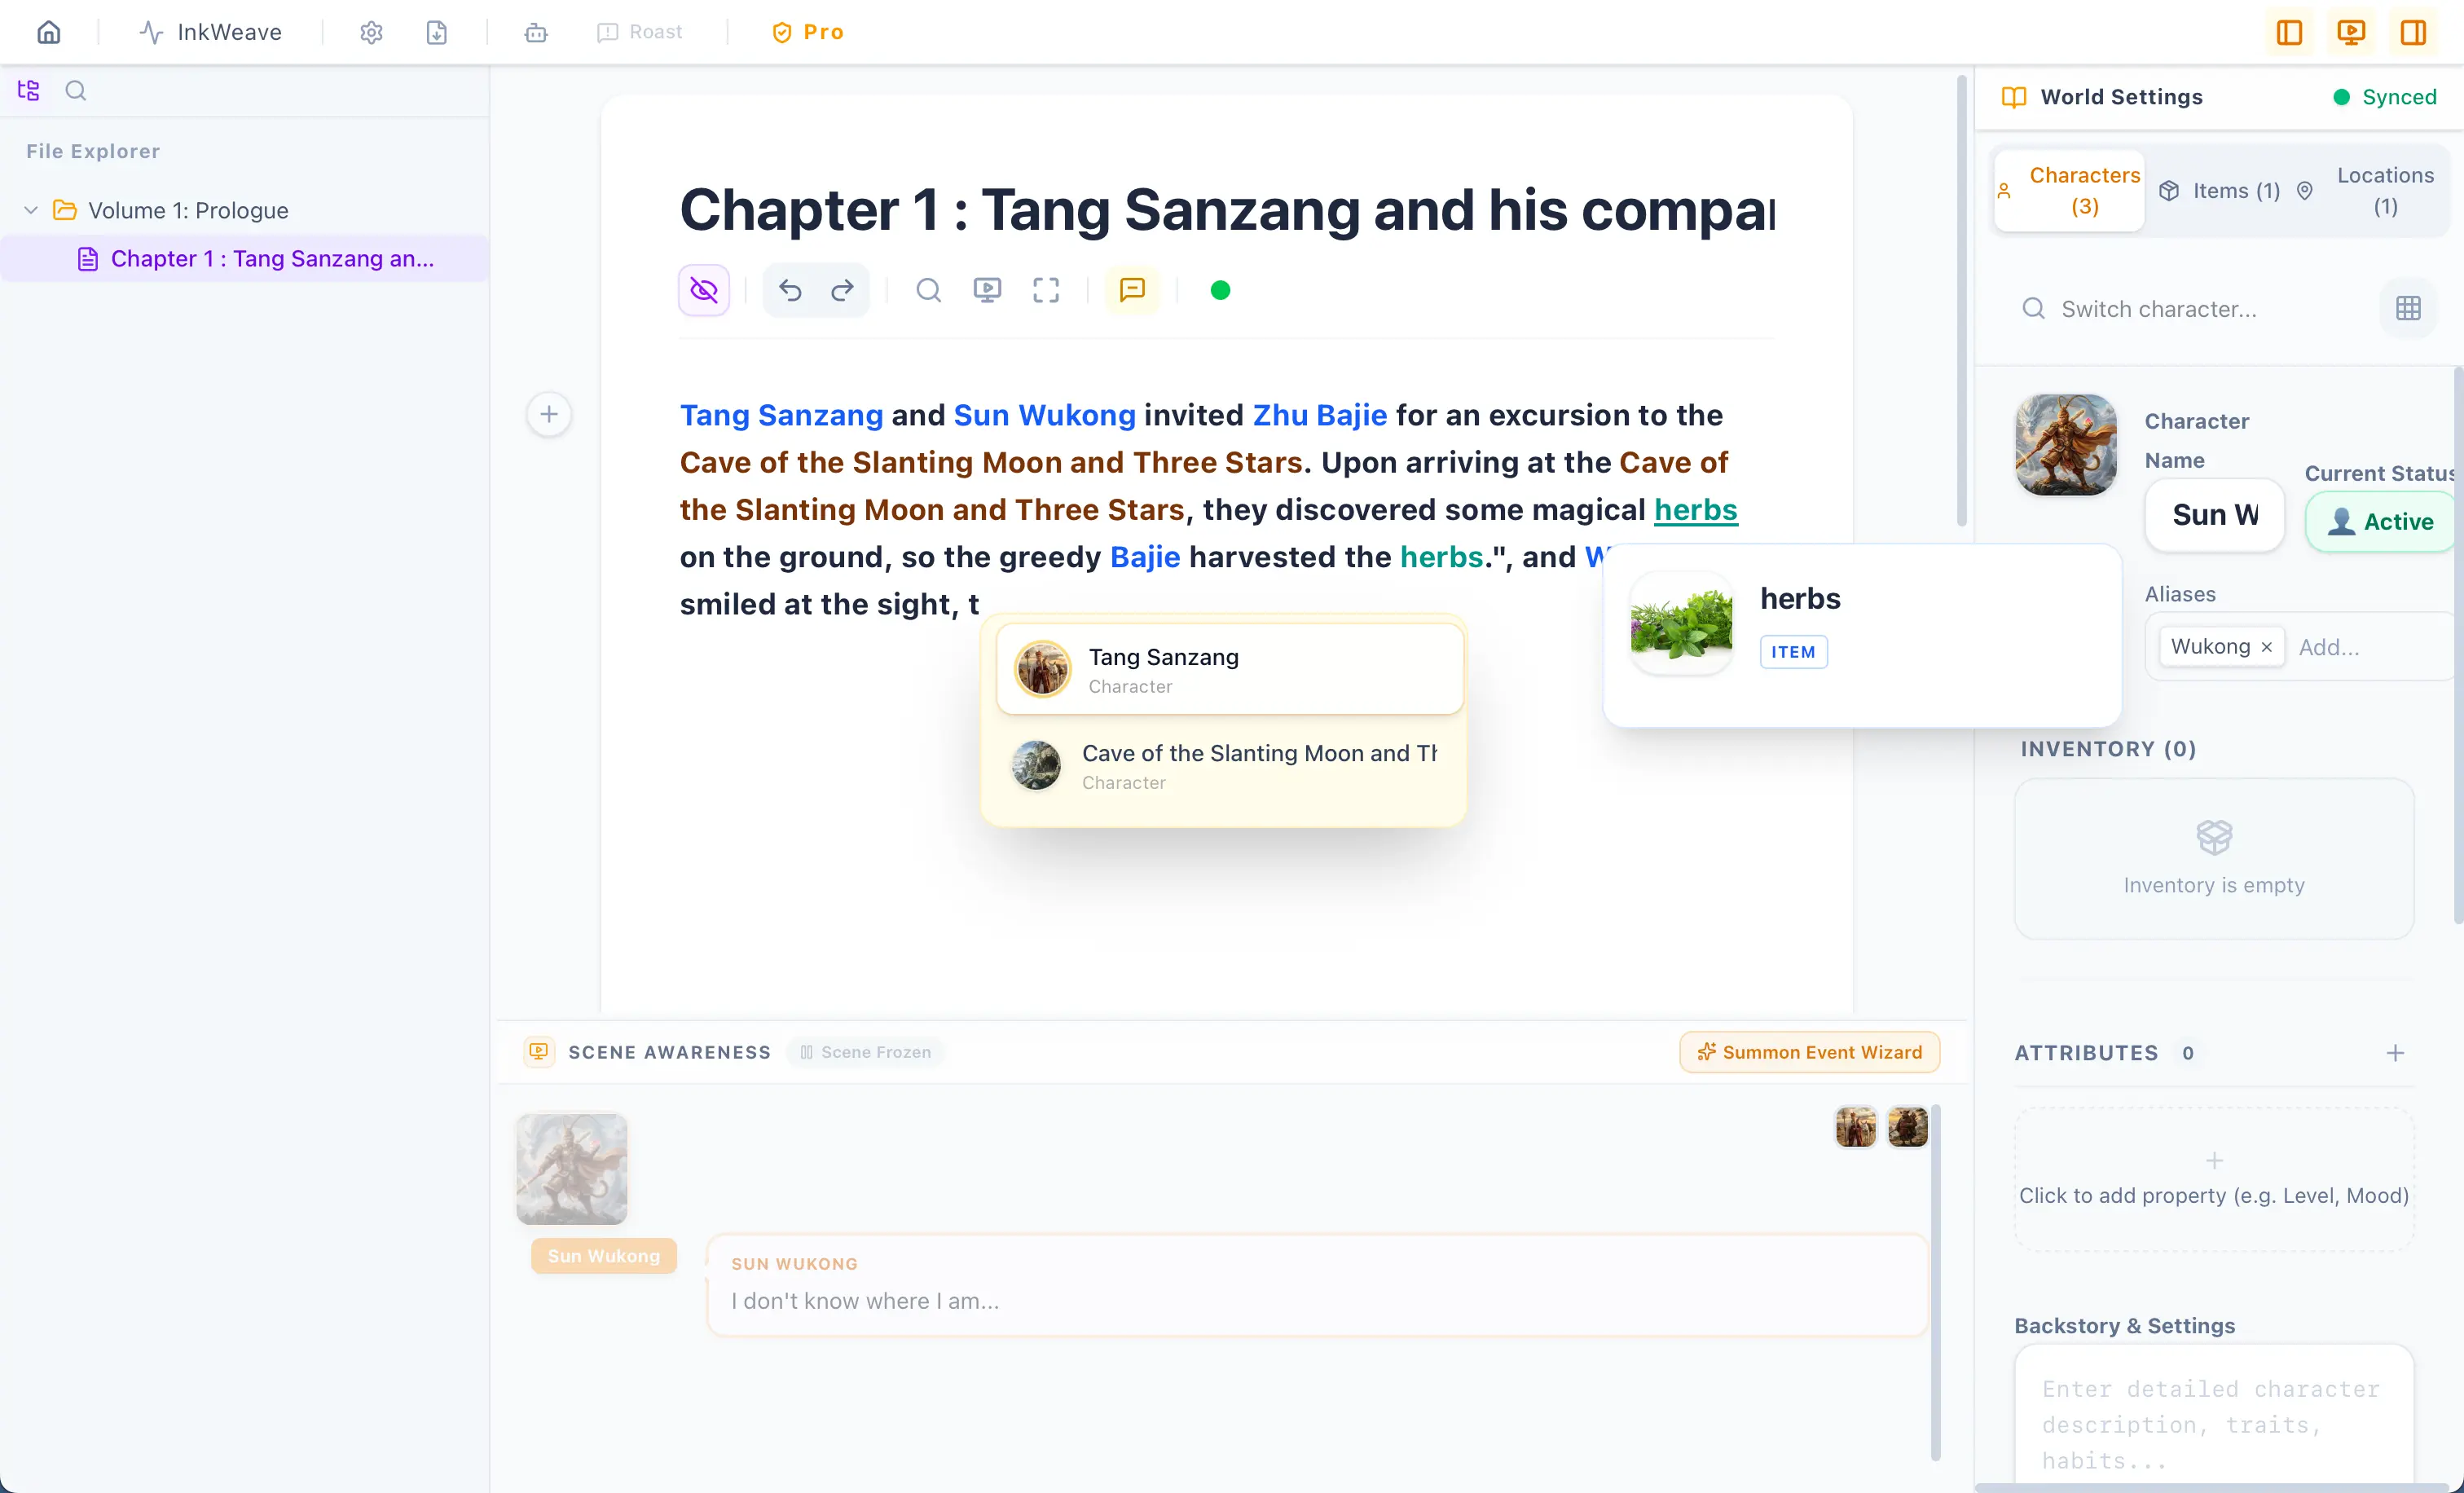
Do you see that all the entities have been highlighted? Moreover, when you hover your mouse over an entity, a floating menu will appear displaying the entity’s information and photo. In the future, when you type, there will even be auto-complete—just press Enter and it will finish typing for you. Additionally, you can see that you can also enter an alias for a character. Under the character name in the Inspector, you can customize aliases. Our editor will automatically capture the entity’s alias and highlight it for you, and the floating window will precisely display the correct character!
In the Inspector and when you were creating entities, did you notice the addition of “Attributes” for characters and items? Here, you can treat them as notes, because not all users will turn on the Causality Engine, so we provide the attribute feature to allow users to record entity information. However, since we did turn on the Causality Engine, we will find a gear icon at the top of the app, to the right of InkWeave. Clicking the gear will bring up a Project Settings window, as shown in the image below:
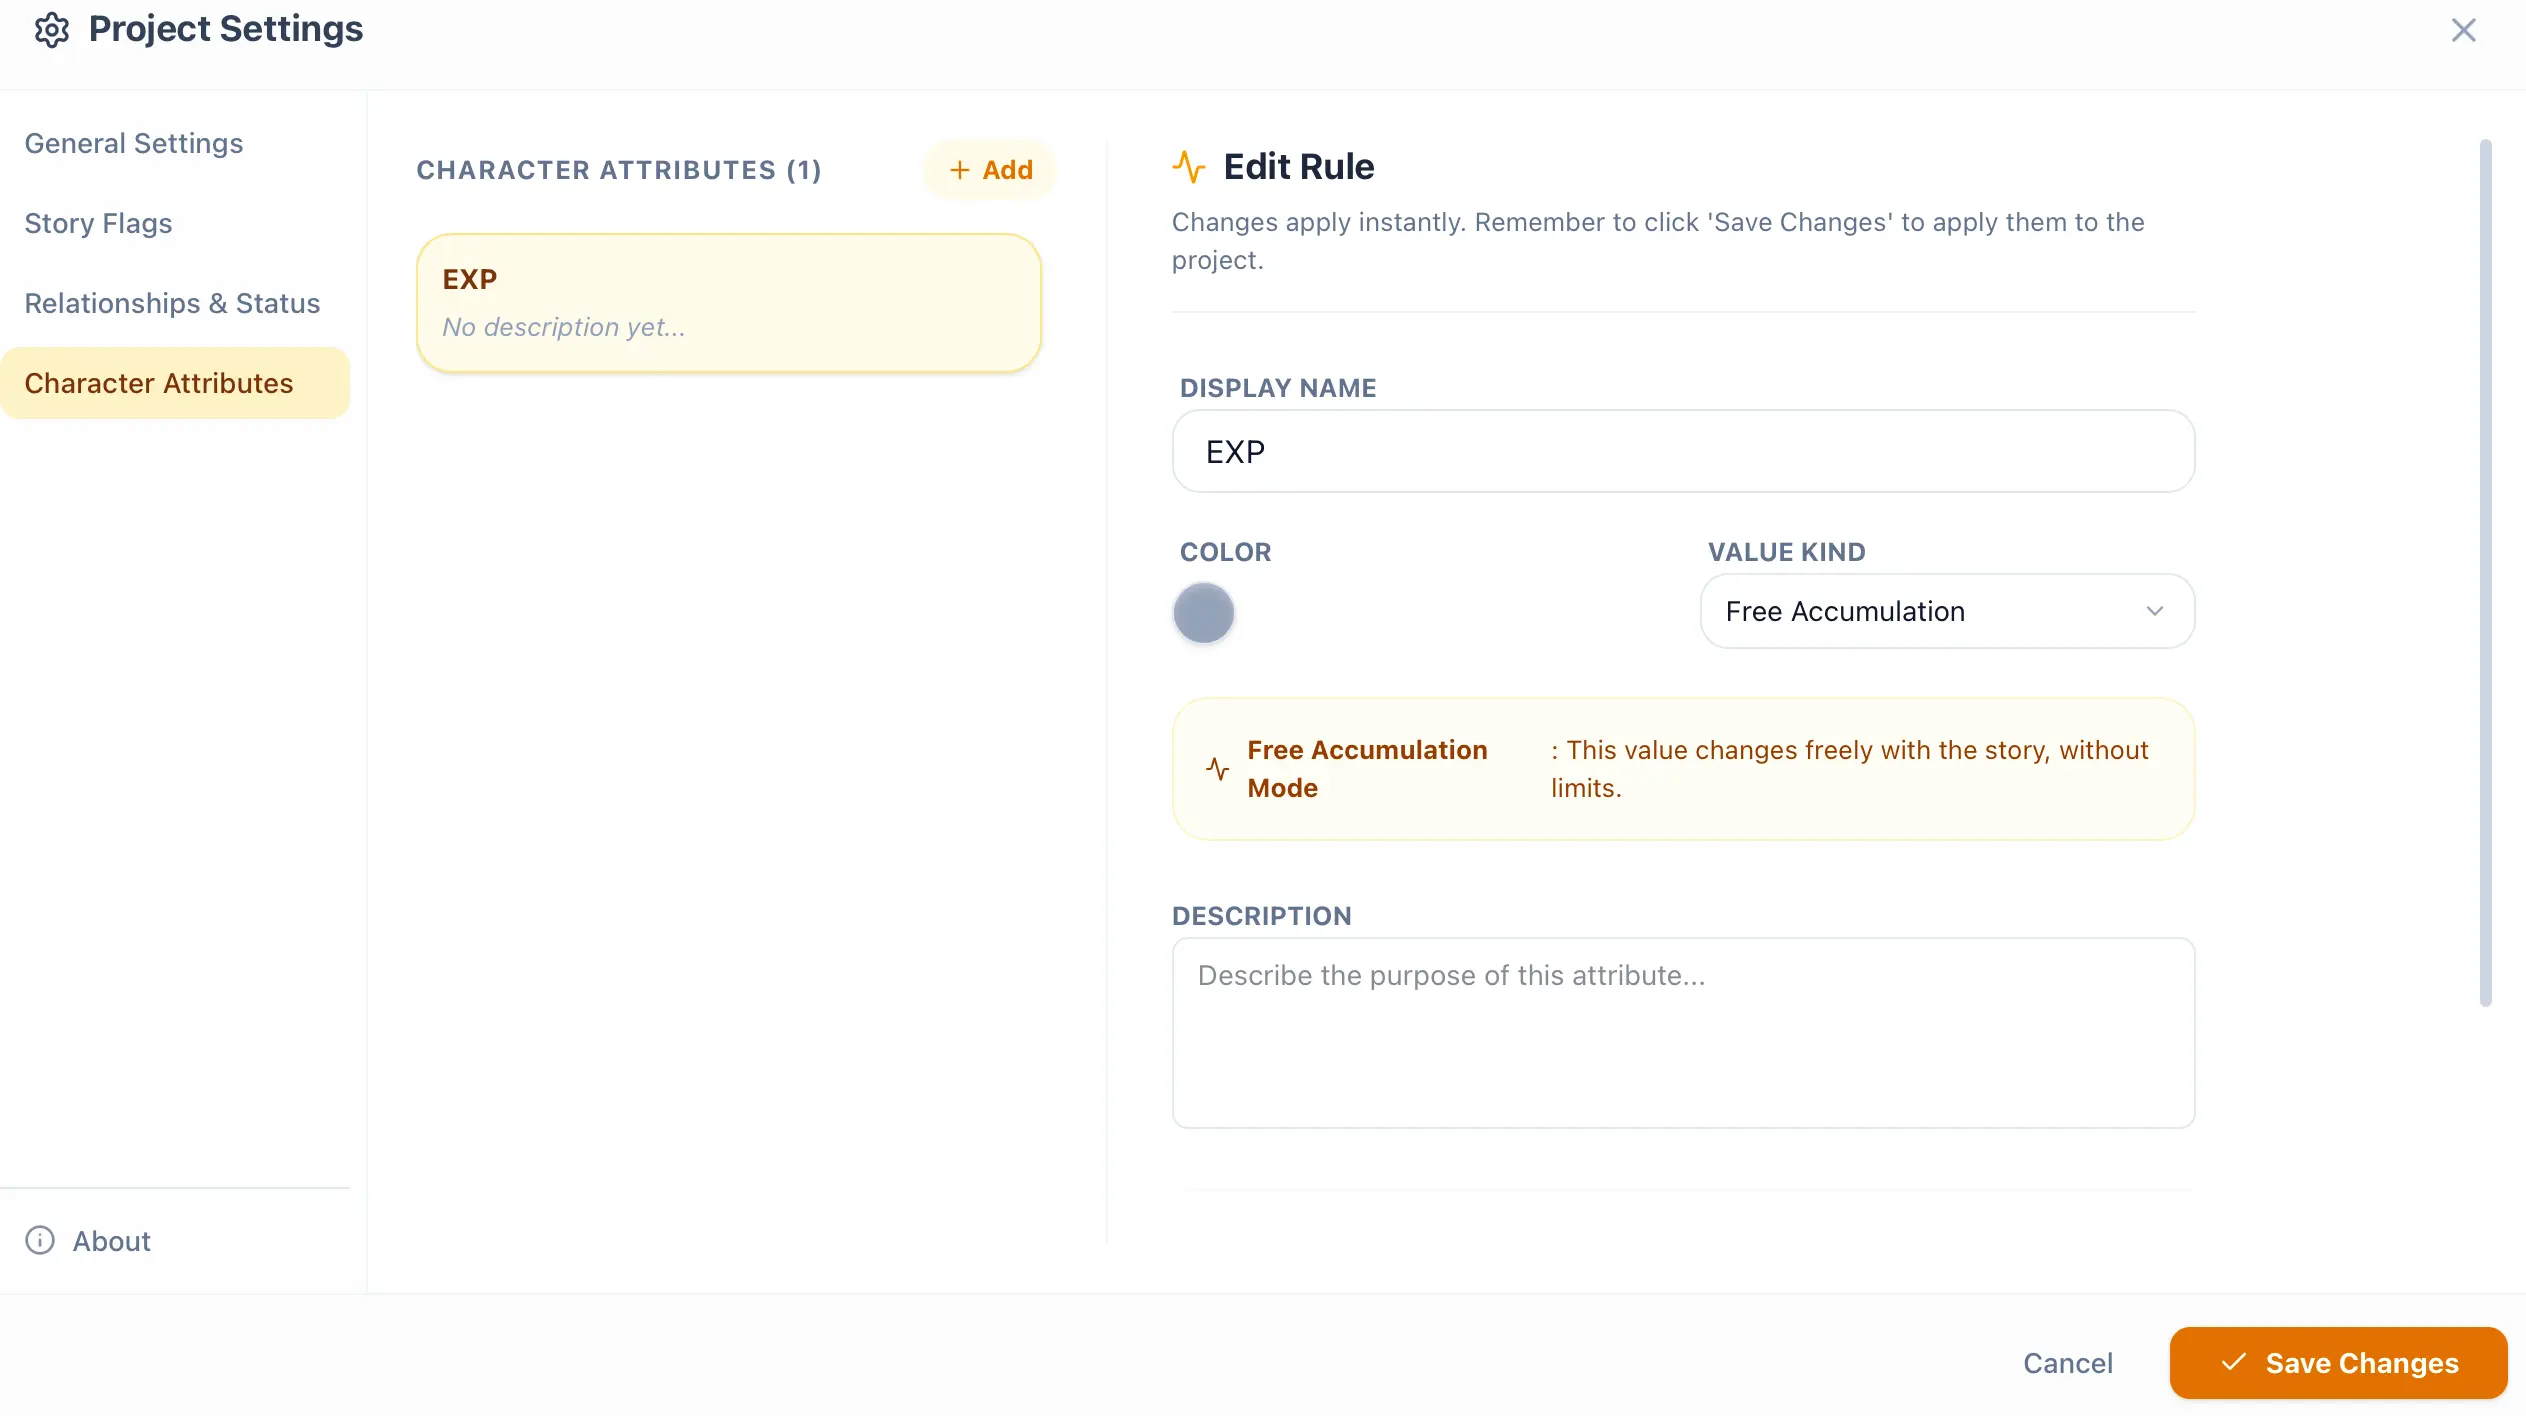
Do you see it? We have added an attribute called “EXP” (Experience) to the character attributes, and selected Free Accumulation as the numeric type. Because experience points will continually accumulate, unless we manually subtract them, they will keep adding up. Of course, you can set attributes according to your writing content. For example, health points might have an upper limit, but as experience points increase and level up, the maximum health limit subsequently increases. All of these can be configured based on your writing. Therefore, Free Accumulation is the most versatile attribute type. Unless you have special requirements and must add a mandatory upper/lower limit to this attribute, we recommend using Free Accumulation.
Next, you can conveniently click a character name in the editor. You will find that the Inspector on the right automatically displays the character’s detailed information, and you will suddenly discover that the EXP attribute you just created has been applied to all characters, as shown in the image below:
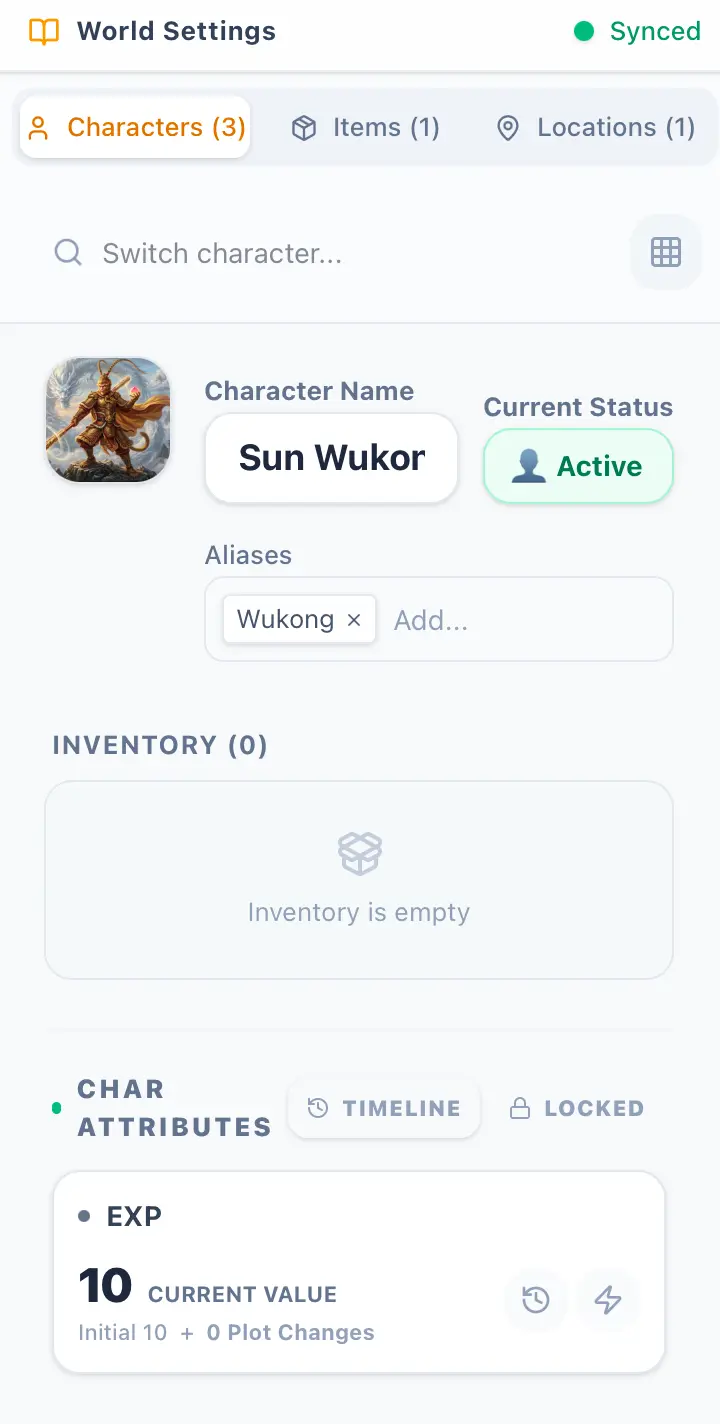
Do you see the experience points? You can click the lightning bolt icon to increase or decrease the value, as shown in the image below:
After confirming, it looks like the image below. Then, do you see a padlock icon (locked) above the experience points in the Inspector? Click it and play around with it yourself. Its purpose is like this: suppose we are playing Zelda. Link is level 1, but Ganon can’t be level 1, right? He might be level 99. That padlock is used to change the Initial Value of each character, so you can set every character’s initial value here. It will only affect the character you currently have selected, and it won’t change the initial values of other characters. Additionally, next to the padlock is a timeline icon, which allows you to visualize the fluctuation trajectory of your experience points throughout the entire manuscript:
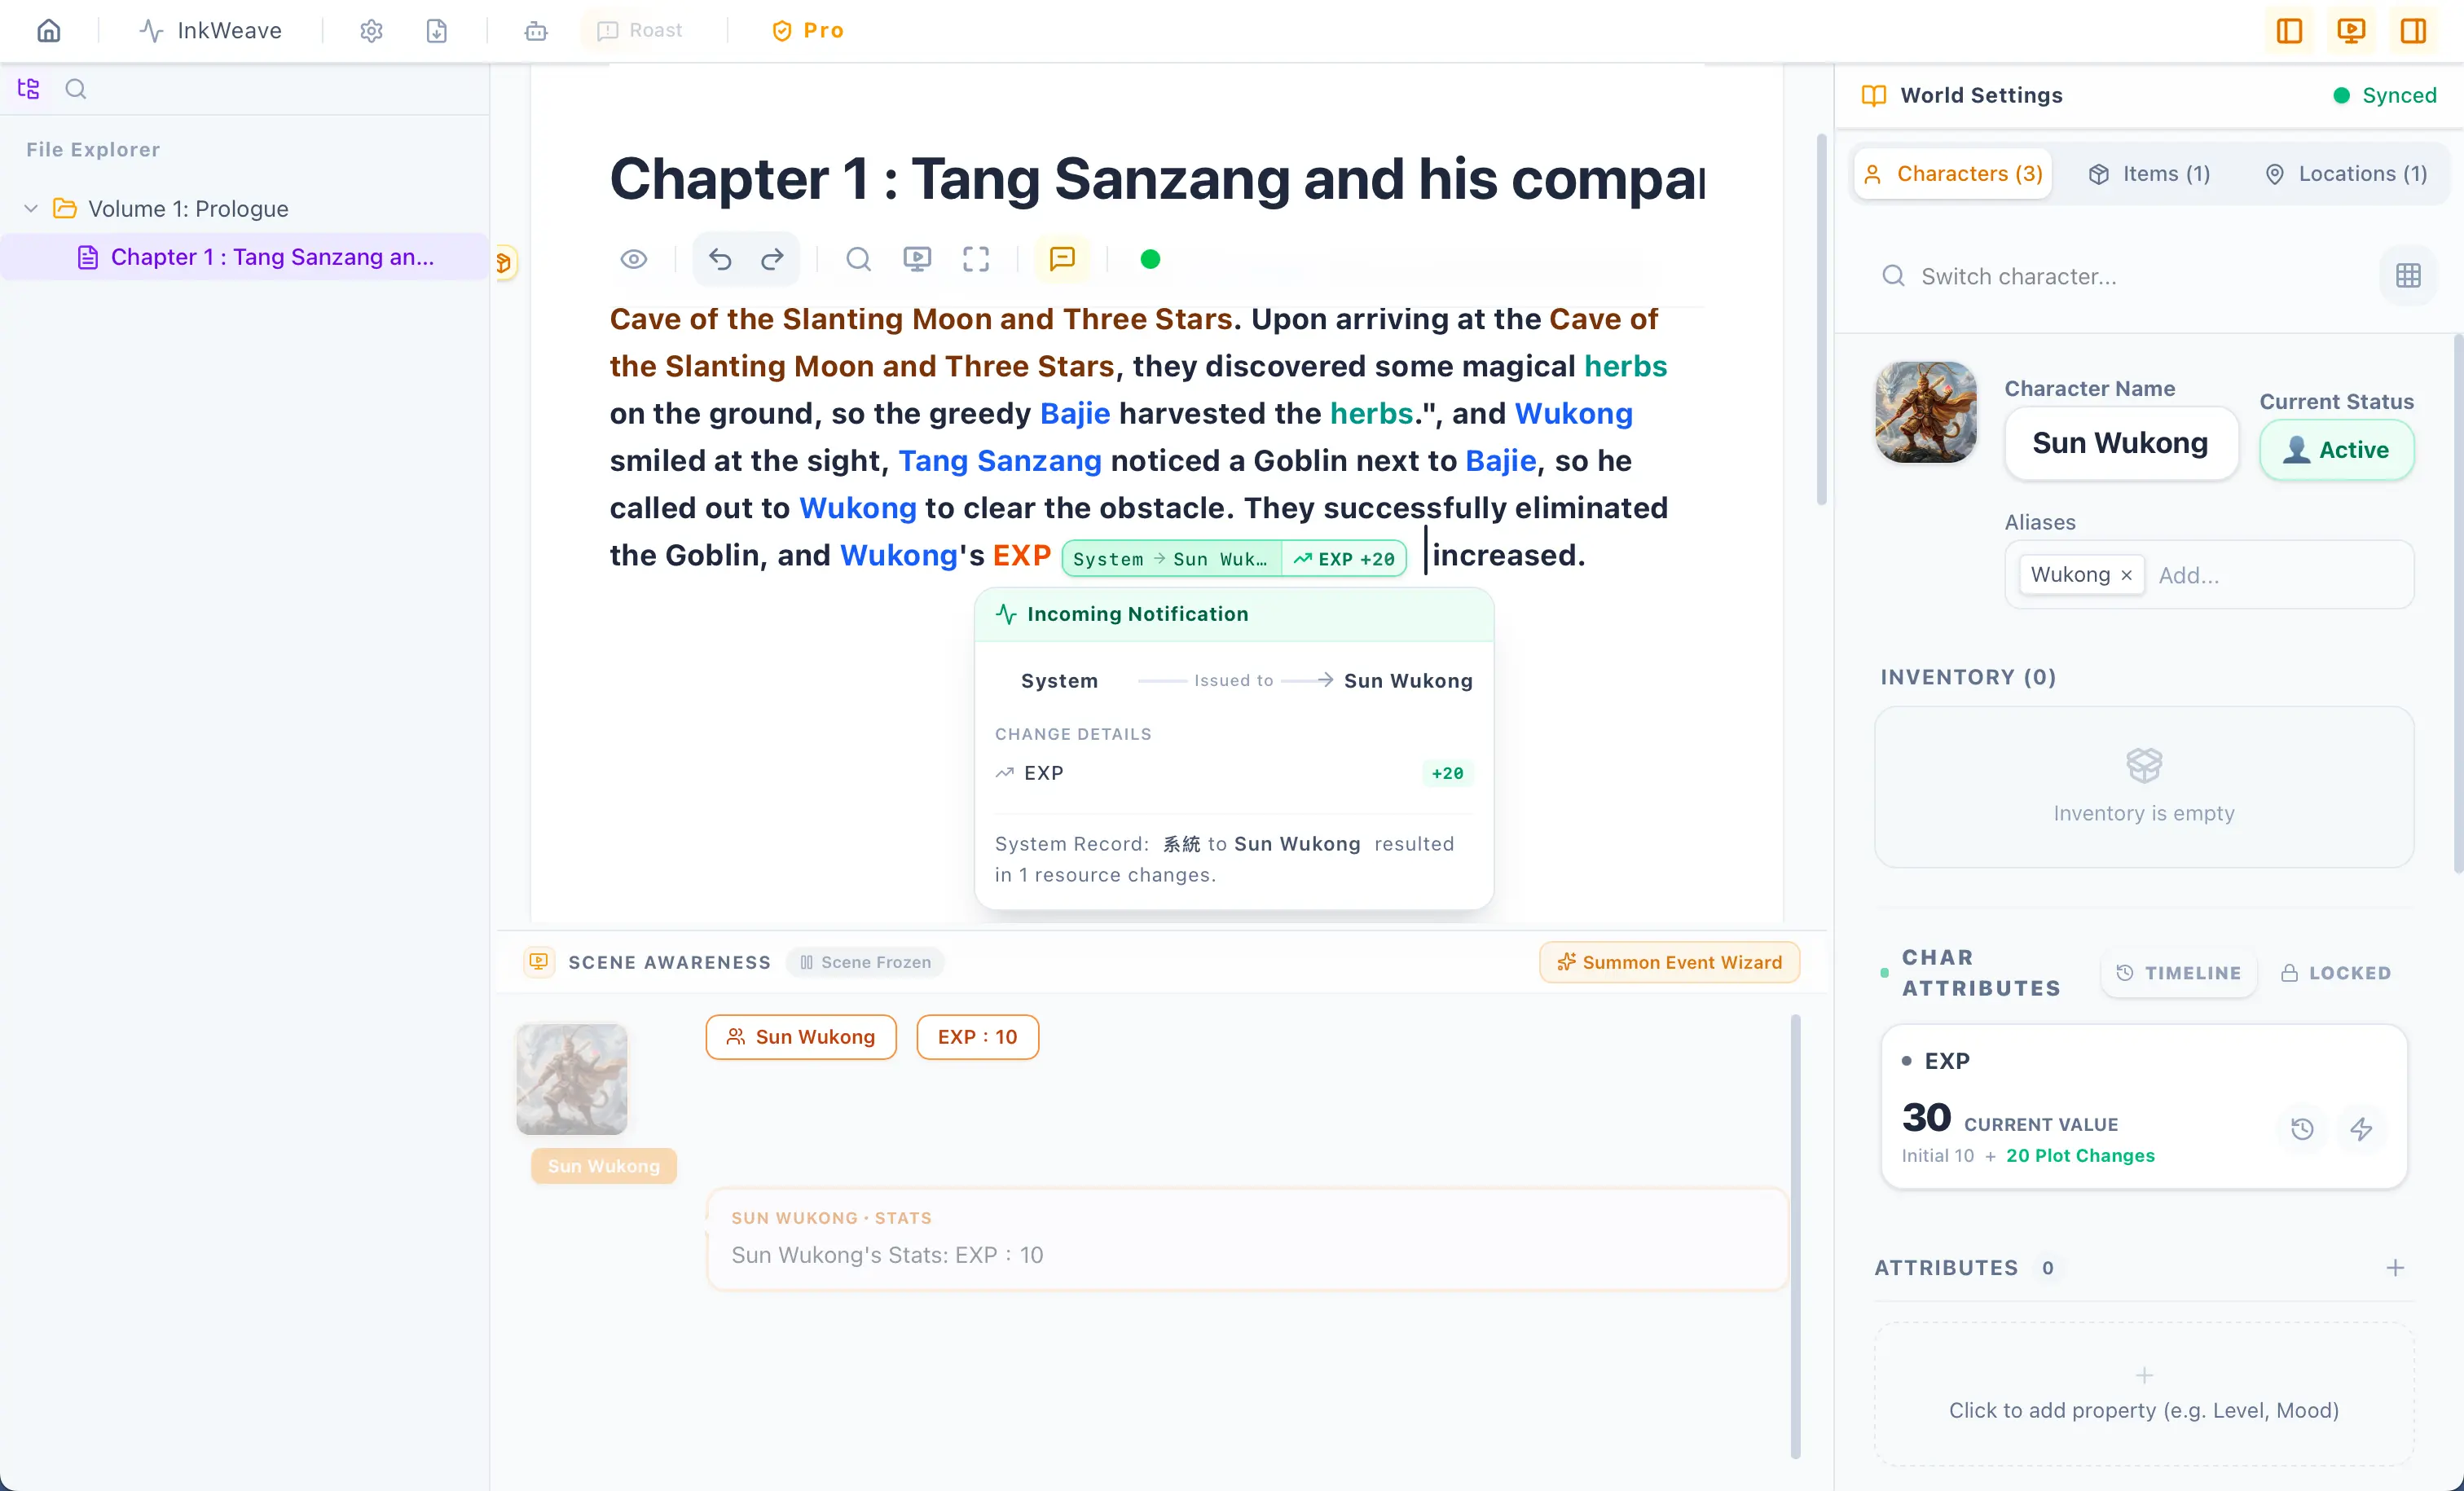
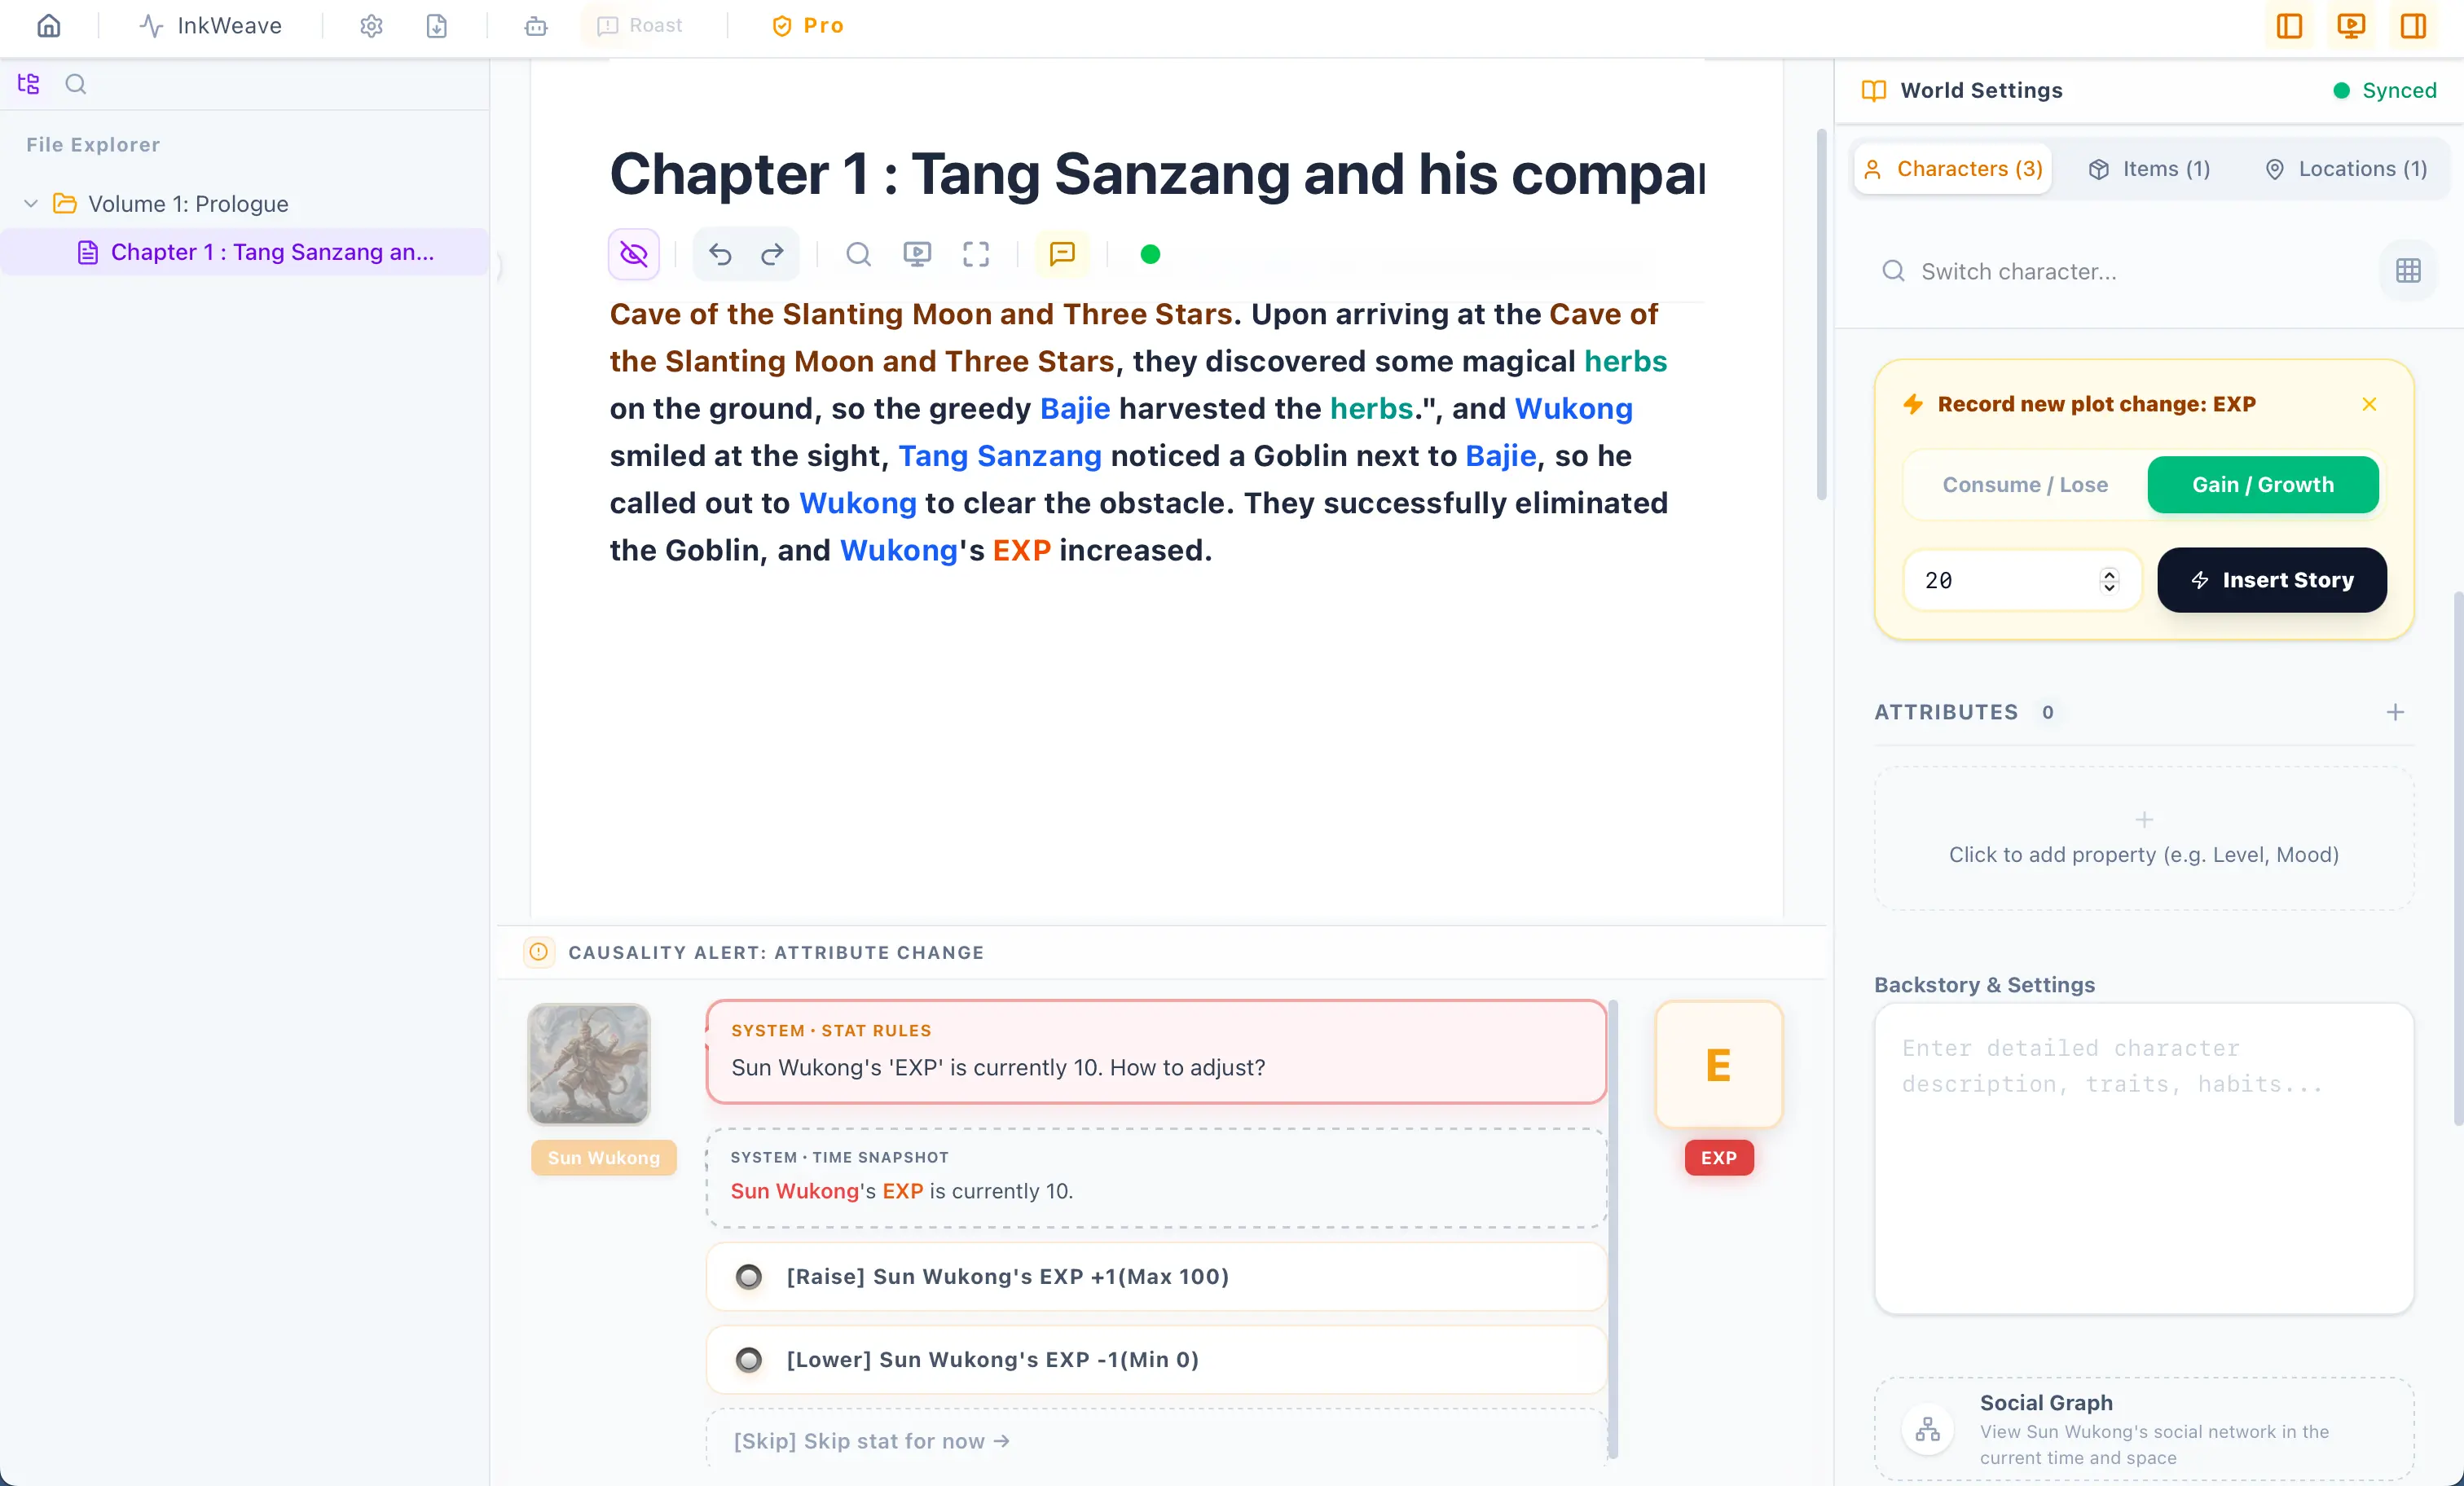
Do you feel InkWeave getting richer? You will see an experience point anchor to the right of the experience points in your editor block, indicating the character gained 20 EXP. This is because we just added 20 EXP in the Inspector. However, I know you have a question. When you enter experience points, you will see a causality alert at the bottom of InkWeave. It tells you the character’s current EXP is 10, do you want to add or subtract? You just press that option button that looks like an AVG game, and it can simply help you +1 or -1. But if you want to customize the value, you must increase or decrease it through the character attributes in the Character Inspector. Their functions are identical, and they will both insert an anchor for you.
Here comes the main event, and it is also the first showcase of the Causality Engine at work. Help me move your cursor to any position before the anchor. You will find that the Causality Engine will calculate and render your cursor’s space-time state in real-time. Before the anchor, your EXP is only 10, but after the anchor, your EXP is 30. This is the Causality Engine.
Additionally, as long as you type any entity in the editor (i.e., the characters, items, locations, generic attributes you created), it will automatically collide and generate dialogues in the preview window below that looks like an AVG game. You can play around with this yourself. Once we place all characters in locations, this AVG collision preview window will turn into an interactive AVG game. I know you are very curious right now, and I won’t keep you waiting.
AVG Collision System and Forced Alignment
Section titled “AVG Collision System and Forced Alignment”Once we place characters in locations, we can start trading items. The Causality Engine will calculate the space-time of your current cursor. Why space-time? Because the core of InkWeave is Time and Space. When characters appear at the same time but in different locations, the Causality Engine will issue a warning. Let’s do this right now. First, let’s turn off the file tree toggle at the top right of InkWeave, as shown in the image below:

Click the left button with your mouse, turning the left button in the image above gray.
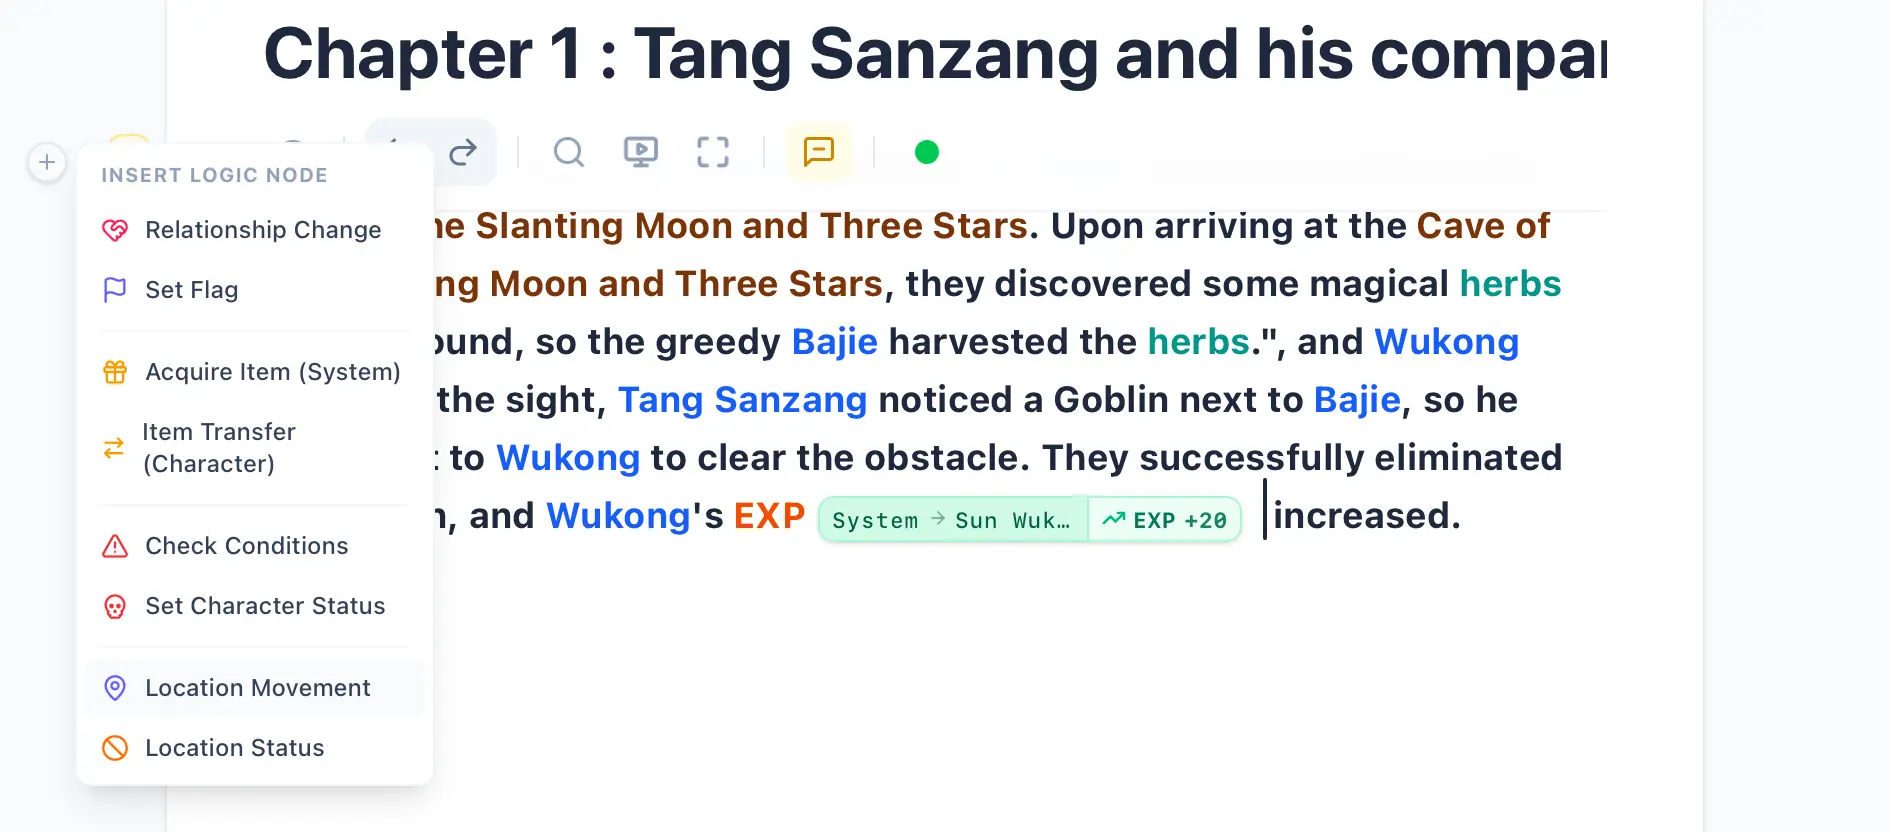
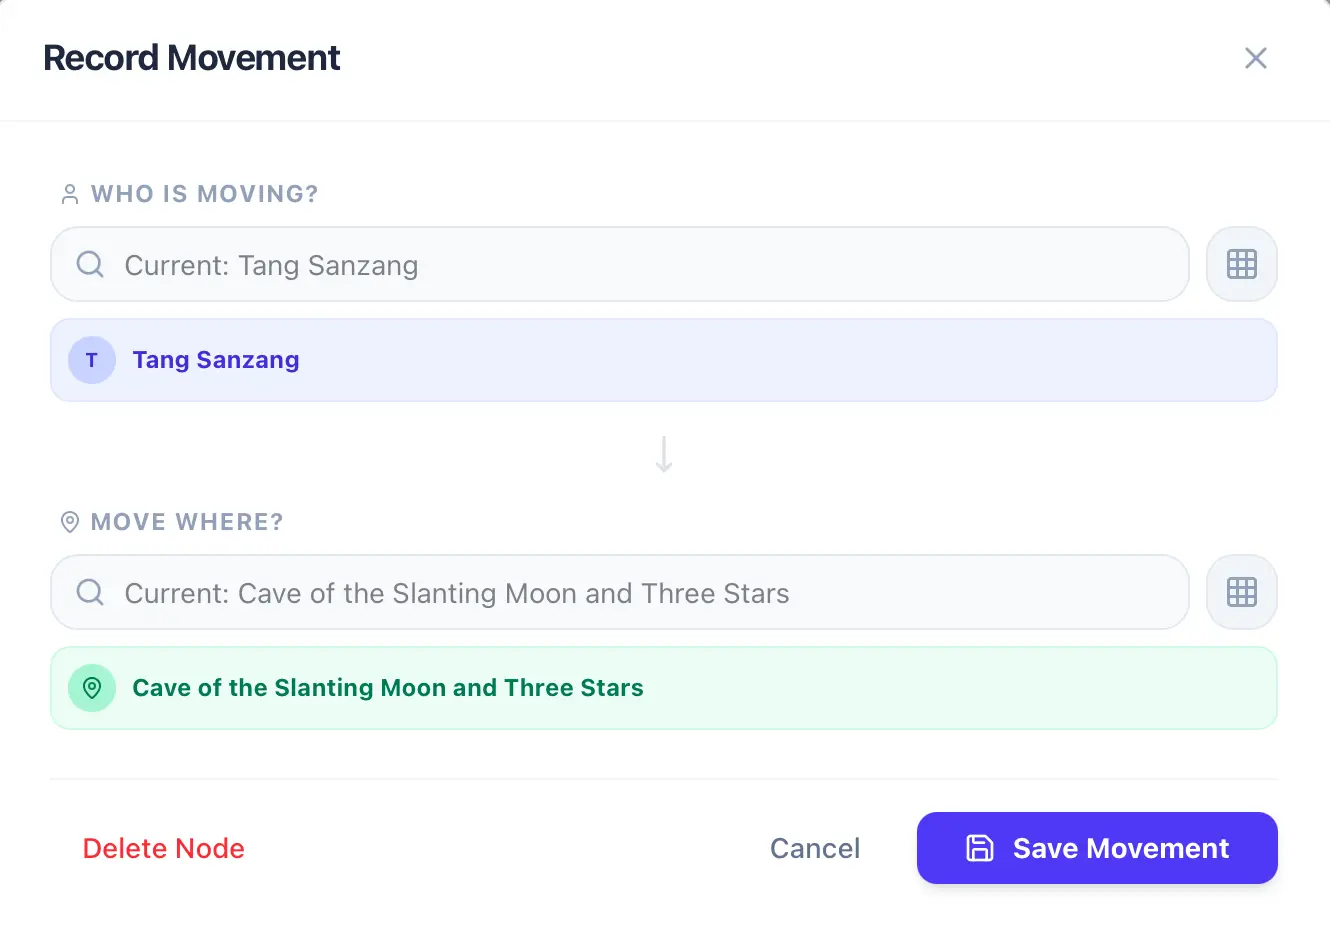
Then you will be able to see a circular + button on the left side of the editor block. If you don’t see it, just click inside the text of the editor so your cursor is active there, and the + button will appear. Then choose Location Movement, a window will pop up, configure it and hit Save. Take this chance to place all characters into a location now, as shown below:
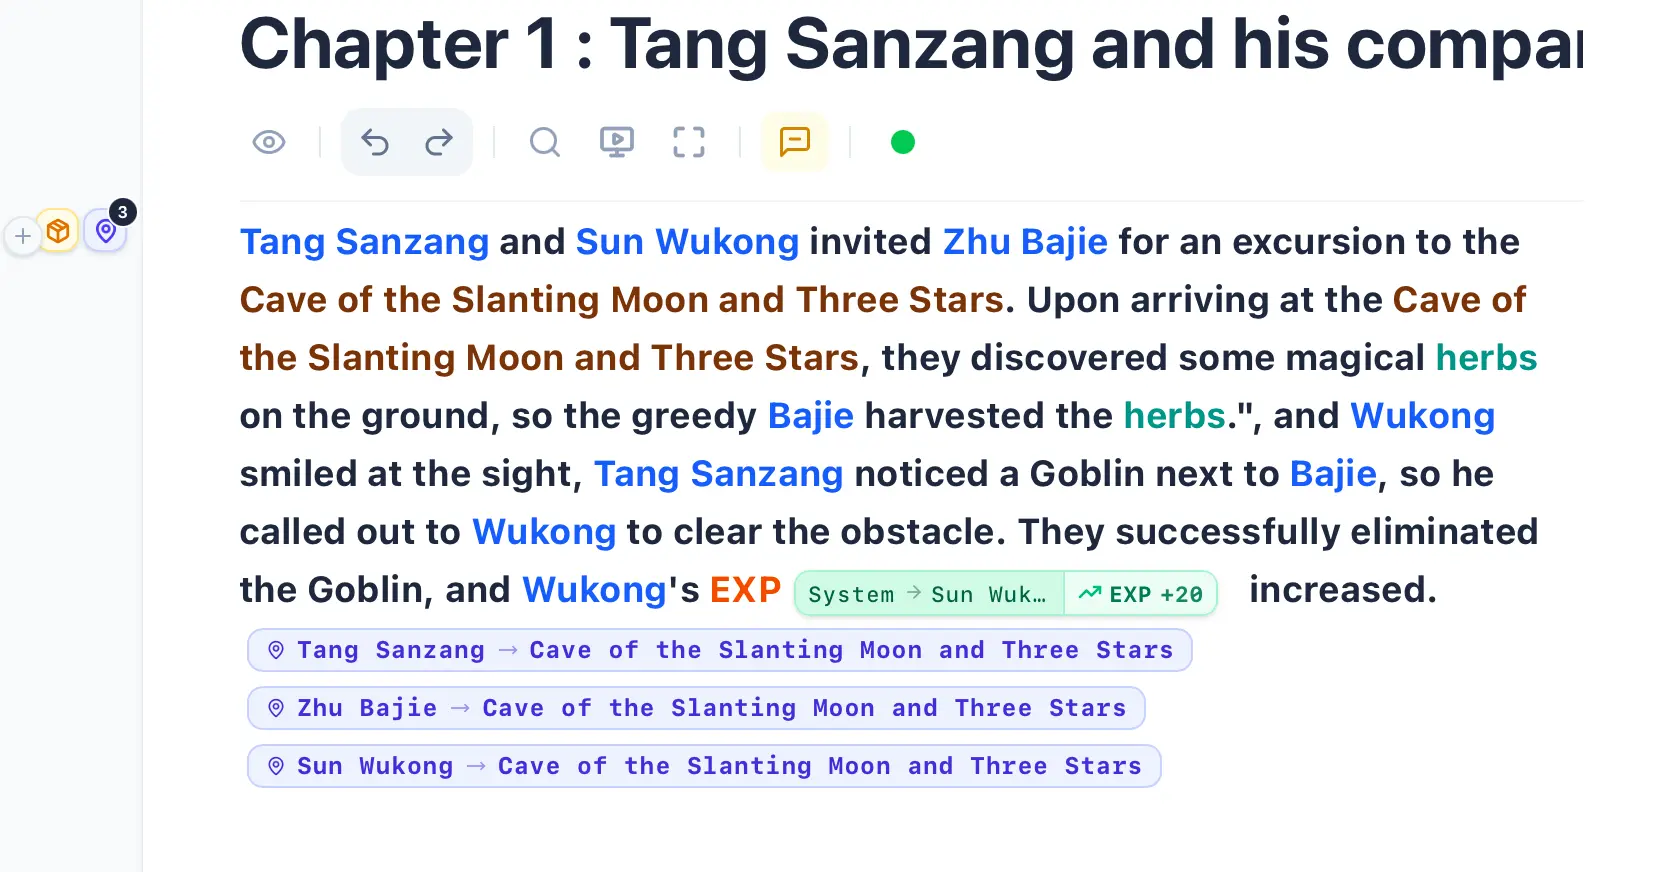
Notice the multiple relocation anchors now spawned behind your cursor? You’ll also find some small icons on the left side of your editor’s + button. Clicking these icons will reveal all the anchors within this paragraph, and you can even drag to reorder them! However, keep in mind that the Causality Engine calculates events chronologically, so dragging and changing their order will directly impact the causality logic. But since the game has just begun, feel free to play around with it, as shown below:

Now, something even more interesting is about to happen. Please move your mouse over to the Inspector and select the Location Tab. At the very top of the Inspector, there are three tabs: Characters, Items, and Locations, right? Help me select the Location tab. Then, using either the search bar or the grid icon next to it, select the location you just moved your characters into. You will find that all the characters present in that location have suddenly appeared! Now, help me move the text cursor in your editor. When your cursor is placed after the relocation anchor, you’ll see the characters inside the location. But if your cursor is placed before the anchor, those characters will disappear from the location. Everything is rendered in real-time—this is the Causality Engine at work!
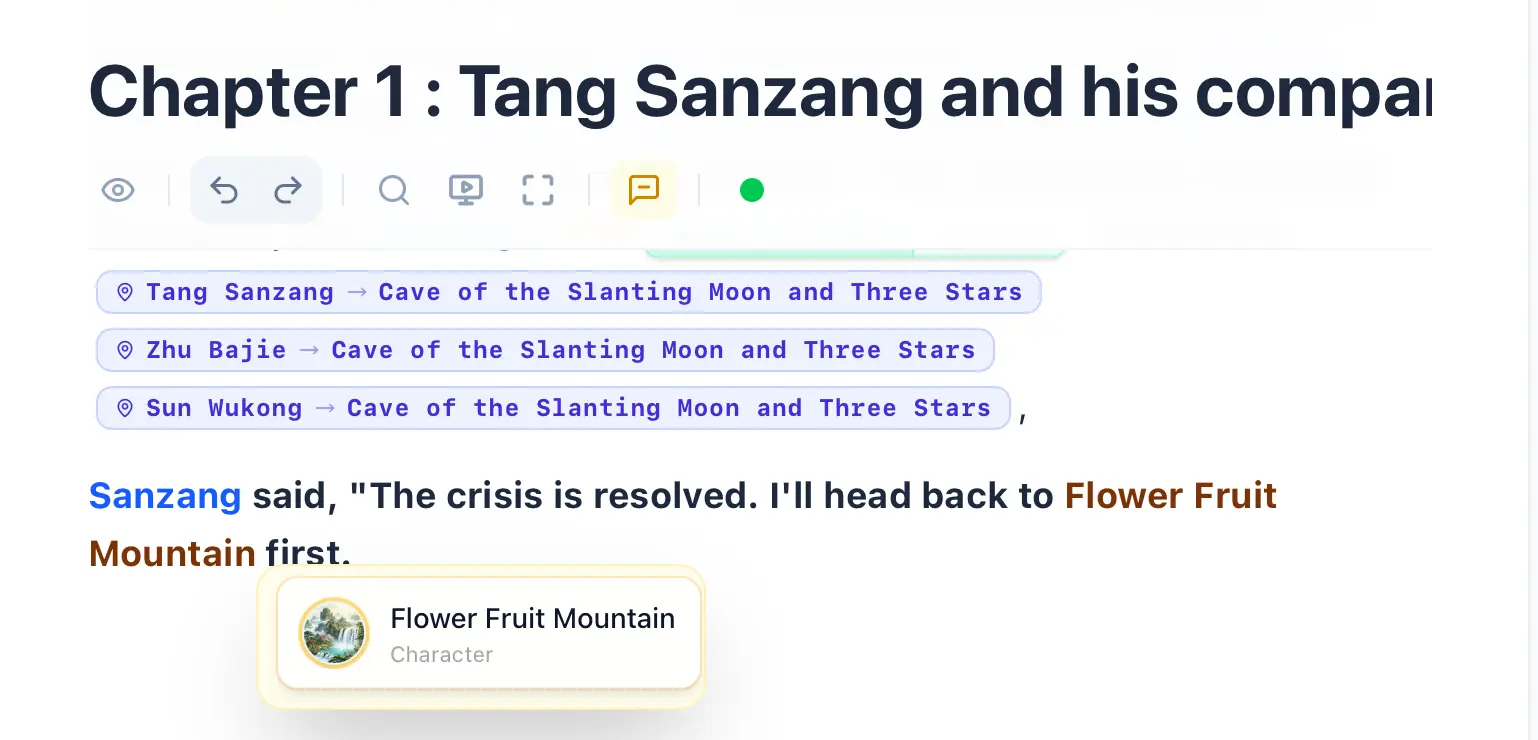
Next, let’s create another location, shall we? Remember how we did it earlier? We type a location name in the editor, highlight it with our mouse, and hit Create Location. Now, take a close look at the bottom right corner of the image below. Do you see a little yellow ‘Summon Event Sprite’? Click on it! You’ll notice that the AVG Collision System immediately senses there’s a character’s name placed right before this location. It will ask if you want to move the character into this location. Click Move to Location, and let’s skip the remaining options for now, as we will cover those in the next section.

You’ll notice that another relocation event anchor has just been generated. Now, verify this for yourself: if you place your cursor before this anchor, the characters are completely absent from the location in the Inspector, aren’t they? The characters will strictly appear in that location only when your cursor is positioned after the anchor. This perfectly demonstrates the core purpose of the Causality Engine. It is an engine designed to compute absolute time and space, continuously monitoring the logic of your current space-time environment in real time to detect if any timeline paradoxes have occurred. Now, let’s jump straight into creating an example of a time-space paradox!
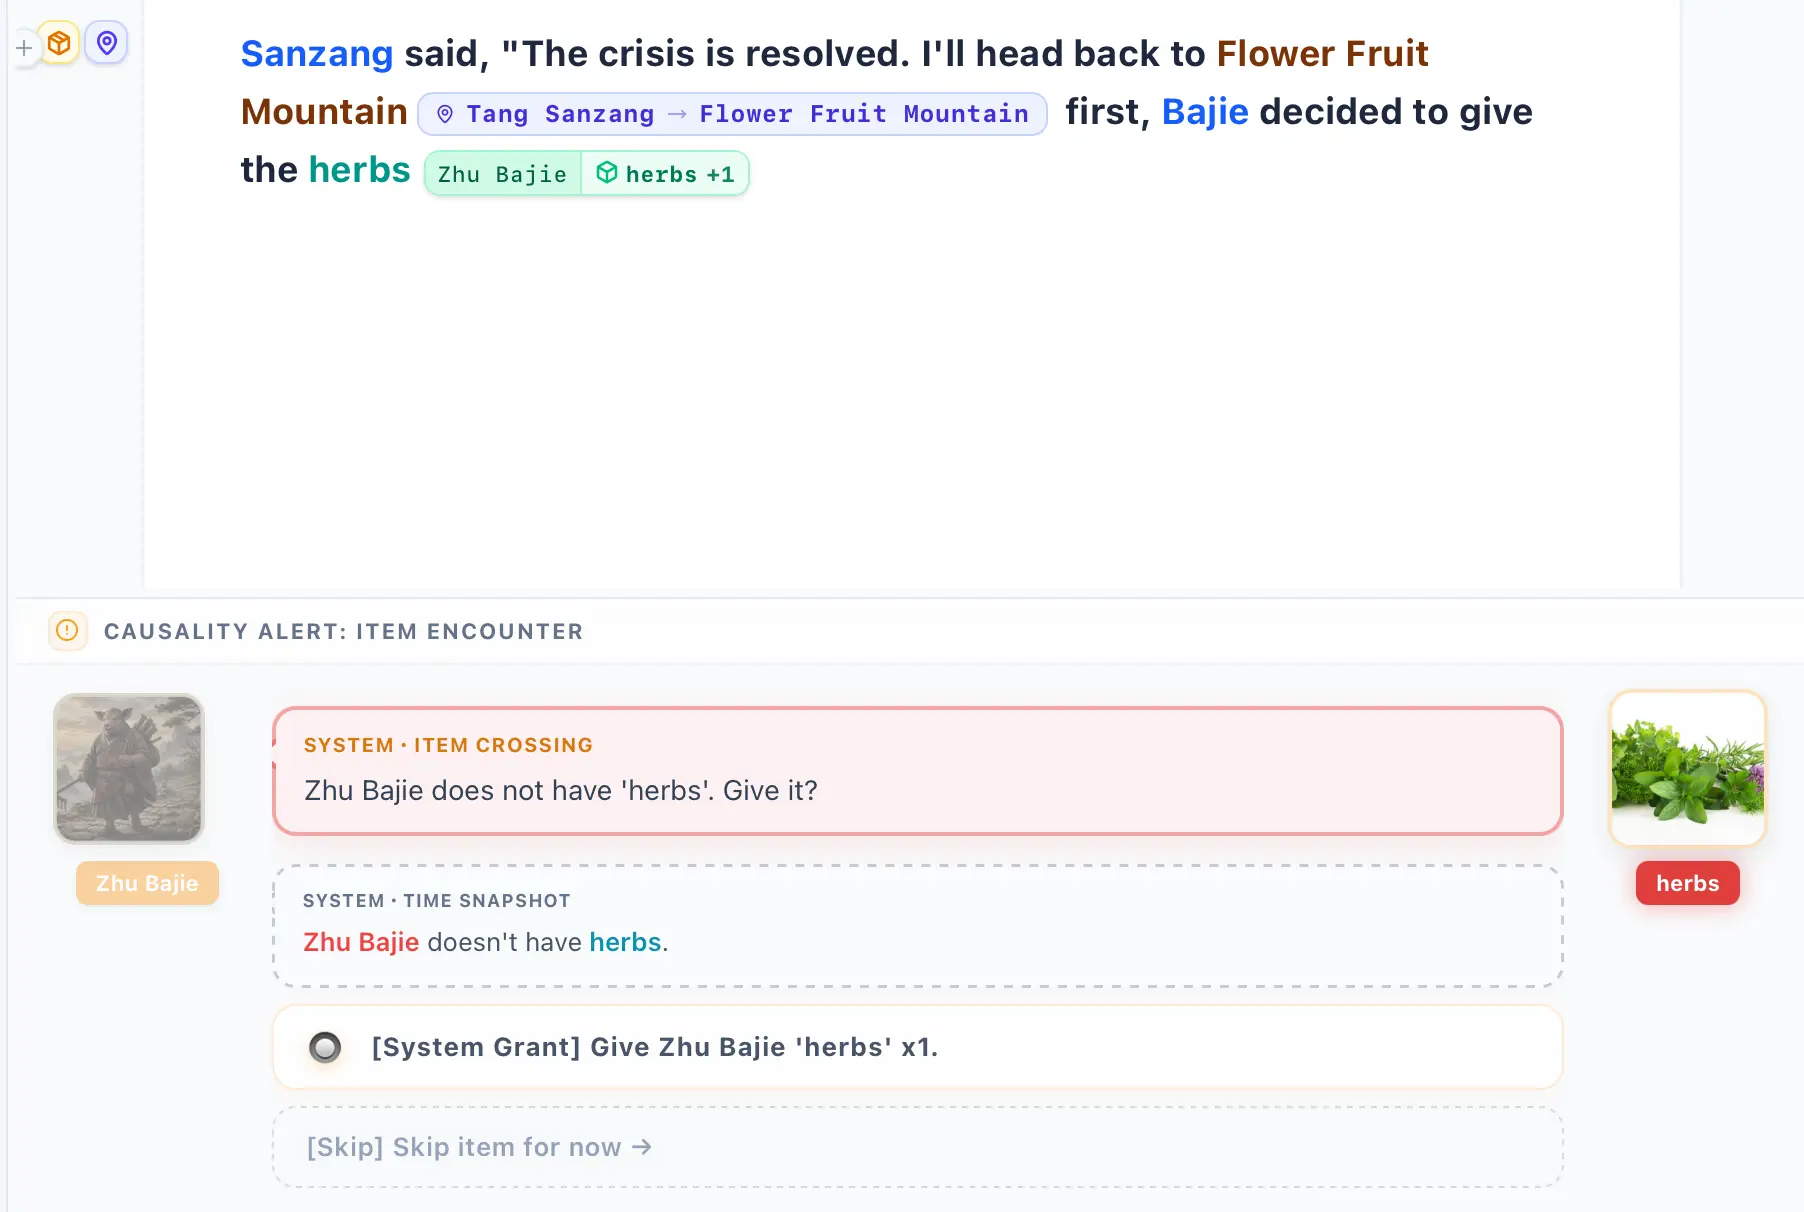
If you haven’t yet, create an item first. Highlight the item name with your mouse, and click Create Item. Now please open the Item Tab in the Inspector, choose Switch Item, and select the item you just created. Then at the bottom you will see the search bar for distributing items. First, choose a character who is NOT in the location you last created, then select the item, and then hit distribute item, as shown in the image below:
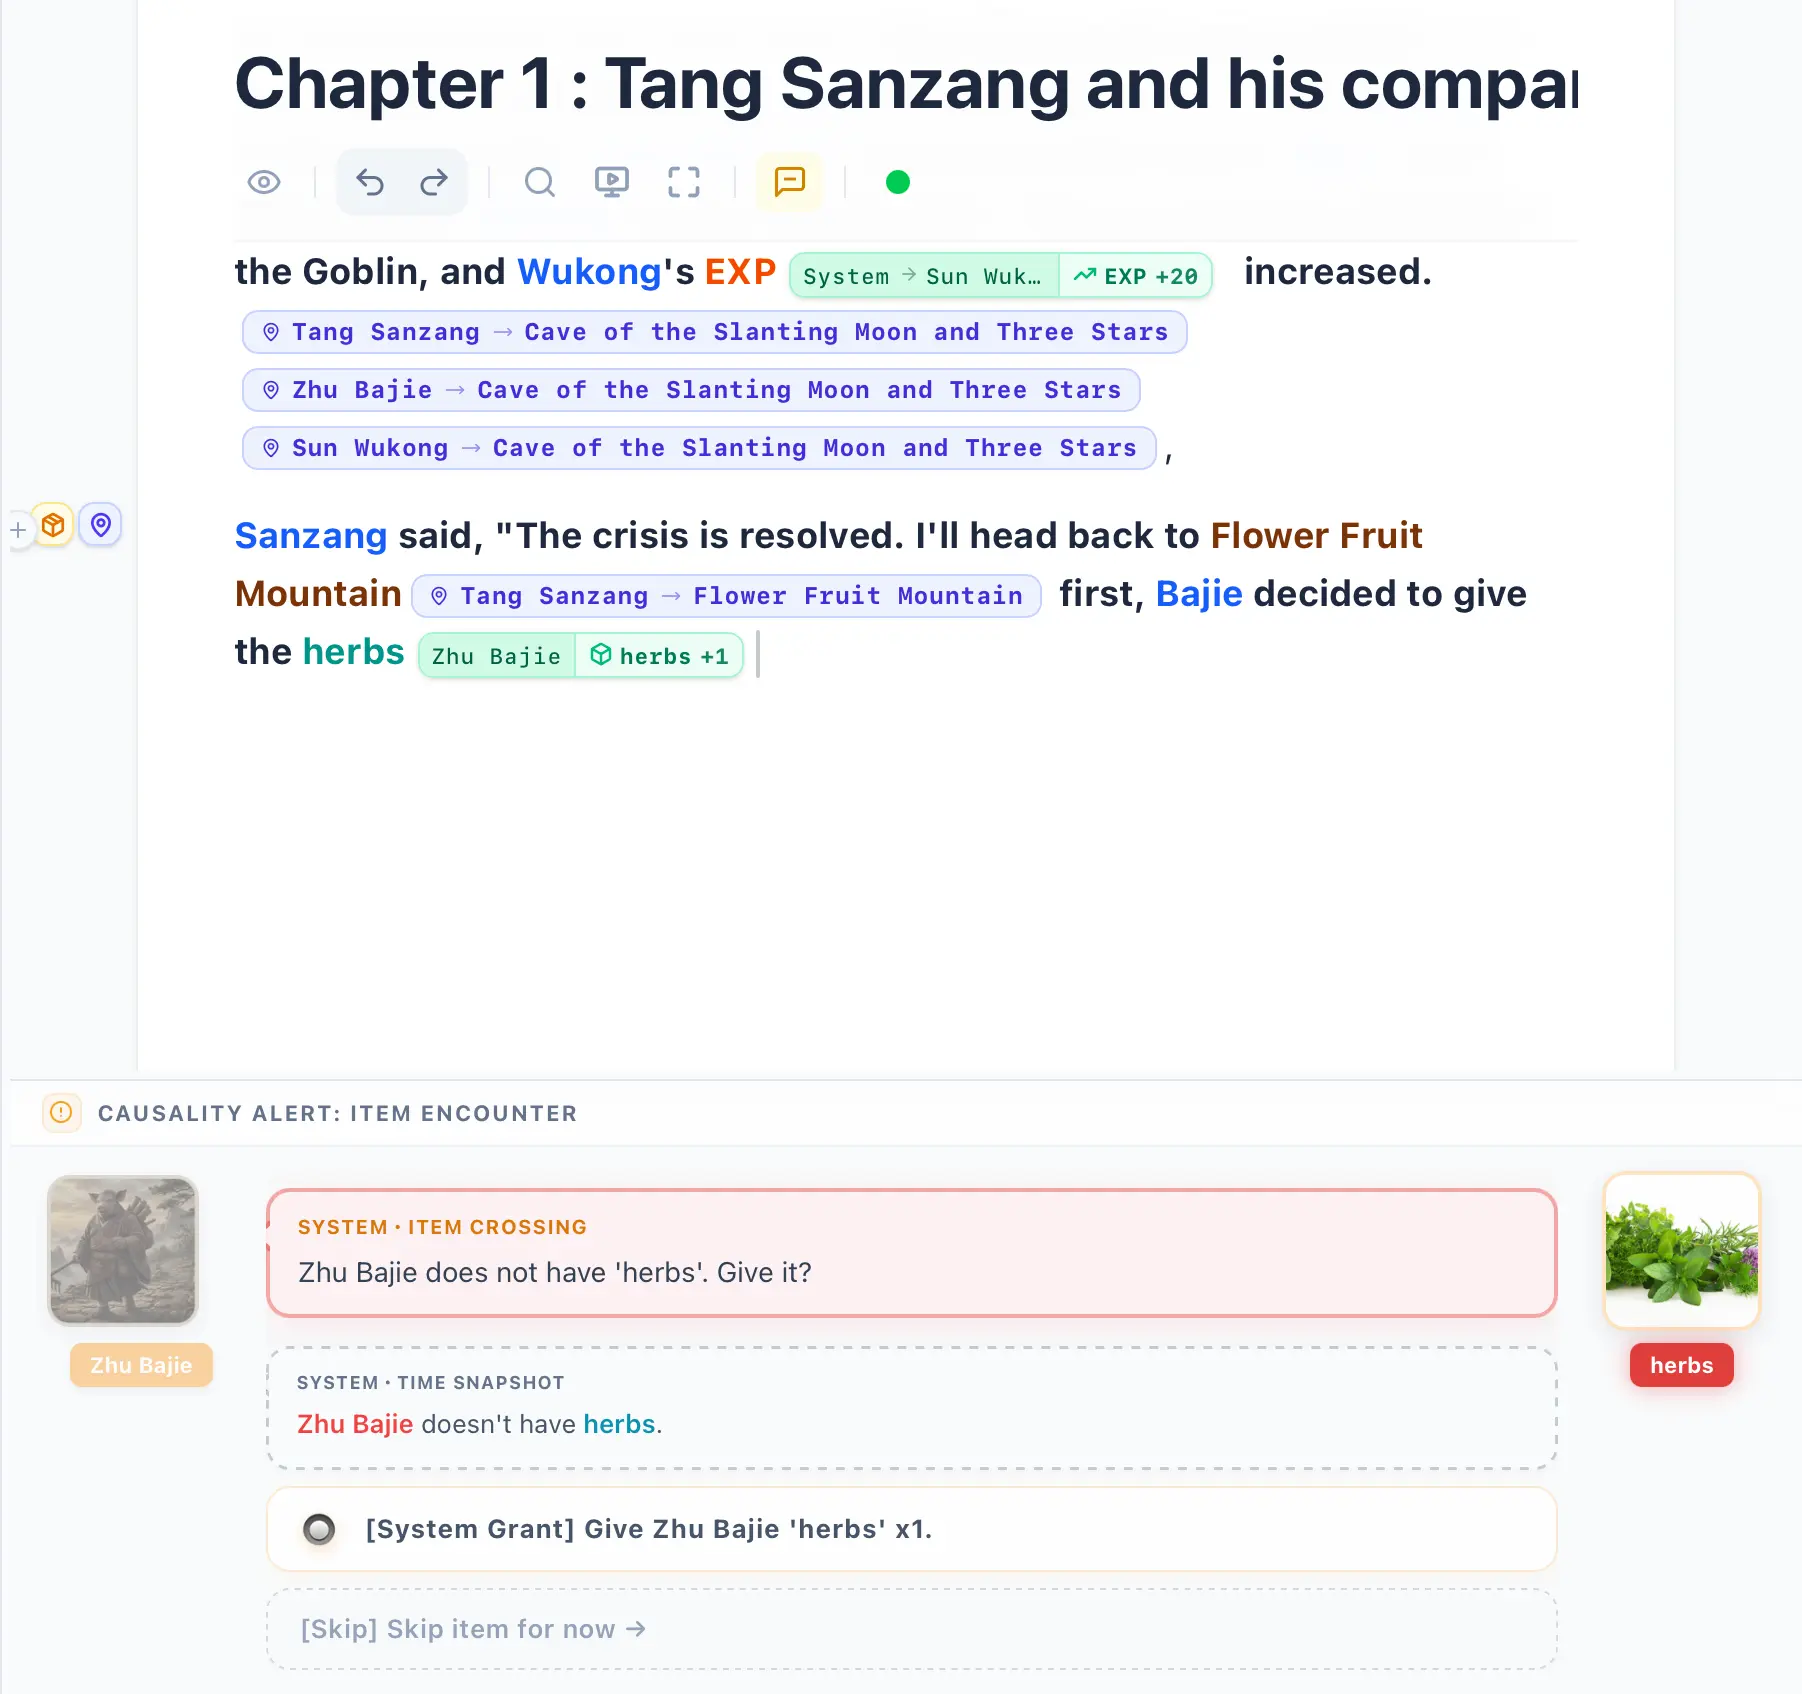
You will see that the AVG area has detected a collision: a character is positioned right before the item. Thus, the AVG collision triggers an event asking: do you want to give the item to the character? Click to let the system give it to the character. Because the Causality Engine already knows the character doesn’t possess the item, the AVG Collision System will preemptively ask the Causality Engine before triggering: “Does the character currently have this item?” If not, it displays the option to let the system grant it. After clicking to let the system give it to the character, there will be more options, but we will skip them all for now, as they are covered in a later tutorial.
You will see the item anchor has appeared, right? Now, use your mouse to click on the character, and the character’s Inspector will open. However, because the character you clicked is positioned before the anchor, you will see that the character doesn’t have the item the system just traded to them. But if you place your cursor after the anchor and look at the Character Inspector again, the item magically appears! Then, the truly magical part that might make you think it’s a bug arrives, as shown below:
Let’s assume your cursor is currently positioned after the anchor. The character now possesses the item, right? But now, I want you to click the Summon Event Sprite in the AVG window. You might find yourself a bit puzzled. Didn’t I just say that if your cursor’s space-time position is after the anchor, the character has the item? So why does the AVG event still indicate that the character doesn’t have the item when you click the Summon Event Sprite? Let’s break down exactly how the AVG Collision System operates: The AVG system treats the most recently mentioned node in the text as the protagonist (POV), and the entity placed immediately before it as the target. Therefore, the fact that you currently see the character lacking the item is actually exactly where the true power of the Causality Engine shines. Can anyone guess why?
So you don’t necessarily have to process every single AVG event. You can simply continue writing your article, and the AVG panel will automatically become semi-transparent until an event useful to you appears—then you can pause and mark the event anchor. The AVG event system will continuously lock onto any entity interactions in your editor, whether it’s Character->Item, Item->Character, Character->Location, or Location->Character. We also have generic attribute entities; all of these will constantly trigger fascinating event interactions. InkWeave is waiting for you to discover this four-dimensional matrix collision system of characters, items, locations, and attributes.
Why Does the Causality Engine Need the AVG Collision System?
Section titled “Why Does the Causality Engine Need the AVG Collision System?”We’ve all probably felt regret over stories that started off brilliantly but eventually unraveled with a terrible ending. This is because authors often overlook details during the writing process, leading to plot holes they can’t logically close. The AVG Collision System was born to prevent exactly this. While we can’t guarantee your work will be a best-seller just because the logic is sound, we can at least help ensure you achieve a flawless logical closure. How do we achieve this?
Continuous Alignment
Section titled “Continuous Alignment”Whenever characters and locations appear together, the AVG Collision System triggers an event asking if you want to move the character to that location. Later in your text, Character A and Character B might appear adjacent to each other. The AVG system will prompt another event asking if Character A should move next to Character B. Through this continuous back-and-forth, your characters will constantly shift between locations, forming a continuous alignment. And a “location” could be anything—a desk drawer, a black hole, or even inside an atomic nucleus.
Therefore, InkWeave isn’t designed exclusively for fiction writers; it’s designed to break the wall between virtuality and reality. Imagine you are a police officer, a forensic examiner, a detective, or any similar profession—you can utilize InkWeave’s Causality Engine to write out real-world cases. Suppose a suspect has been brought to the police station. You can create a character and transcribe their confession into InkWeave. Within the confession, you can treat pieces of evidence as item entities, and then cross-reference the space-time of their testimony: Was the evidence present? Did the testimony appear first, or did the evidence appear first? We can even recreate the crime scene and the suspect’s footprints using location entities. Through this continuous back-and-forth, you can clearly determine whether the entire logic of the case is closed and whether there are any logical loopholes. This is the true power of the Causality Engine.
Back to the main topic—we’ve strayed a bit far. Let’s return to how we generate a space-time paradox and trigger a warning from the Causality Engine. Right now, your screen should look like mine, with your cursor resting after the item anchor, as shown below:
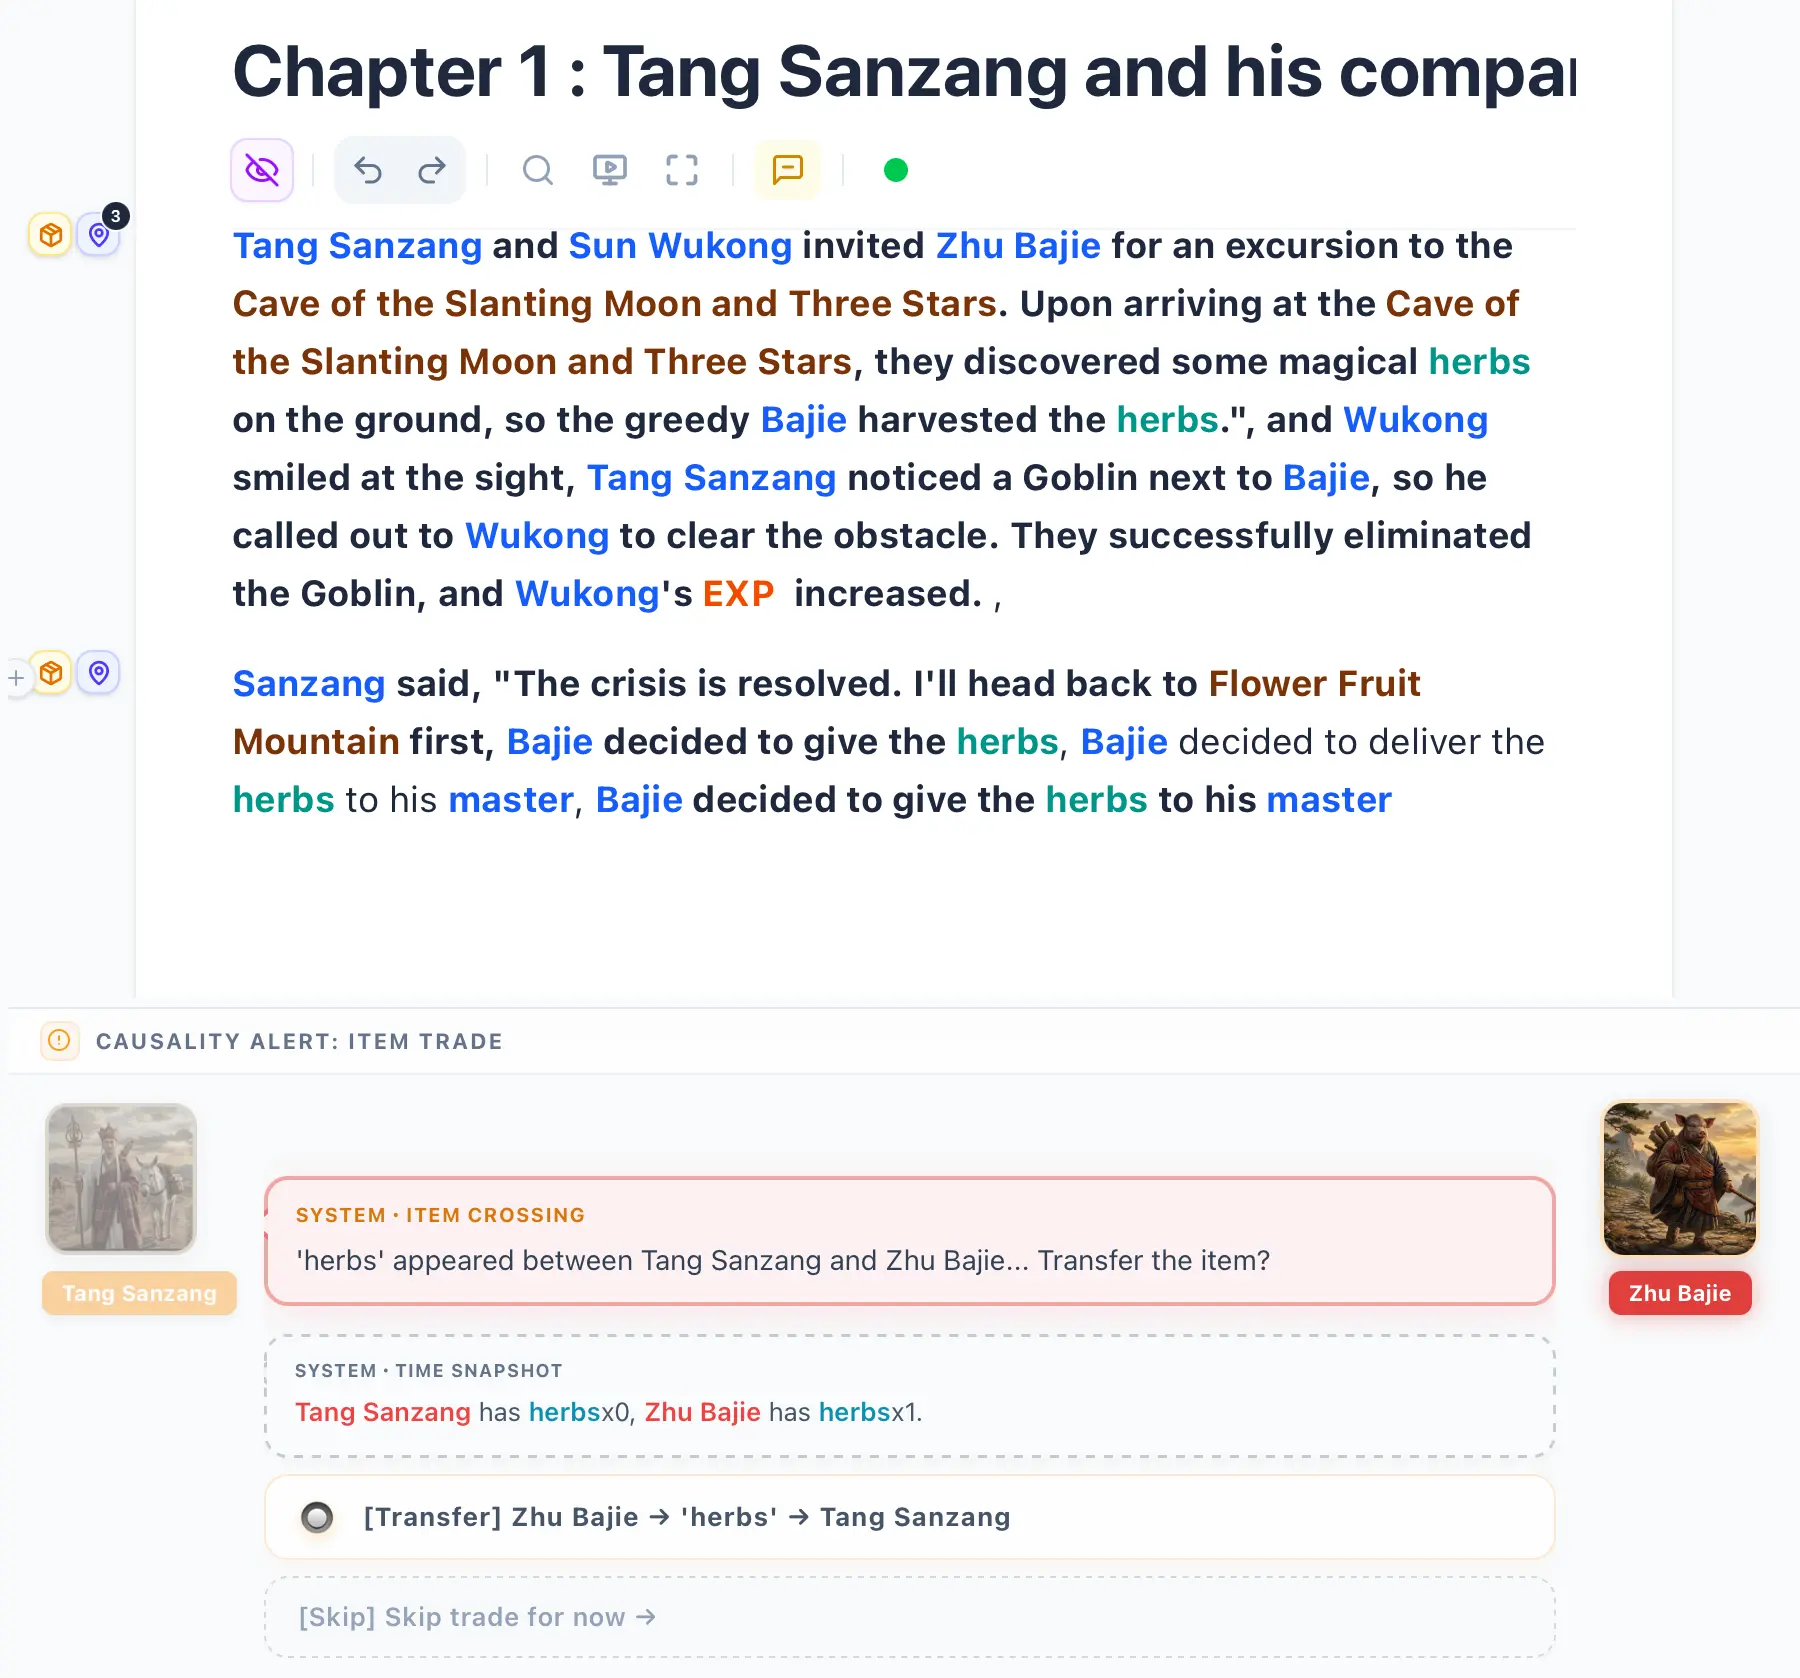
If your screen looks like mine, you’ve probably also experienced sudden AVG events popping up while typing, right? But those weren’t what we were aiming for. That is, until the AVG event currently on screen: in front of the character POV, there is an item entity; in front of that item entity, there is another character; and the space-time of that preceding character finally possesses the current item. Therefore, at this exact moment, the AVG system asks: An item has appeared between two characters—do you want to trade it?
- Click to Trade.
- We will skip the other options for now.
Then, you will be surprised to find that the character’s trade anchor has actually turned red! Hover your mouse over it—no need to click—and a floating window will appear, as shown in the image below:
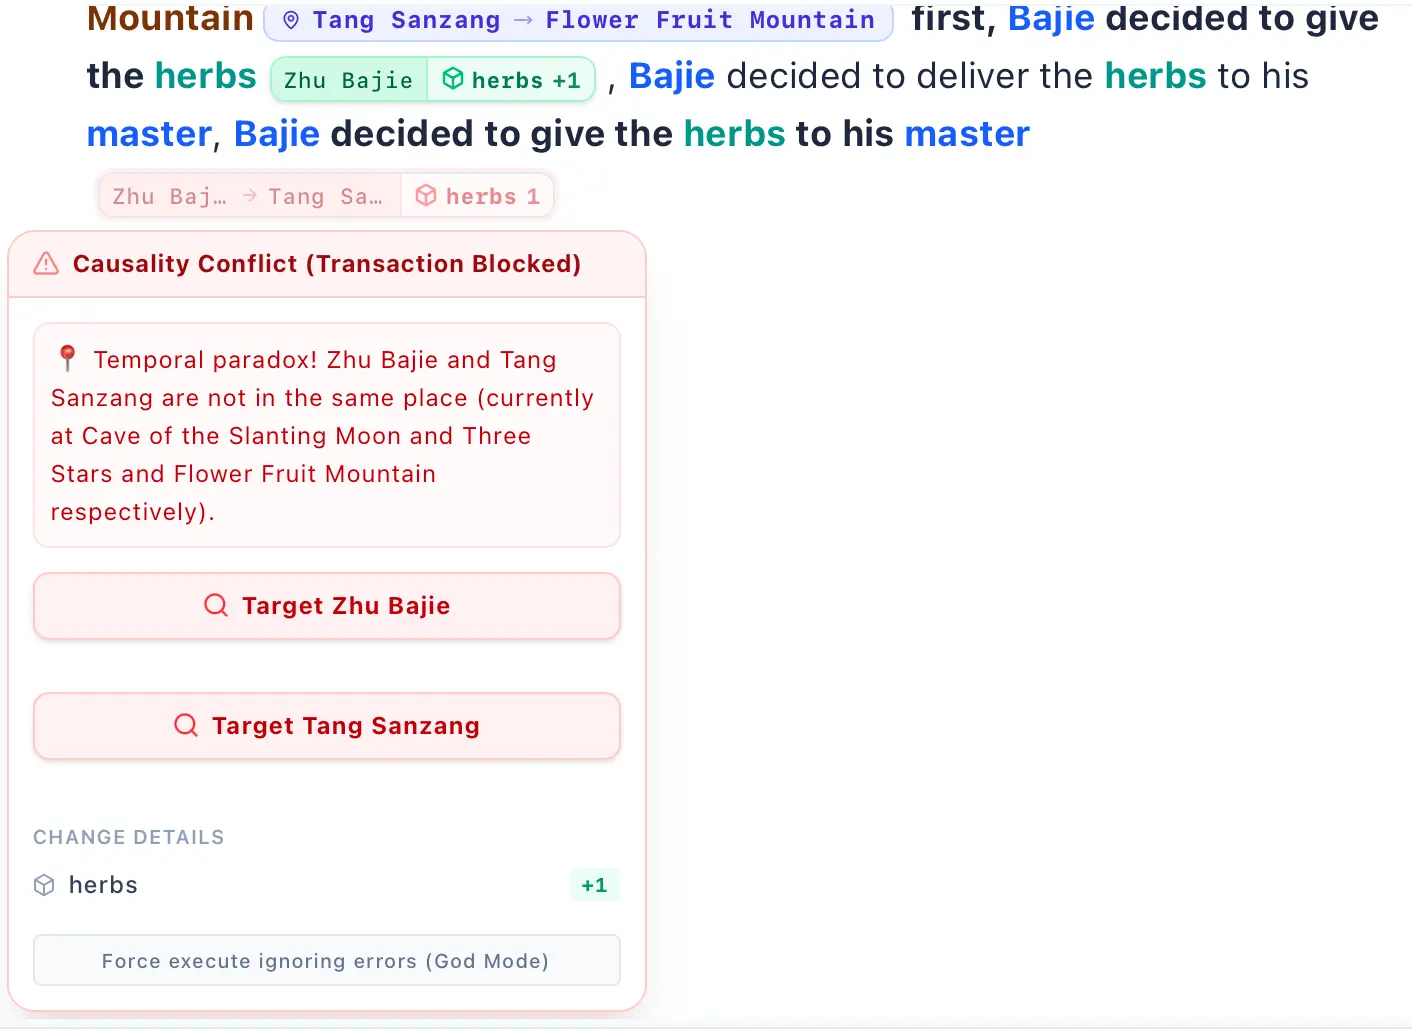
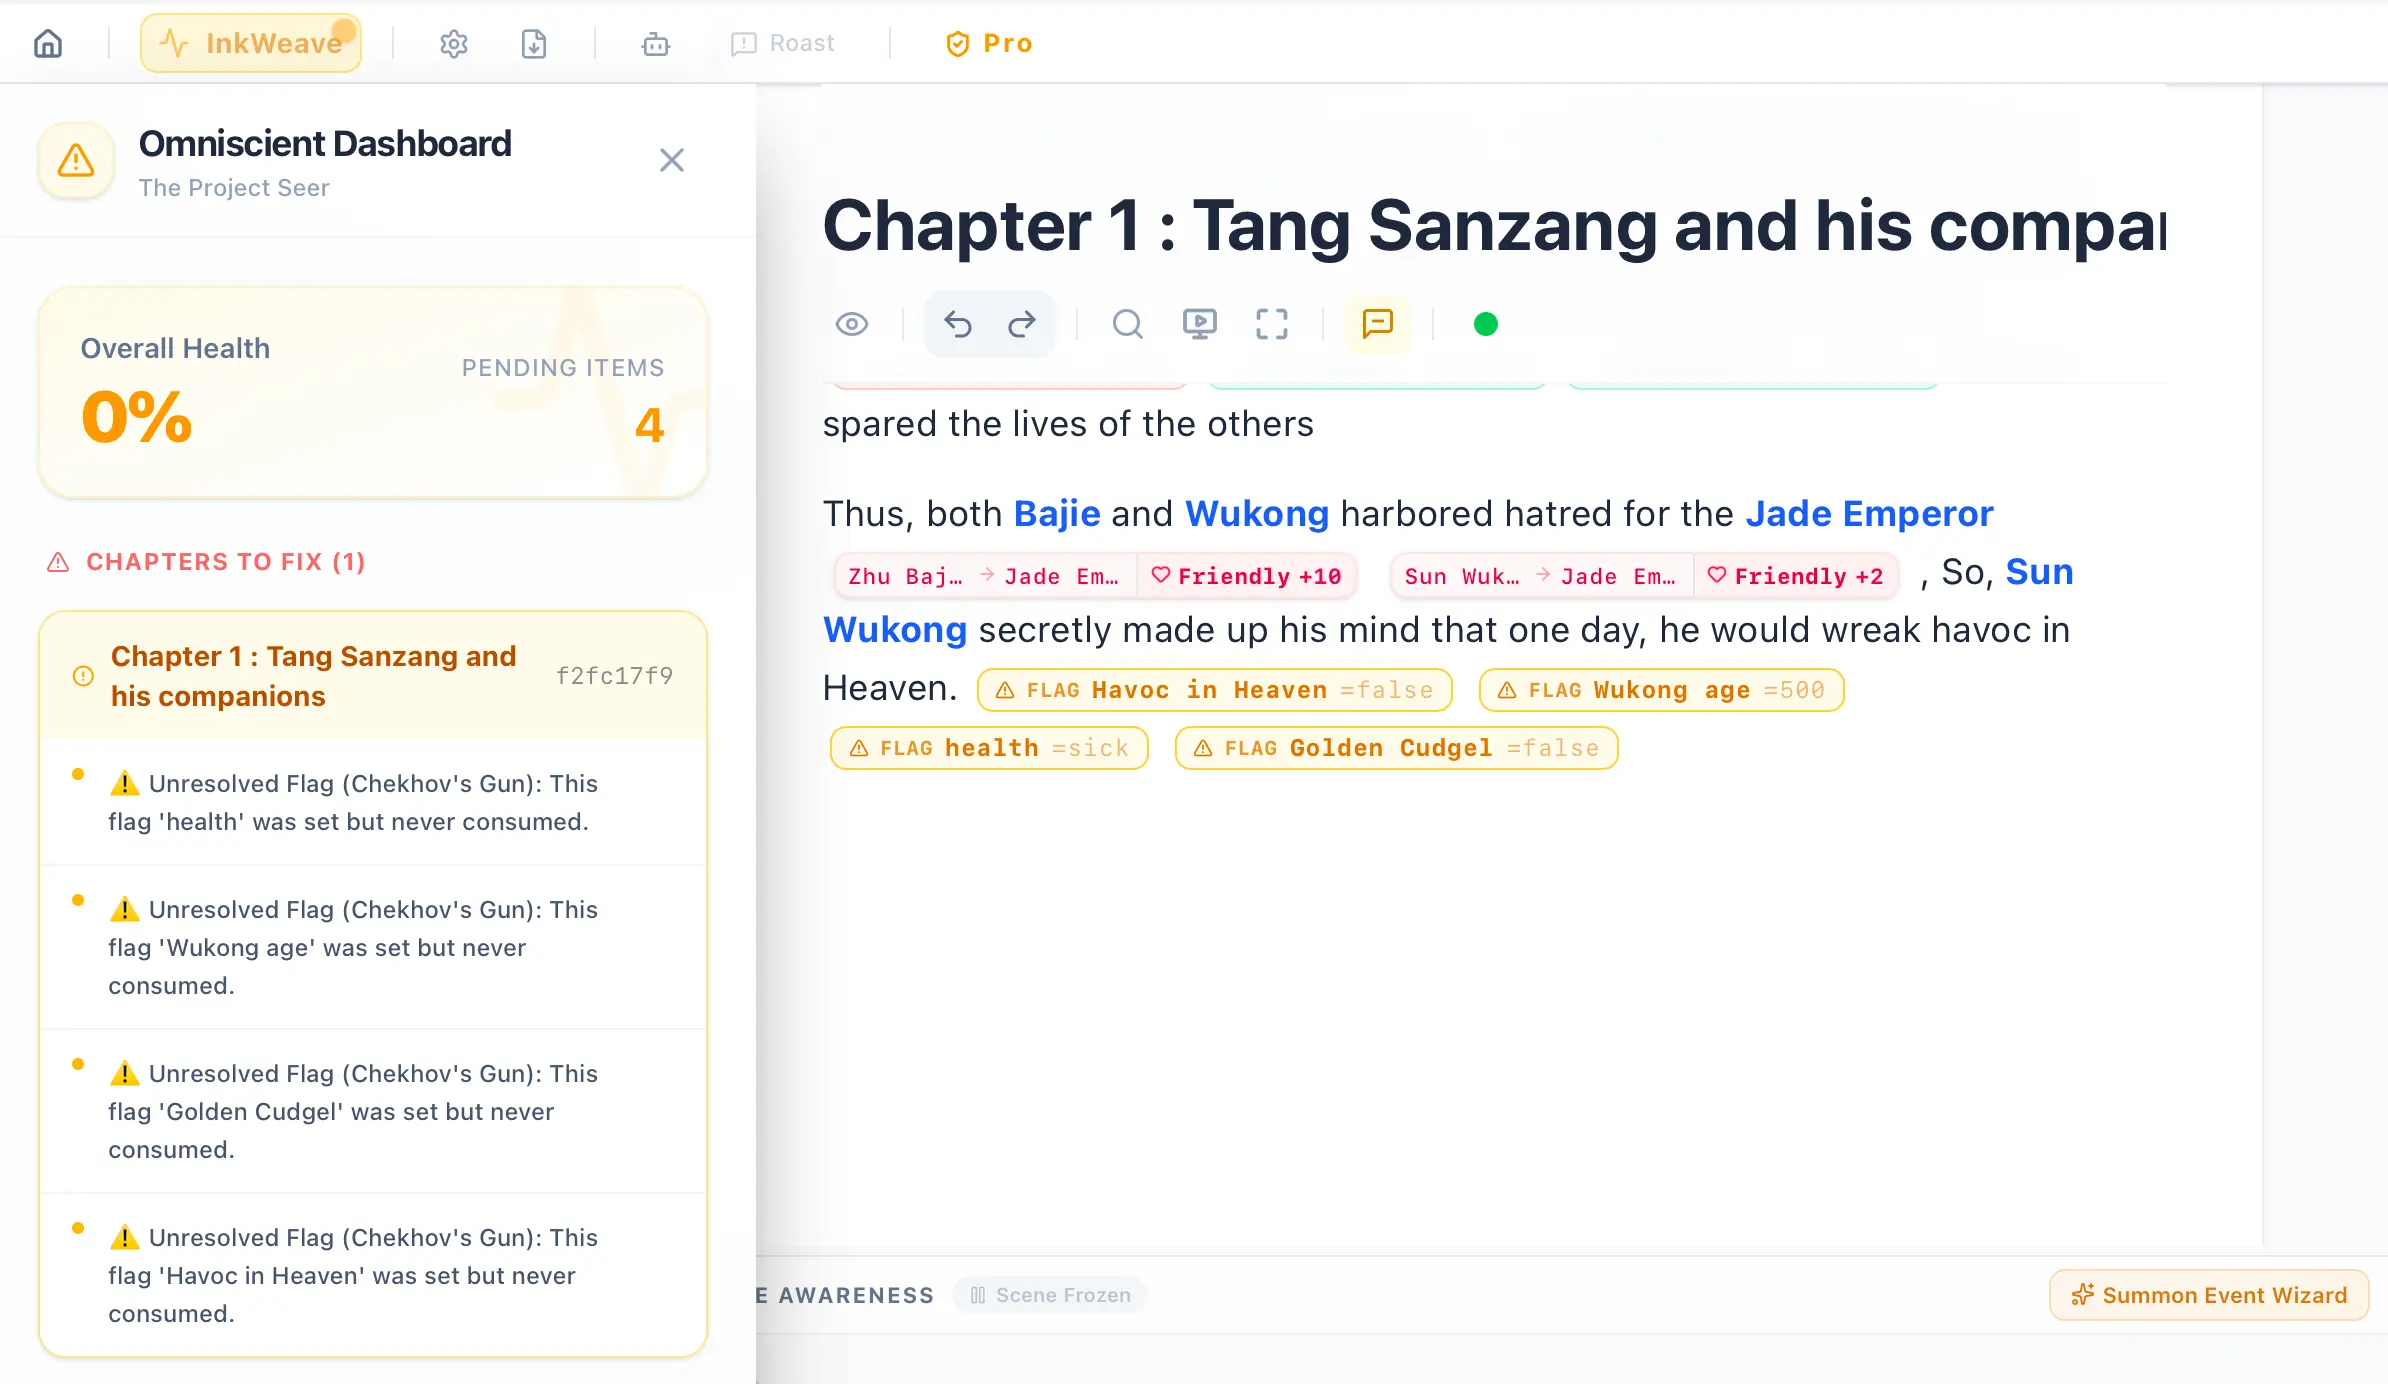
You can see information about the space-time paradox inside the floating window, and the InkWeave button at the very top of the screen has turned red. You can click on the error information in the Omniscience Dashboard, and it will jump straight to that chapter. Inside the floating window for that continuously blinking red anchor, there are two buttons representing the characters’ current space (the position of their last movement anchor). Clicking them will jump directly to that specific anchor within that chapter.
Right now we are in the same chapter, but in the future, you might generate space-time paradoxes across different chapters, making this feature incredibly convenient for debugging. However, because we have the continuous alignment of the AVG Collision System, you can actually rest assured that you won’t need to use it very often. When encountering a space-time paradox, we simply move one character to the other character’s location. When both characters are in the exact same location, trading items between them will no longer trigger an error, as shown in the image below:

Of course, because this is a tutorial, we’ve packed the logic very densely, making it look like there are a lot of anchors. In actual writing, you’ll find that you rarely ever need to use this. Unless you intentionally write very complex logic, under normal circumstances you just need to focus on writing—the AVG Collision System will automatically handle most things for you. You only need to occasionally check the Omniscient Dashboard to ensure no space-time paradoxes have occurred.
You might also notice a toolbar in the editor with an eye icon. Clicking it makes the anchors disappear, and clicking it again makes them reappear, as shown below:

After clicking the eye icon, the anchors will be hidden, as shown below:

Our tutorial won’t be too long, because InkWeave is meant to be played with, not studied—you’ll naturally get the hang of it, I promise! Next, let’s introduce character death. In the eyes of us humans today, death might mean burying the physical body while consciousness vanishes into nothingness. However, in InkWeave, death is merely a state. As long as any entity has interacted with other entities (i.e., through those anchors), it will never, cannot, and is not permitted to disappear. Unless you delete all interactions generated with that entity, it will exist forever. InkWeave believes that if a cup of coffee inexplicably vanished from your life—not stolen, not forgotten—then neither you reading this tutorial right now nor I on a small island far away in the Pacific Ocean should exist, because the universe would have collapsed. The current universe exists precisely because there are so many trivial, verifiable little things.
Imagine you’ve created a character, and in InkWeave they have visited countless locations, traded items, and even established relationships with other characters (we have anchors for establishing two-way relationships—it’s super fun, you can try it later under Project Settings in Relationships & States). If you establish a relationship, the AVG events will start doing some very interesting things. What kinds of things, you ask? I’ll leave that for you to discover! Remember what I said: InkWeave isn’t meant to be learned, it’s meant to be played. Yet, while you are having fun, InkWeave is operating on an extremely rigorous Causality Engine. Your only responsibility is to write; InkWeave mathematically guarantees that your logic will never be flawed.
Character Death
Section titled “Character Death”I’ve strayed off topic again; let’s get back to character death. Right now, you have a character who possesses an item, correct? In the editor, type `/status `—remember to include a space. Alternatively, you can click the + button next to the editor block and select Set Character Status, which is essentially the UI interface for the `/status ` command. If you don’t feel like memorizing commands, just use the + button. It contains every type of anchor available in InkWeave, including the `/loc` (Location Movement) and `/status` (Set Character Status) commands we just covered.
If you can’t see the + button, it means you haven’t placed your cursor inside the paragraph you are currently writing, or you haven’t closed the file tree toggle on the left side of InkWeave (sometimes the file tree can block it), as shown below:

After adding a space (Space), it will look like the image below:
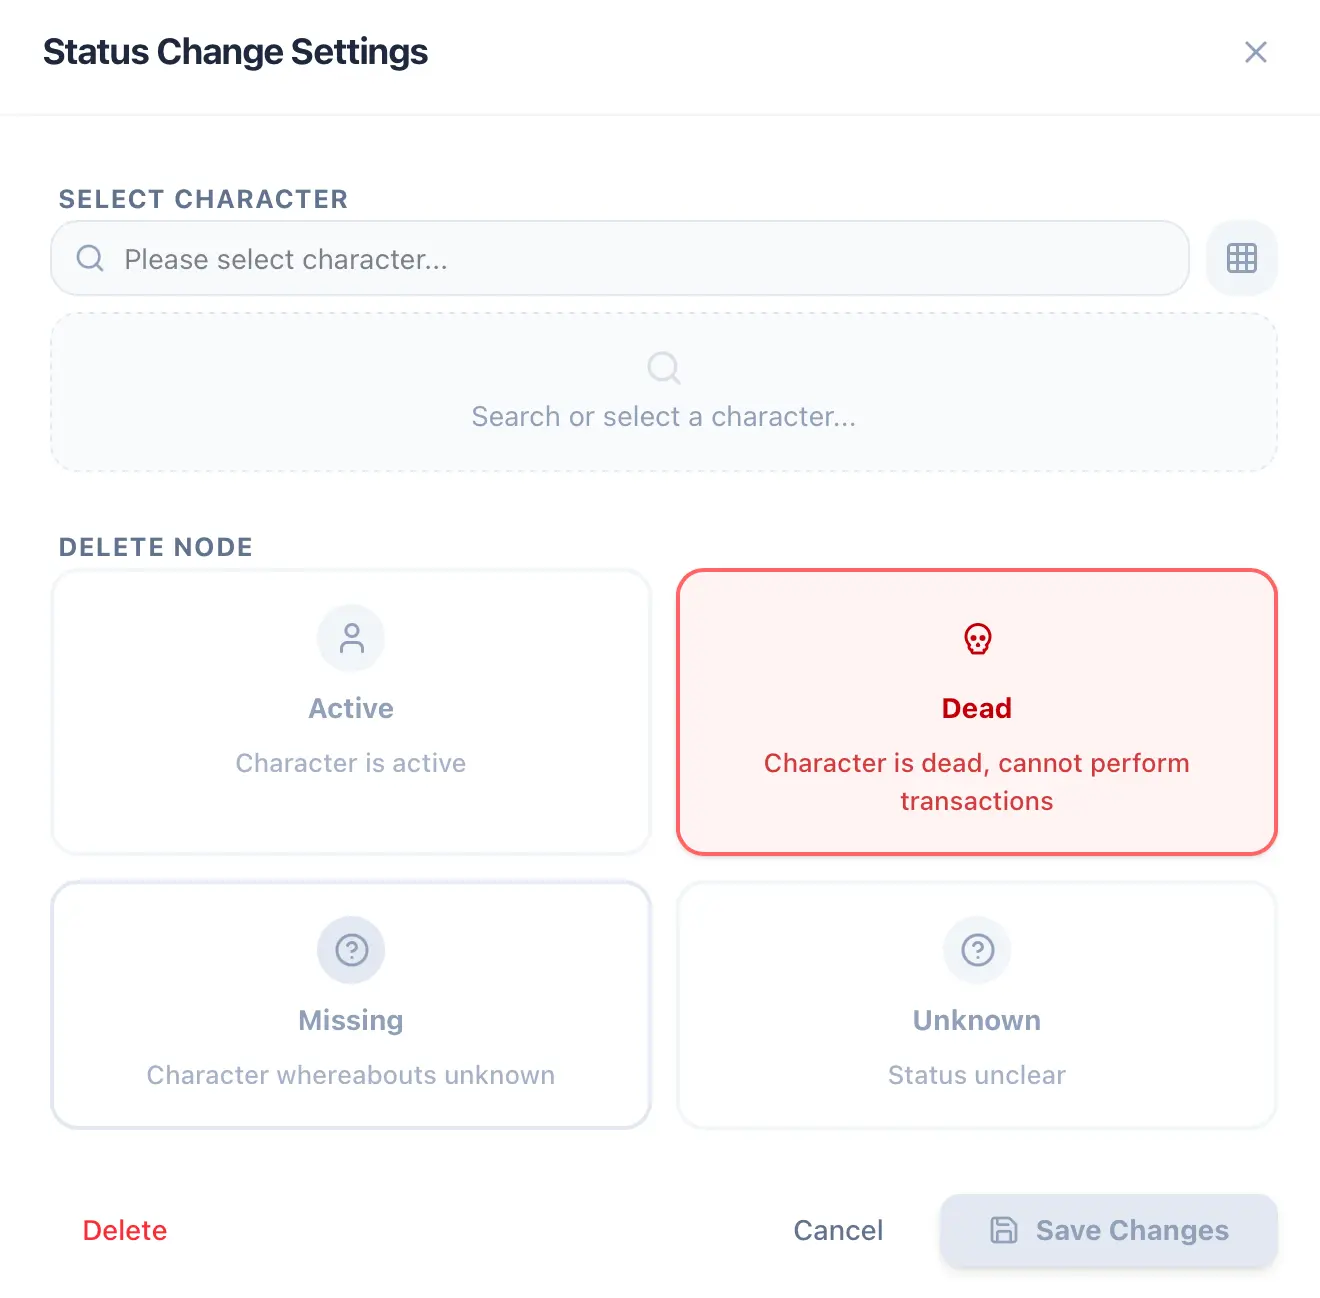
Next, using the state change UI, we select Dead, and then choose the character currently holding the item. Why specifically the character holding the item? I’m guessing someone might have figured it out. That’s right—when a character dies, the ownership of their items is decided based on the location and which other characters are currently present in that location. If the items aren’t given to another character present at the location (perhaps because the other character is an enemy), then the items will scatter on the ground at that location. After we enter the character’s name, you’ll suddenly see an additional option appear, as shown below:
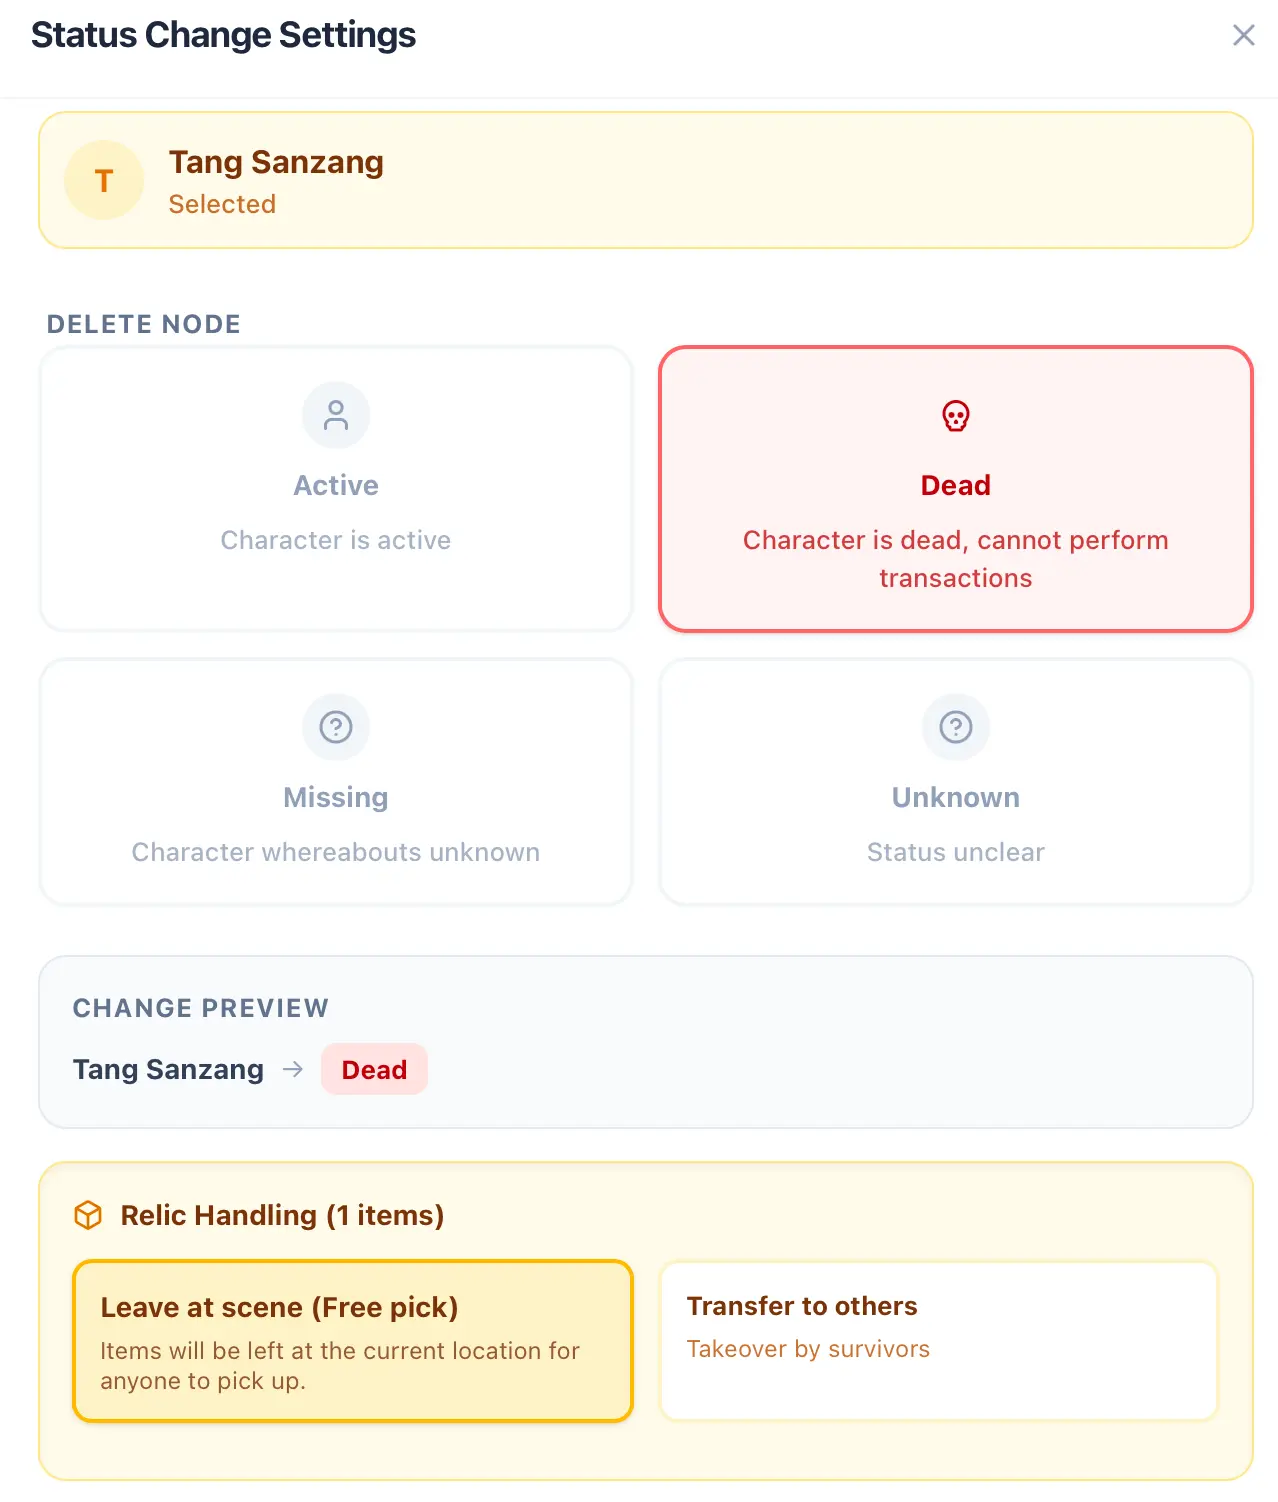
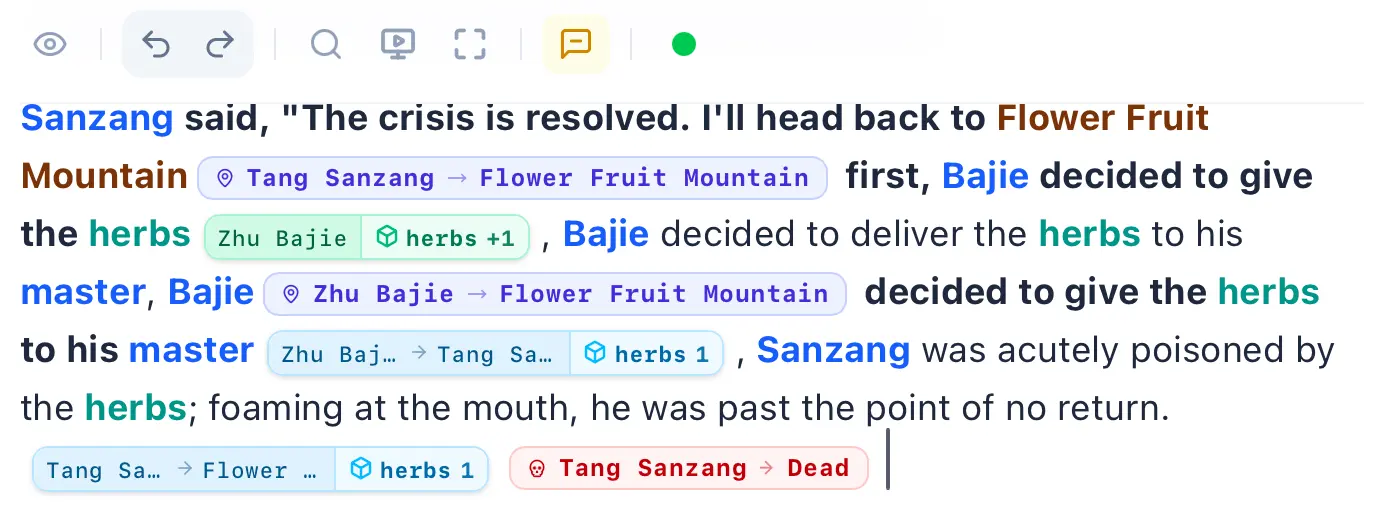
For now, let’s select Drop at Scene, and you will see that two anchors have been inserted, as shown below:

See that? If you place your cursor after the death anchor and open the Character Inspector, you’ll notice the character’s status has changed from Active to Dead. But if you move your cursor back before the death anchor, the character becomes active again.
After death, you’ll find the character’s inventory has been emptied. Now go to the Location Inspector (please switch to the Location tab) and check the location where the character died—are the dead character’s items scattered there? Next, try moving your cursor back and forth across the death anchor; do you notice the location’s inventory changing depending on whether the cursor is before or after the anchor? Because the Causality Engine perfectly understands the space-time causality of your work, you can even resurrect characters as shown below. Therefore, you only need to focus on writing. InkWeave will automatically handle most things for you; you just need to occasionally check the Omniscient Dashboard to ensure no space-time paradoxes have occurred.
You might also notice a toolbar in the editor with an eye icon. Clicking it makes the anchors disappear. But please remember to keep it turned on while editing! (That is, if you have the Causality Engine enabled.)
Additionally, you can try entrusting items to another character upon death to see what happens. Simply select Transfer to Others.
Location Status
Section titled “Location Status”Location Status has a very cool feature: you can set the status of a location, such as Location Destroyed. To destroy a location, you can type `/ls ` in the editor, or click the + button on the left of the editor block and select Location Status. The complete text and image are shown below:
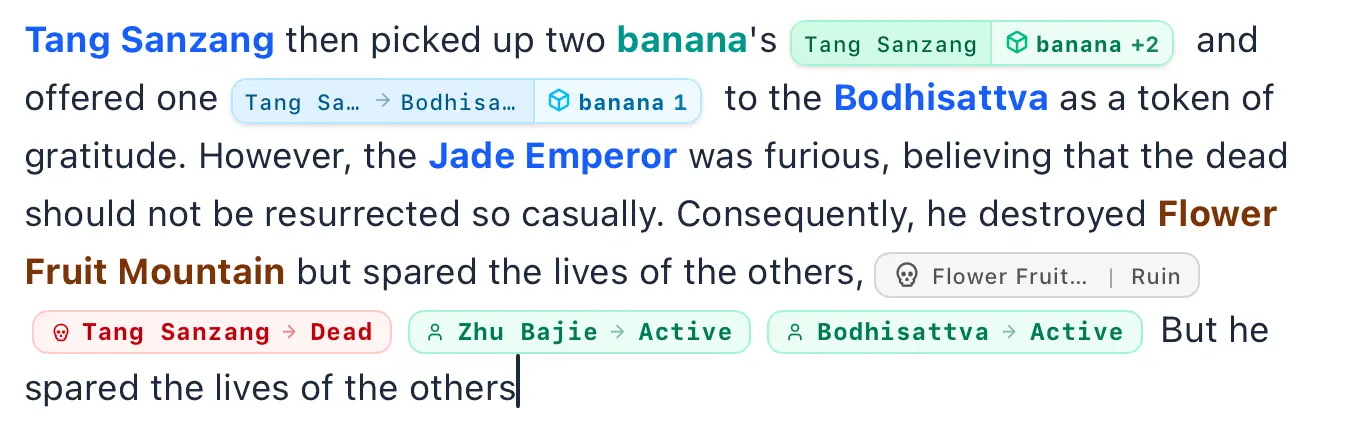
Complete Text
Section titled “Complete Text”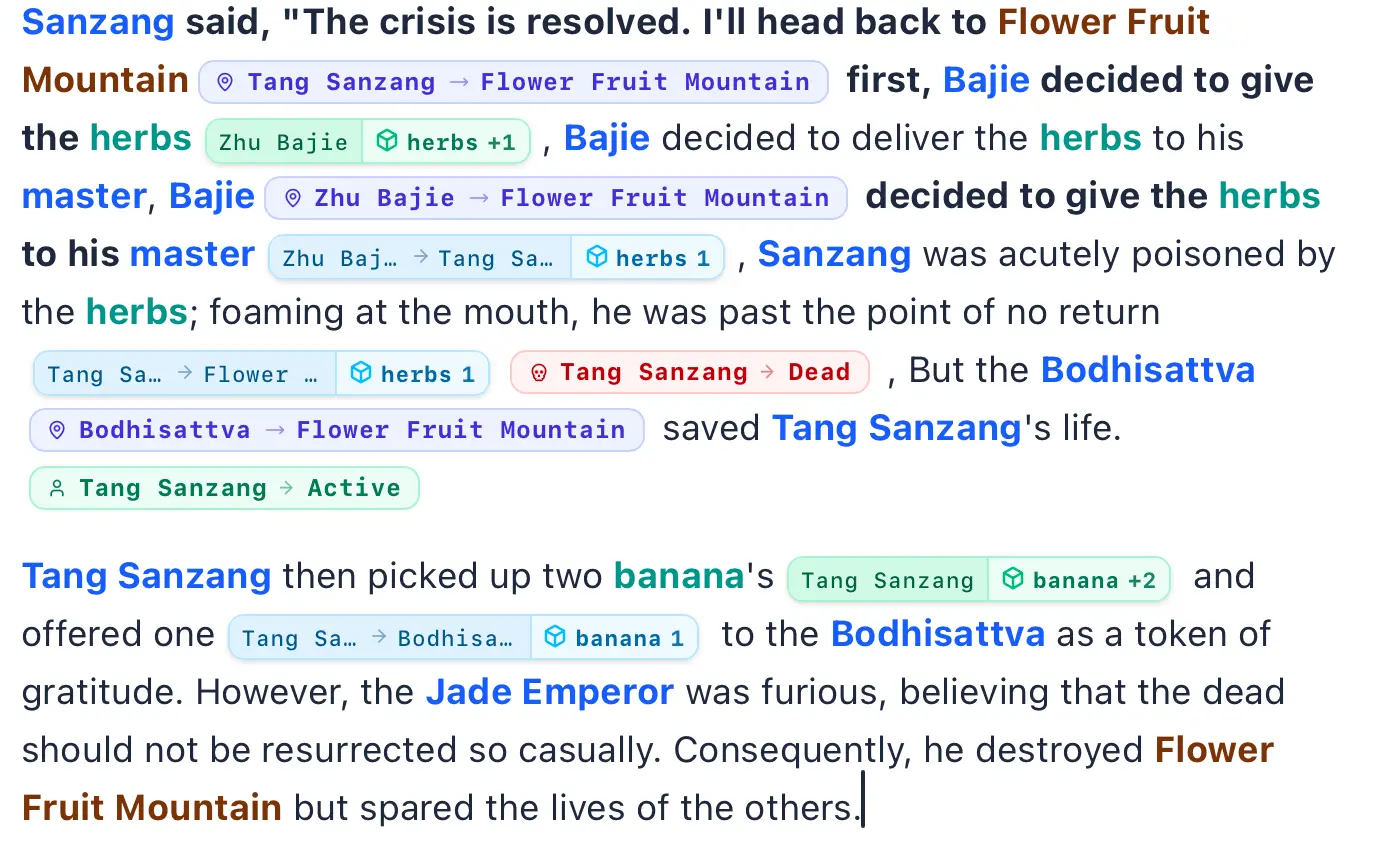
Location Status UI
Section titled “Location Status UI”You can type out my text exactly and drop the anchors. You will notice that I added a piece of plot after the character death anchor, describing how a new character helps the dead character resurrect, and then I added a Set Character Status anchor to bring them back to life. However, you will see that I placed an anchor moving the new character to the location where the death occurred. You can choose not to do this movement at first. Because the resurrected character, wanting to thank their savior, will give their item to the savior, but that will immediately cause a space-time paradox!
Since the new character hasn’t moved to the dead character’s location, and the dead character gives the item to the new character, a space-time paradox occurs. Therefore, you must first move the new character to the dead character’s location before having the dead character give them the item. This way, the space-time paradox warning will disappear. Otherwise, the item trade anchor for thanking the savior will issue a warning. But as long as you insert the anchor for the new character’s movement beforehand, the warning on the item trade anchor will be immediately resolved. Isn’t that magical?
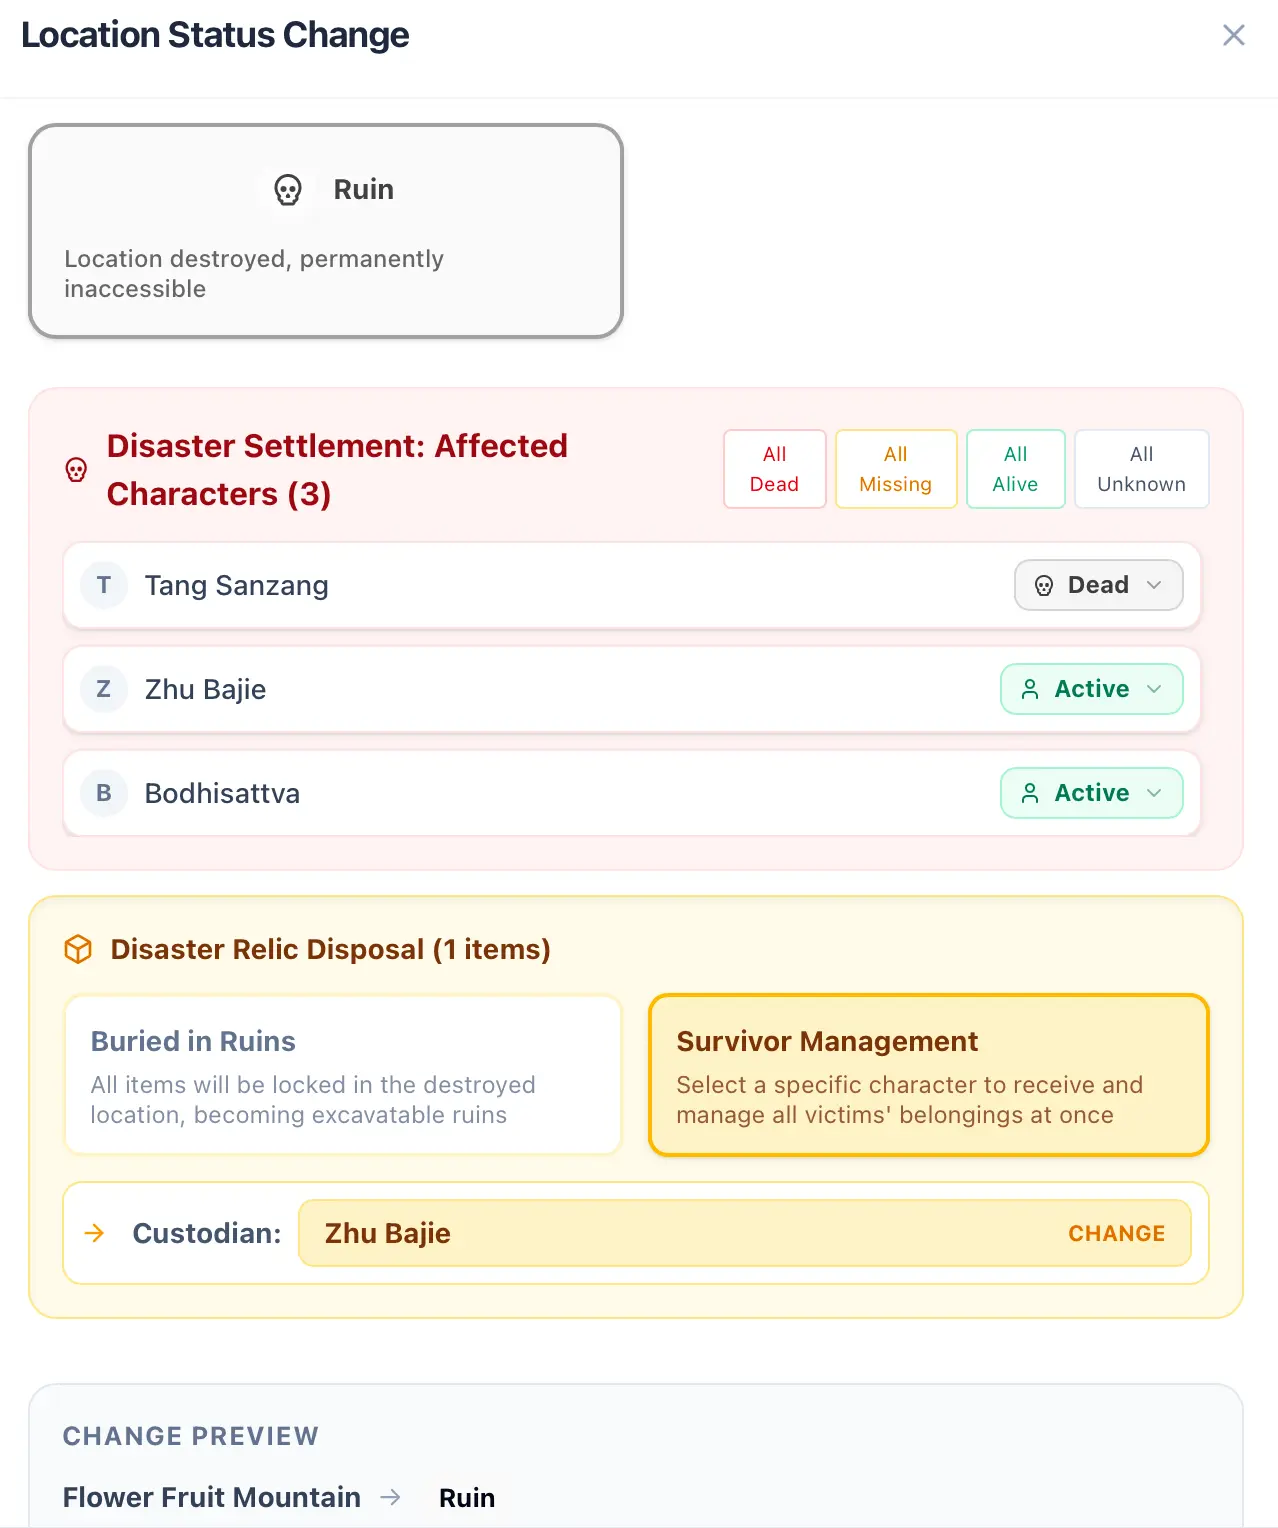
Let’s get back to Location Destroyed. You can type `/ls ` or click the + button on the left of the editor block and select Location Status. Then, select the location, select which characters die, choose Destroyed for the location status, and finally select Survivor Coordination and pick the survivor. This way, the survivor will obtain all items from the deceased characters, as shown below:
You can see that item trade anchors, location status anchors, and character status anchors are placed consecutively in the text, allowing you to simulate scenarios involving mass casualties. Of course, locations have other statuses, but they are all quite simple, so you can explore them on your own. For example, if you use Entry Banned or Lockdown, a warning will occur if a character tries to enter; Exit Banned is the exact opposite—a warning will occur if a character tries to leave.
Relationships & States
Section titled “Relationships & States”You can configure relationships and states in the Project Settings, as shown in the image below:
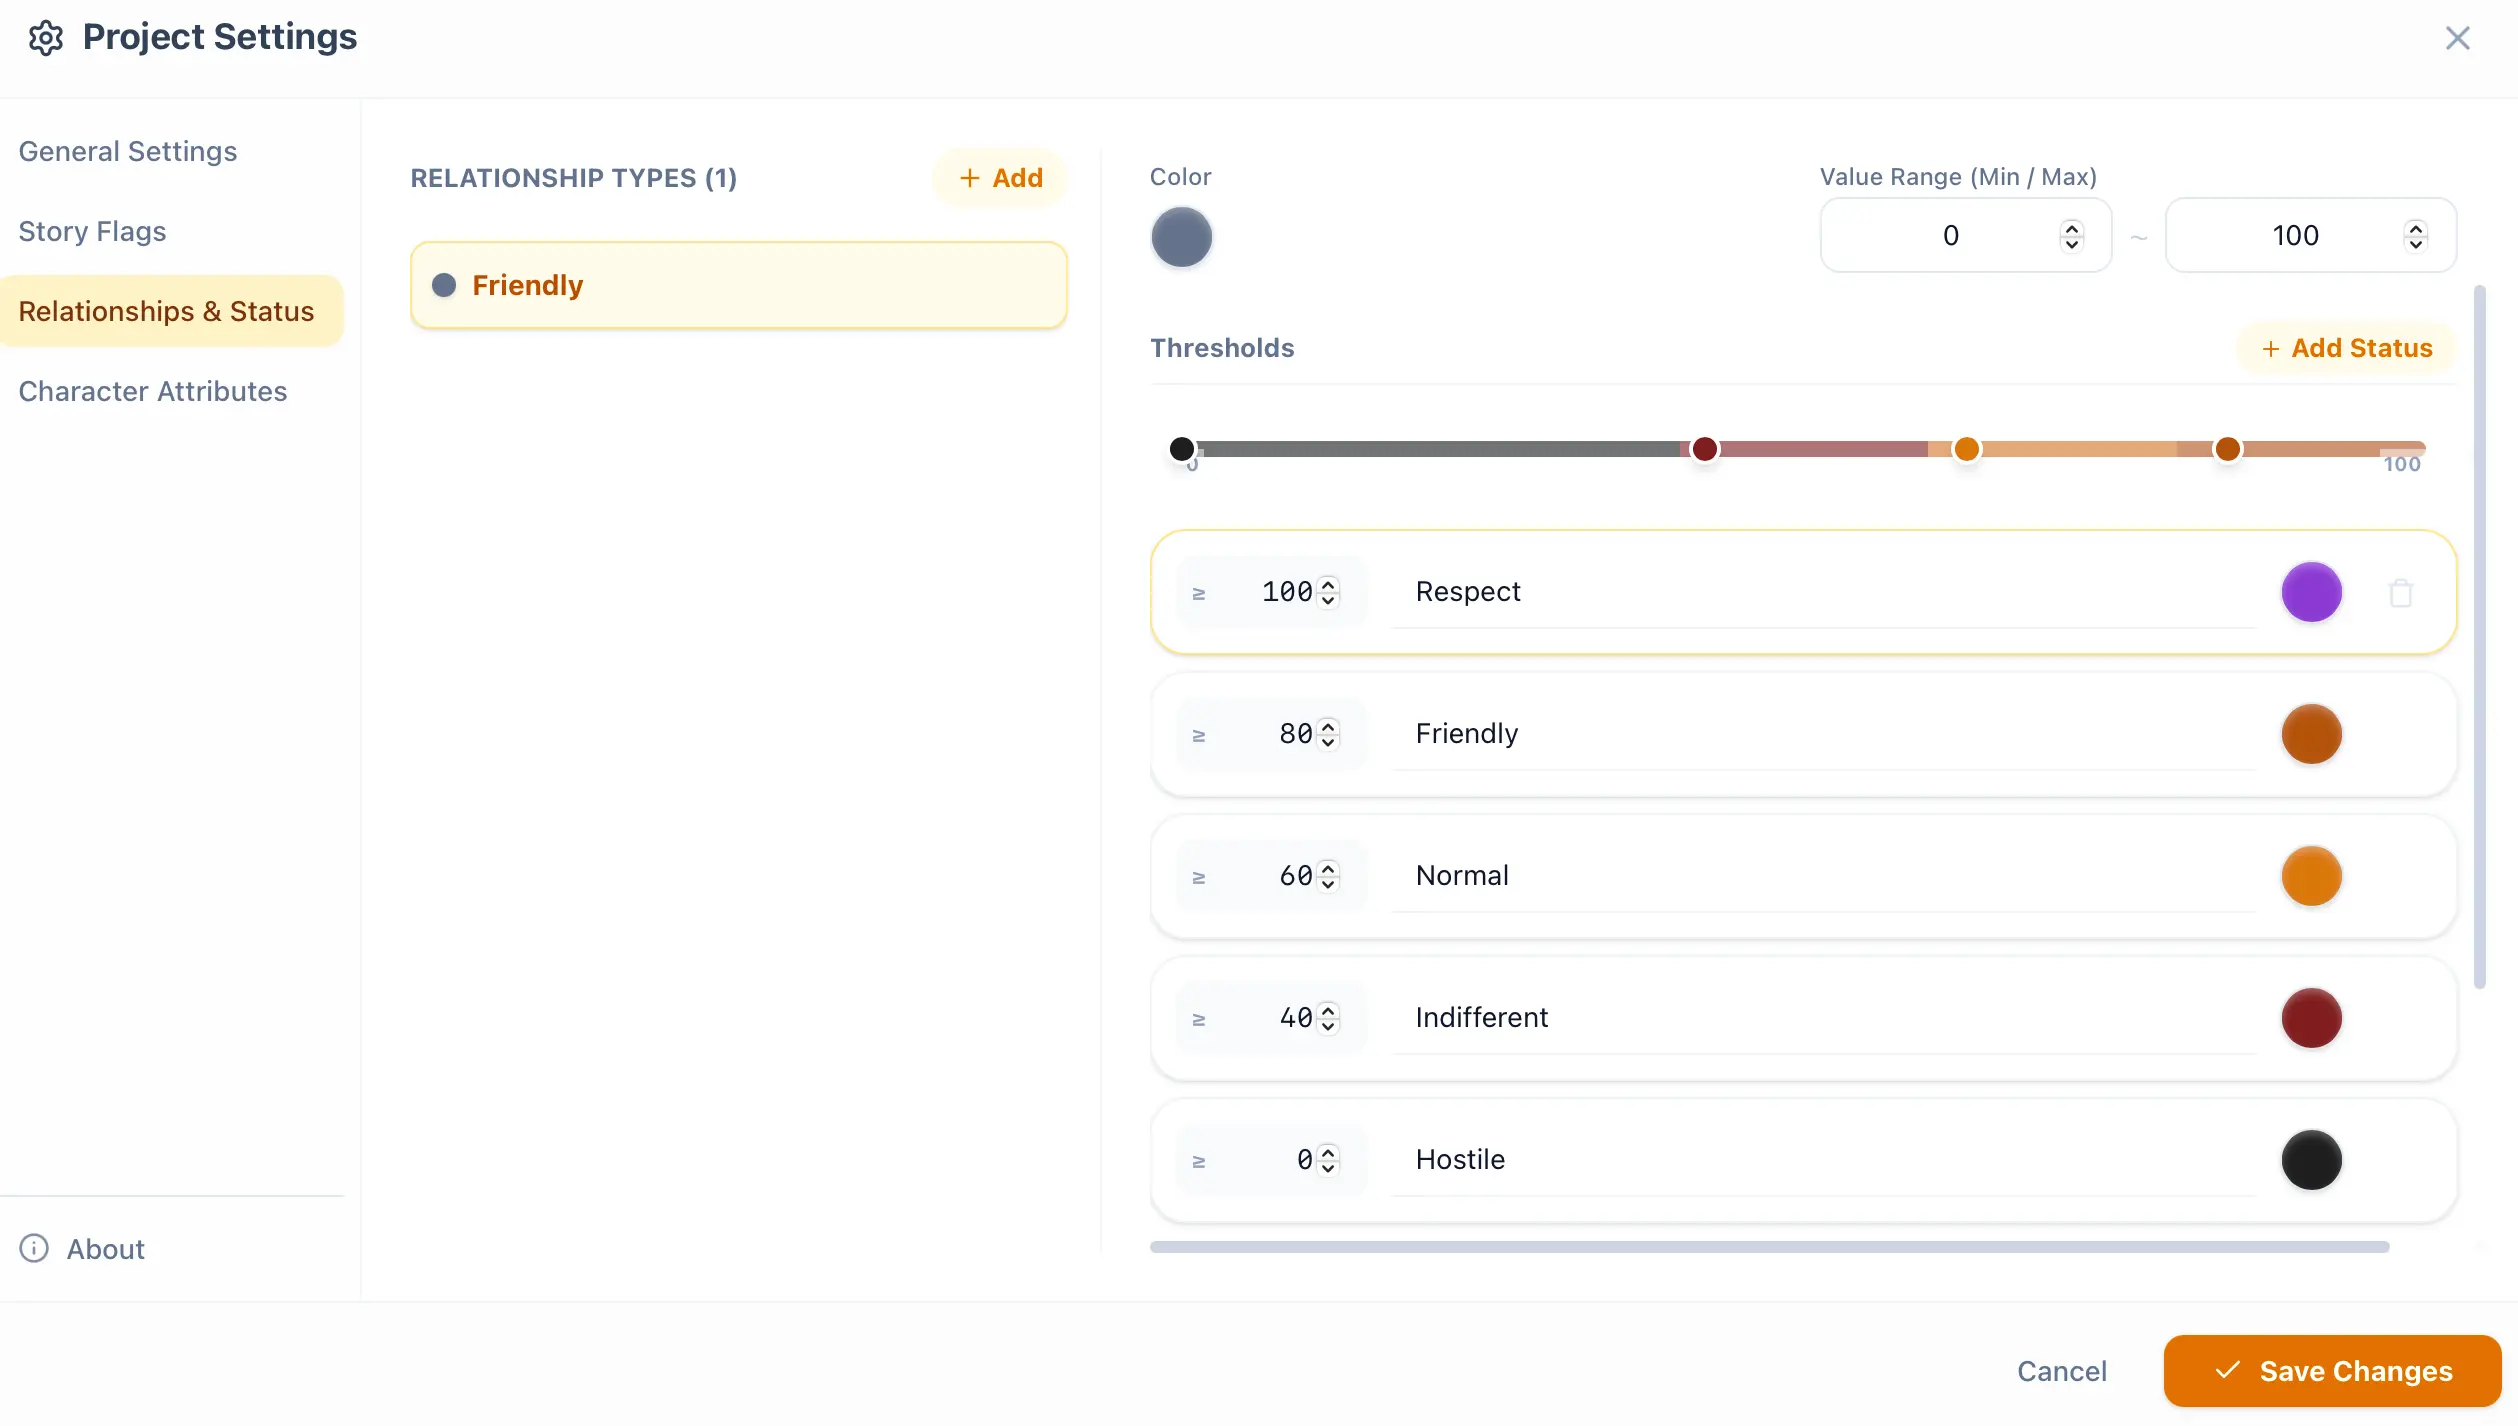
Then, you can type `/rel ` in the editor, or click the + button on the left of the editor block and select Relationship Change. The complete text and three reference images are shown below:
Enter /rel
Section titled “Enter /rel ”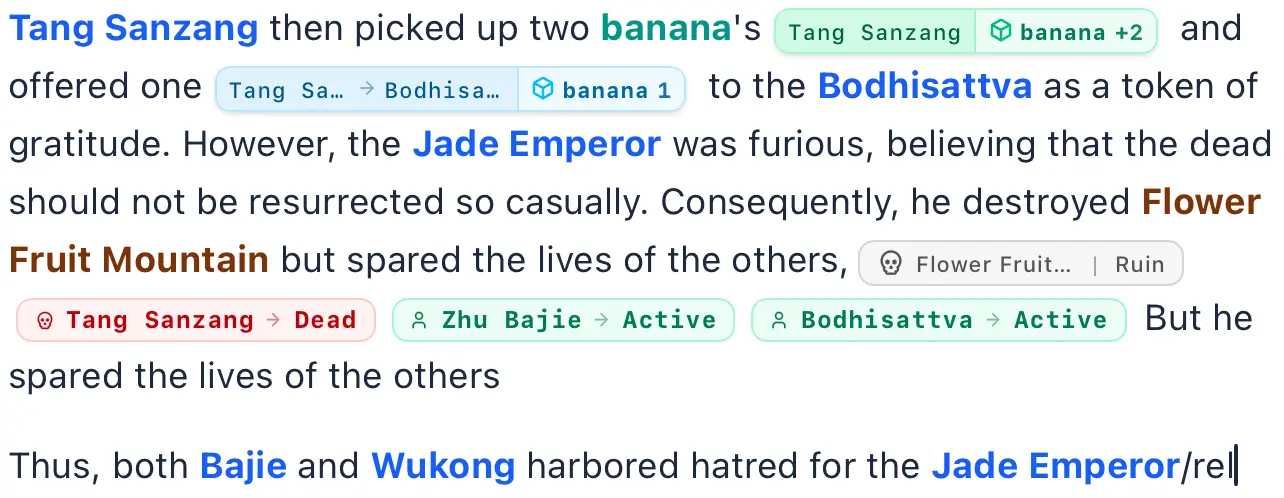
Relationship Change UI
Section titled “Relationship Change UI”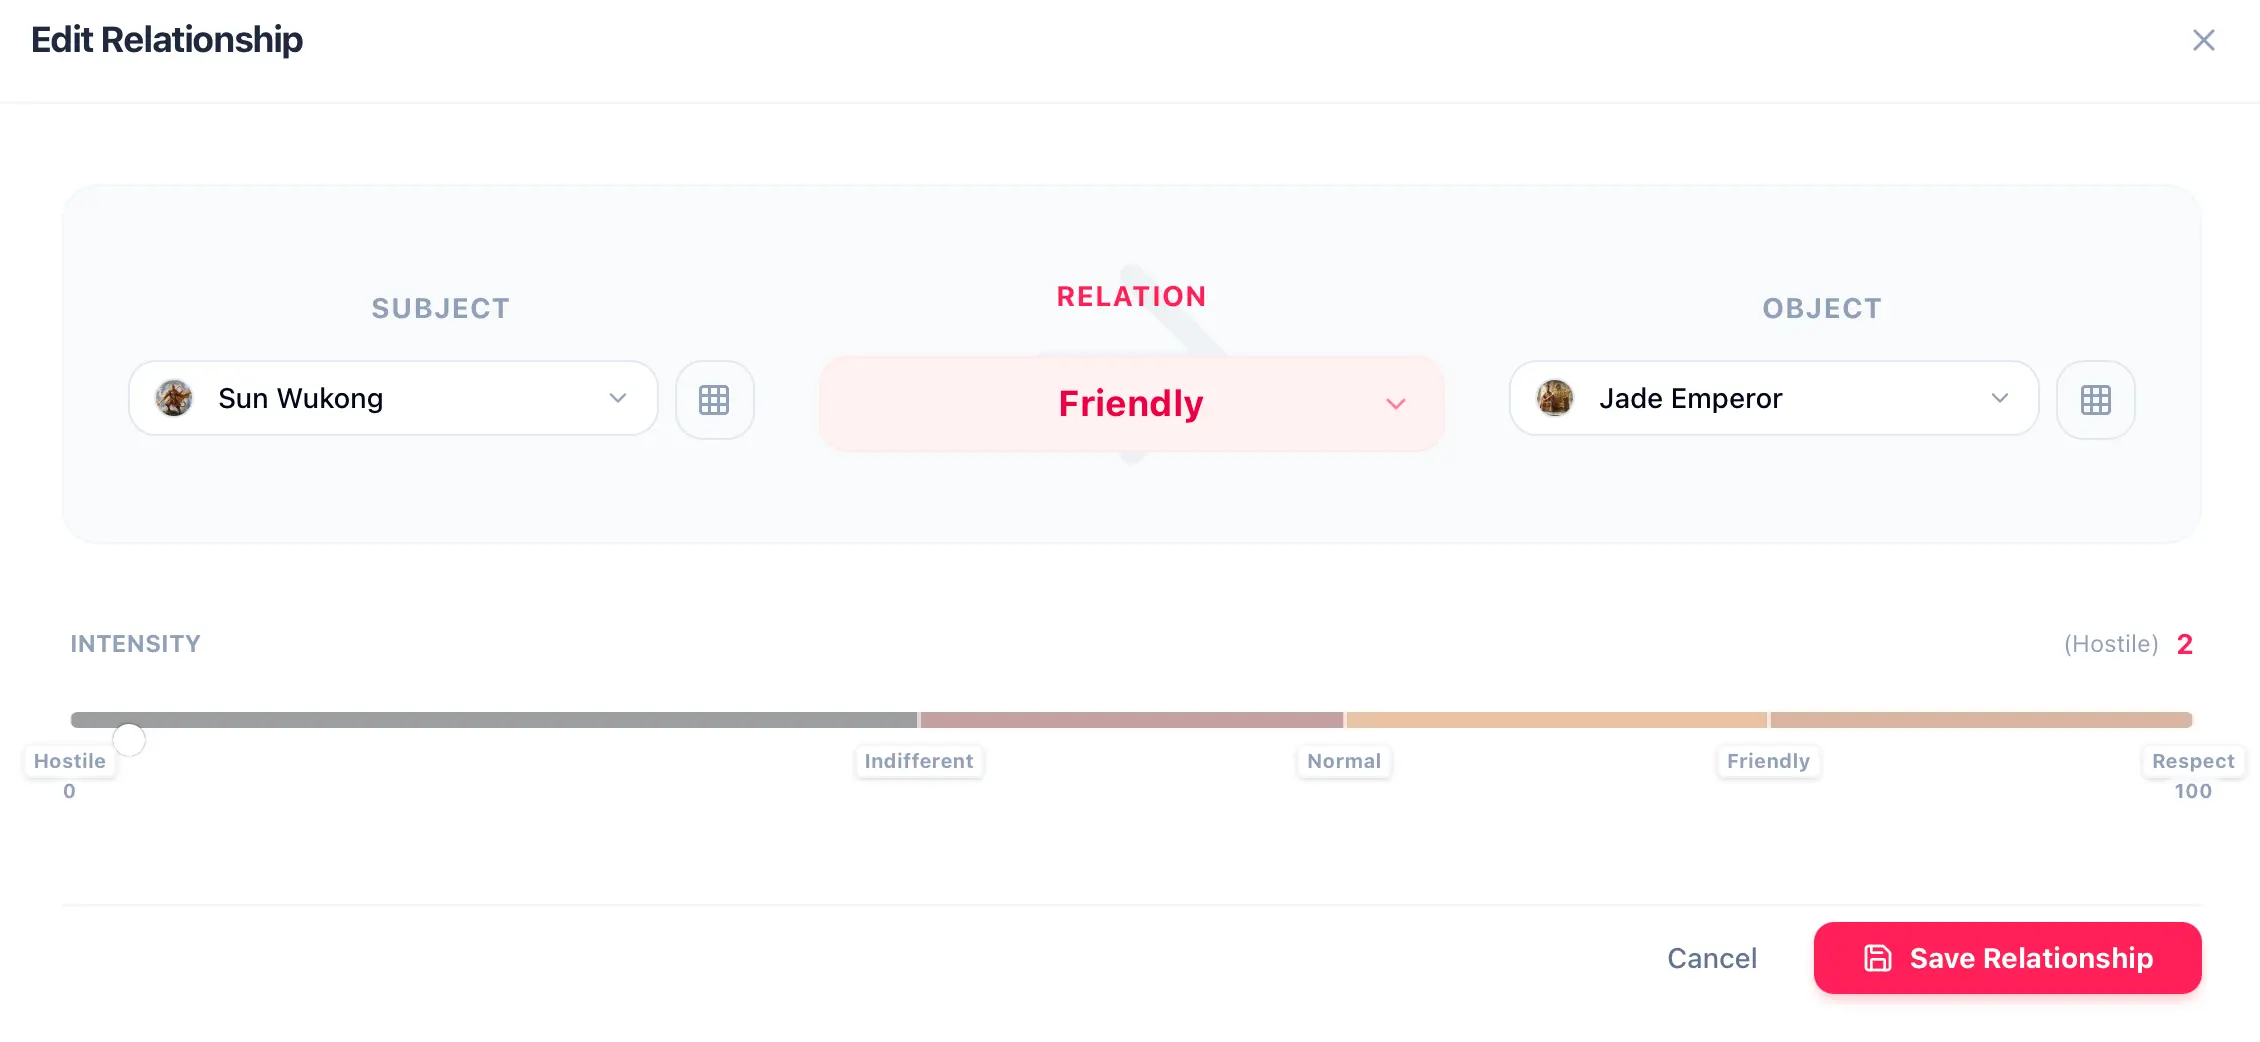
Relationship Change Result
Section titled “Relationship Change Result”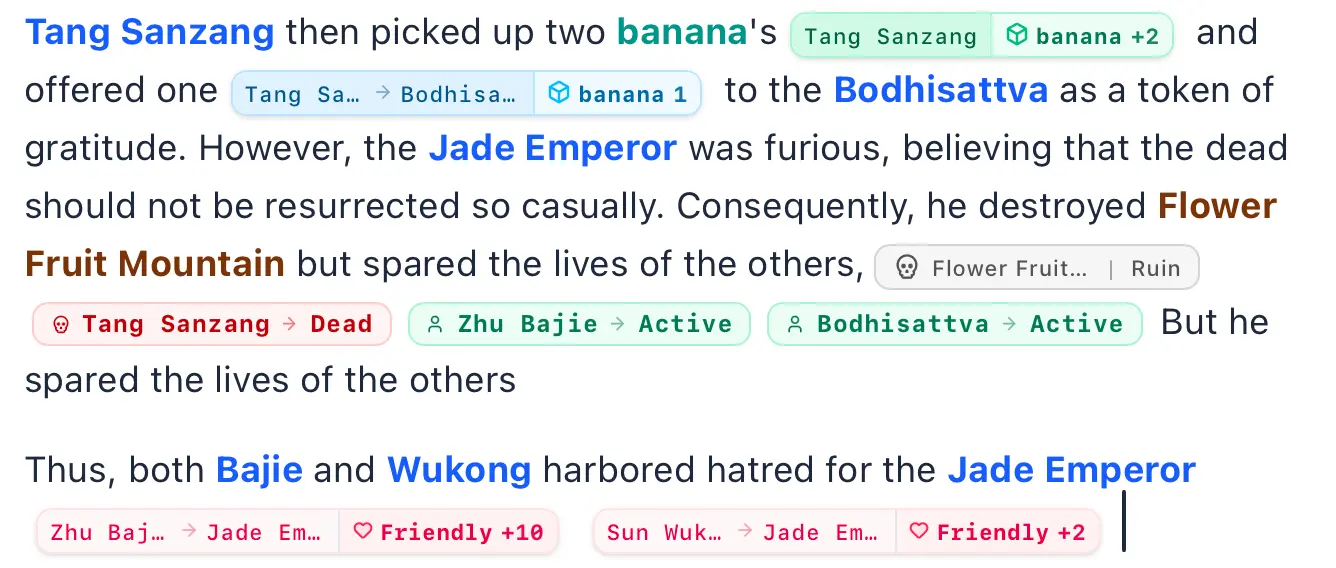
All done? Great. Now, navigate to the Inspector of the character whose relationship you just changed, and select Social Graph. You will find a beautiful relationship diagram, as shown in the three images below:


Plot Flags
Section titled “Plot Flags”You can configure plot flags in the Project Settings, as shown in the four images below:
Set Plot Flag 1
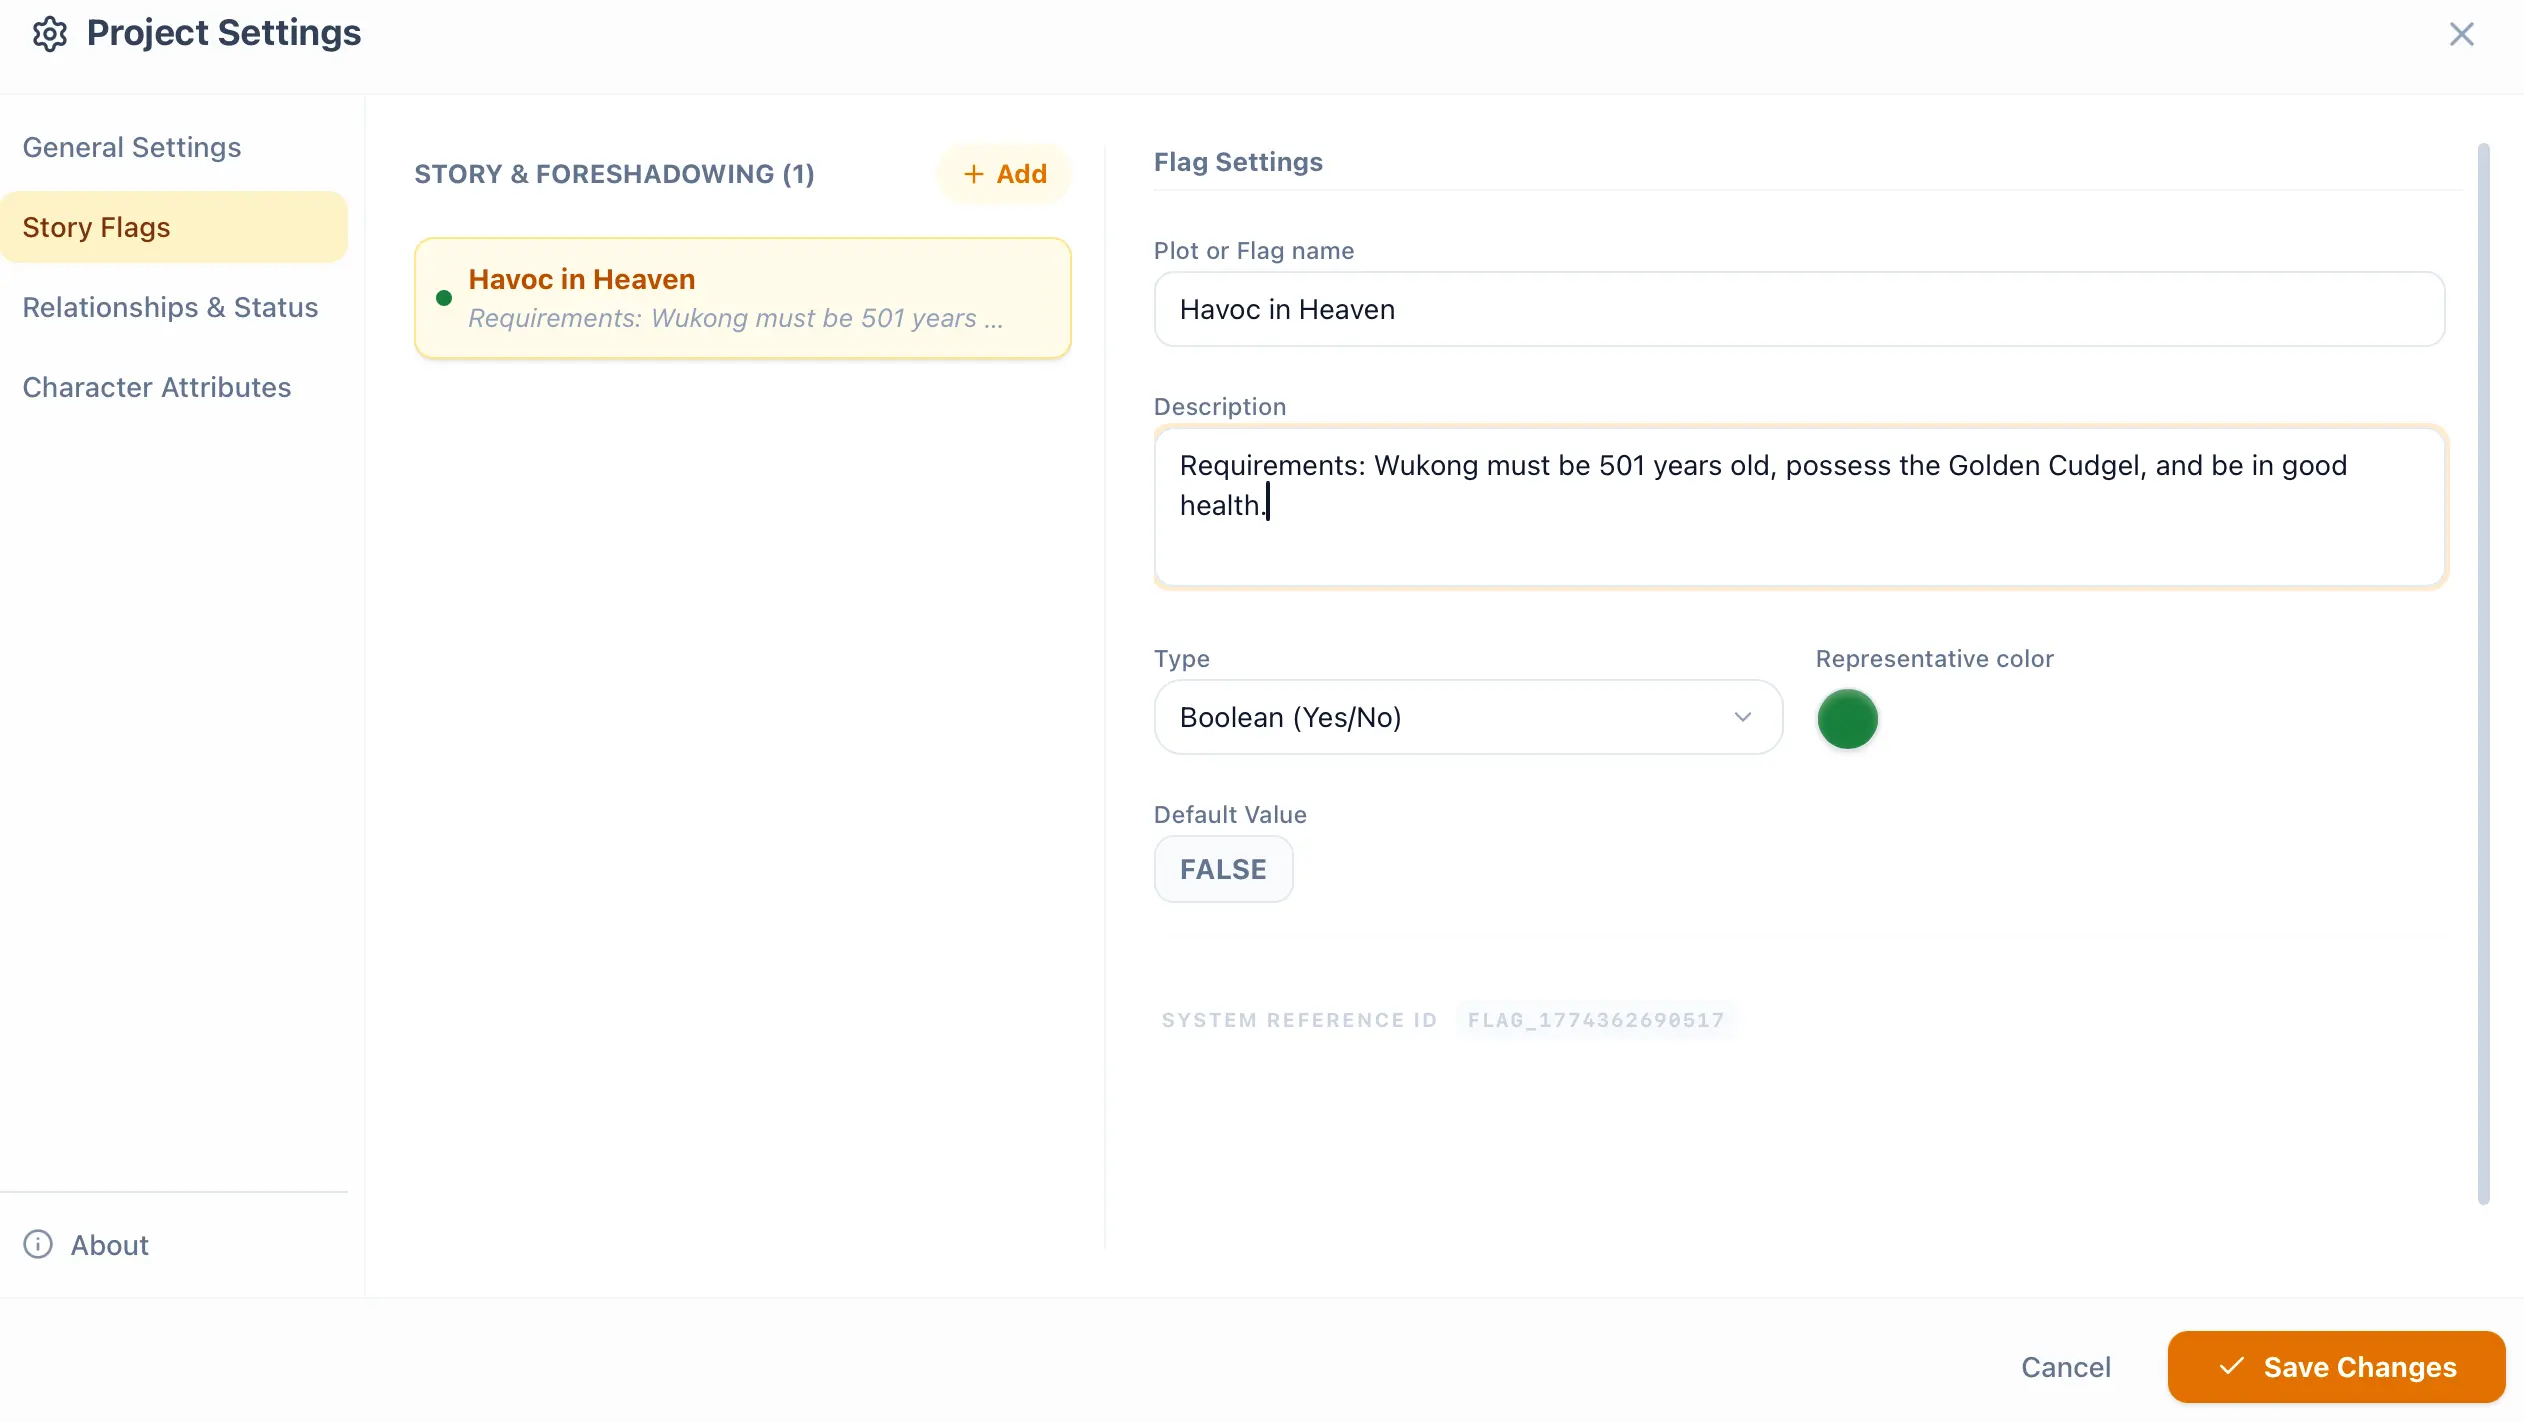
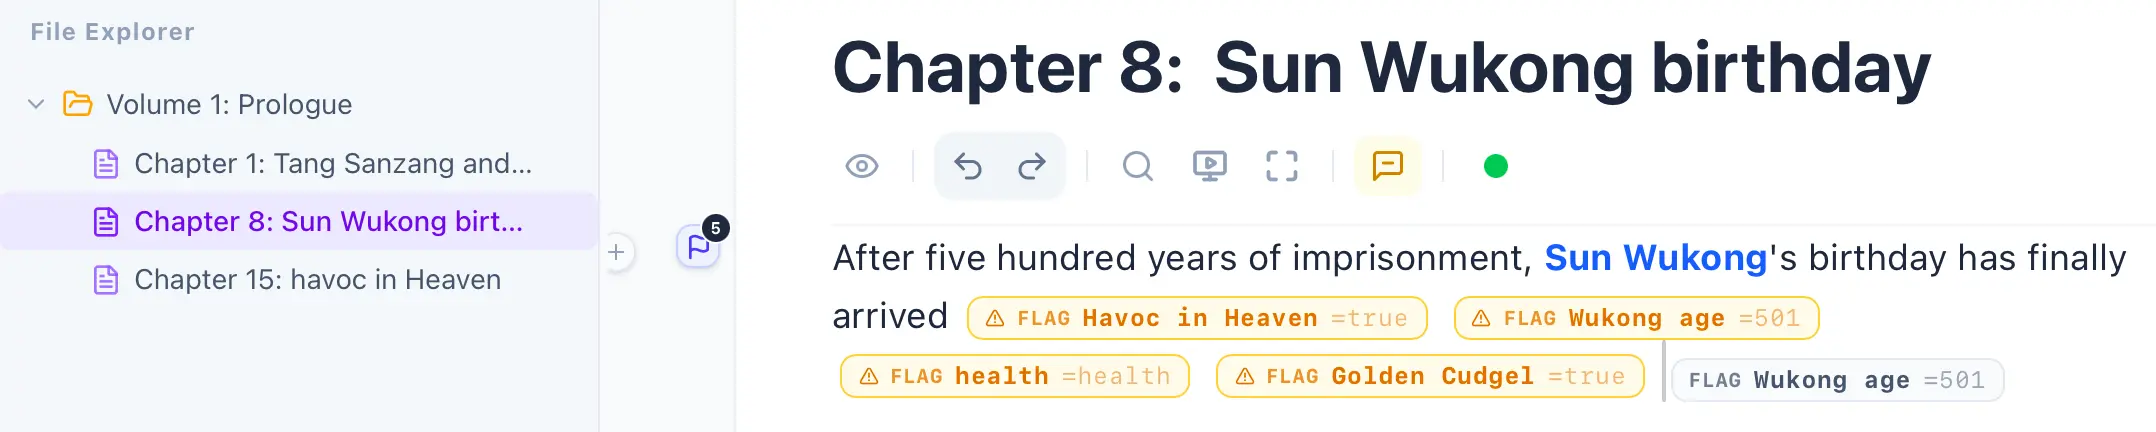
Section titled “Set Plot Flag 1”For the first flag, I’ve set a true/false (Yes/No) plot flag. The intention here is to plant a foreshadowing that will be revealed later, so I set its initial value to false, as shown below:
Set Plot Flag 2
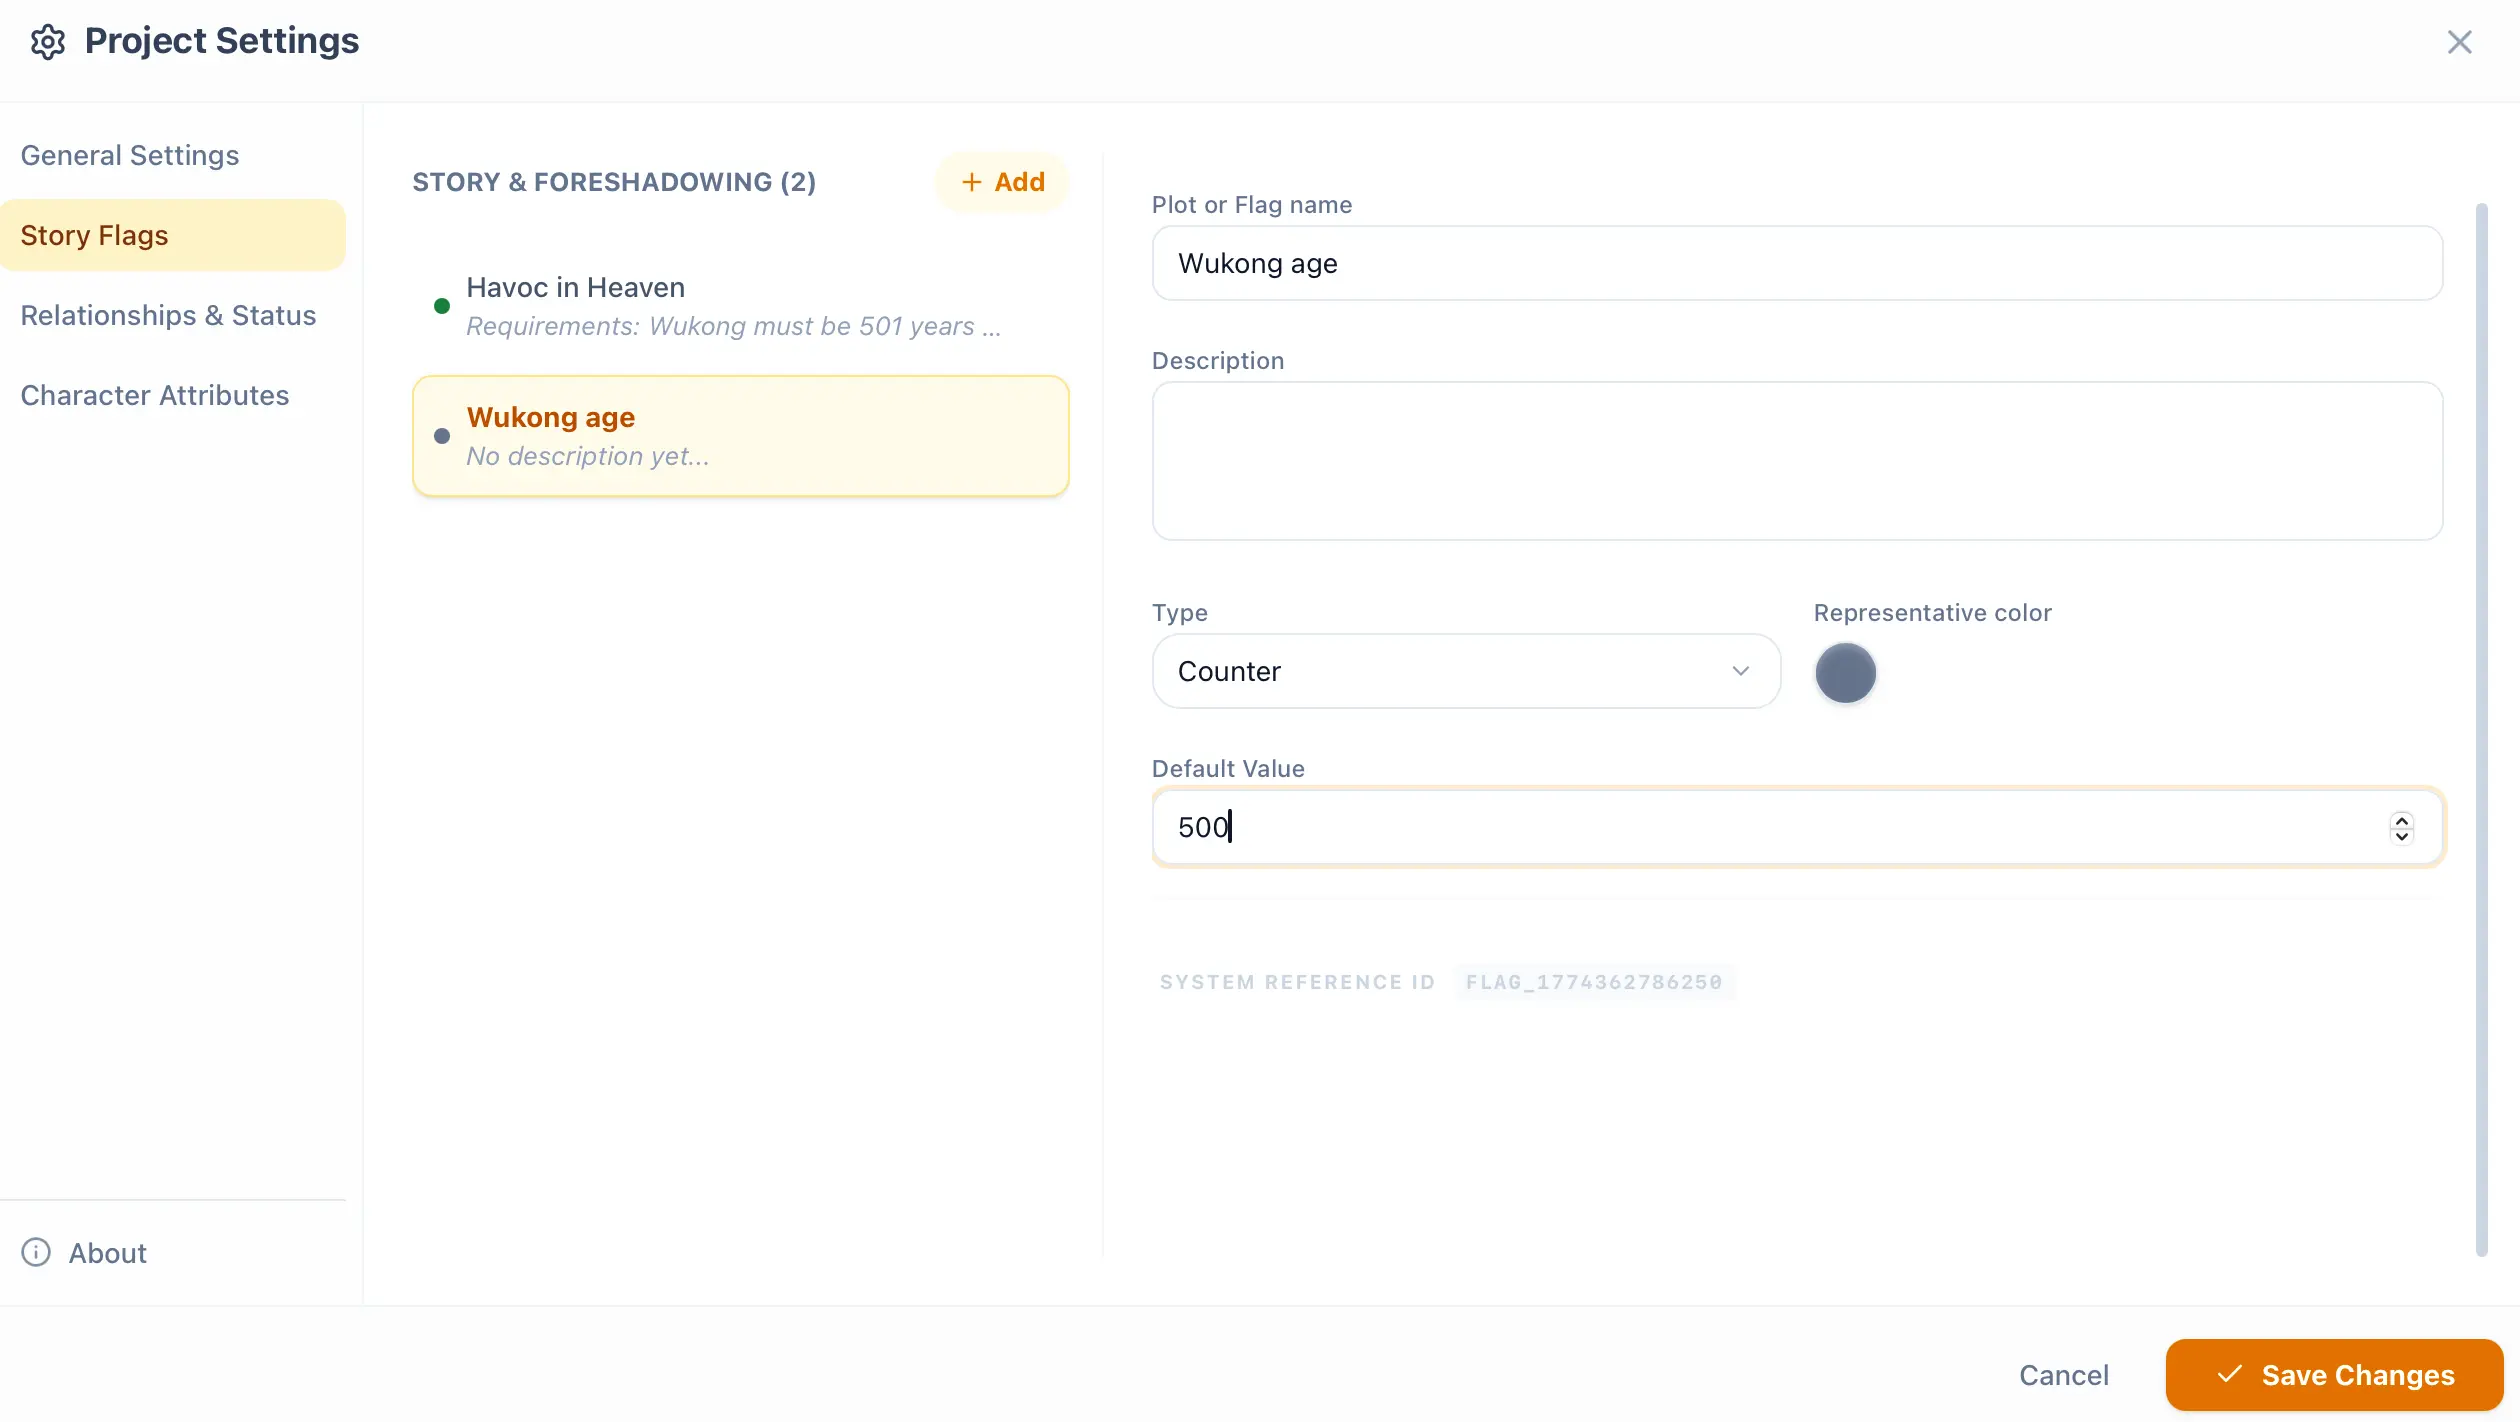
Section titled “Set Plot Flag 2”For the second flag, I’ve set a Number flag designed to record a specific value. For example, has a character’s current age reached 501? Since I entered an initial value of 500, they obviously haven’t reached 501 yet! This is exactly where the brilliance of this feature lies. I will explain it in just a moment, so don’t rush! As shown below:
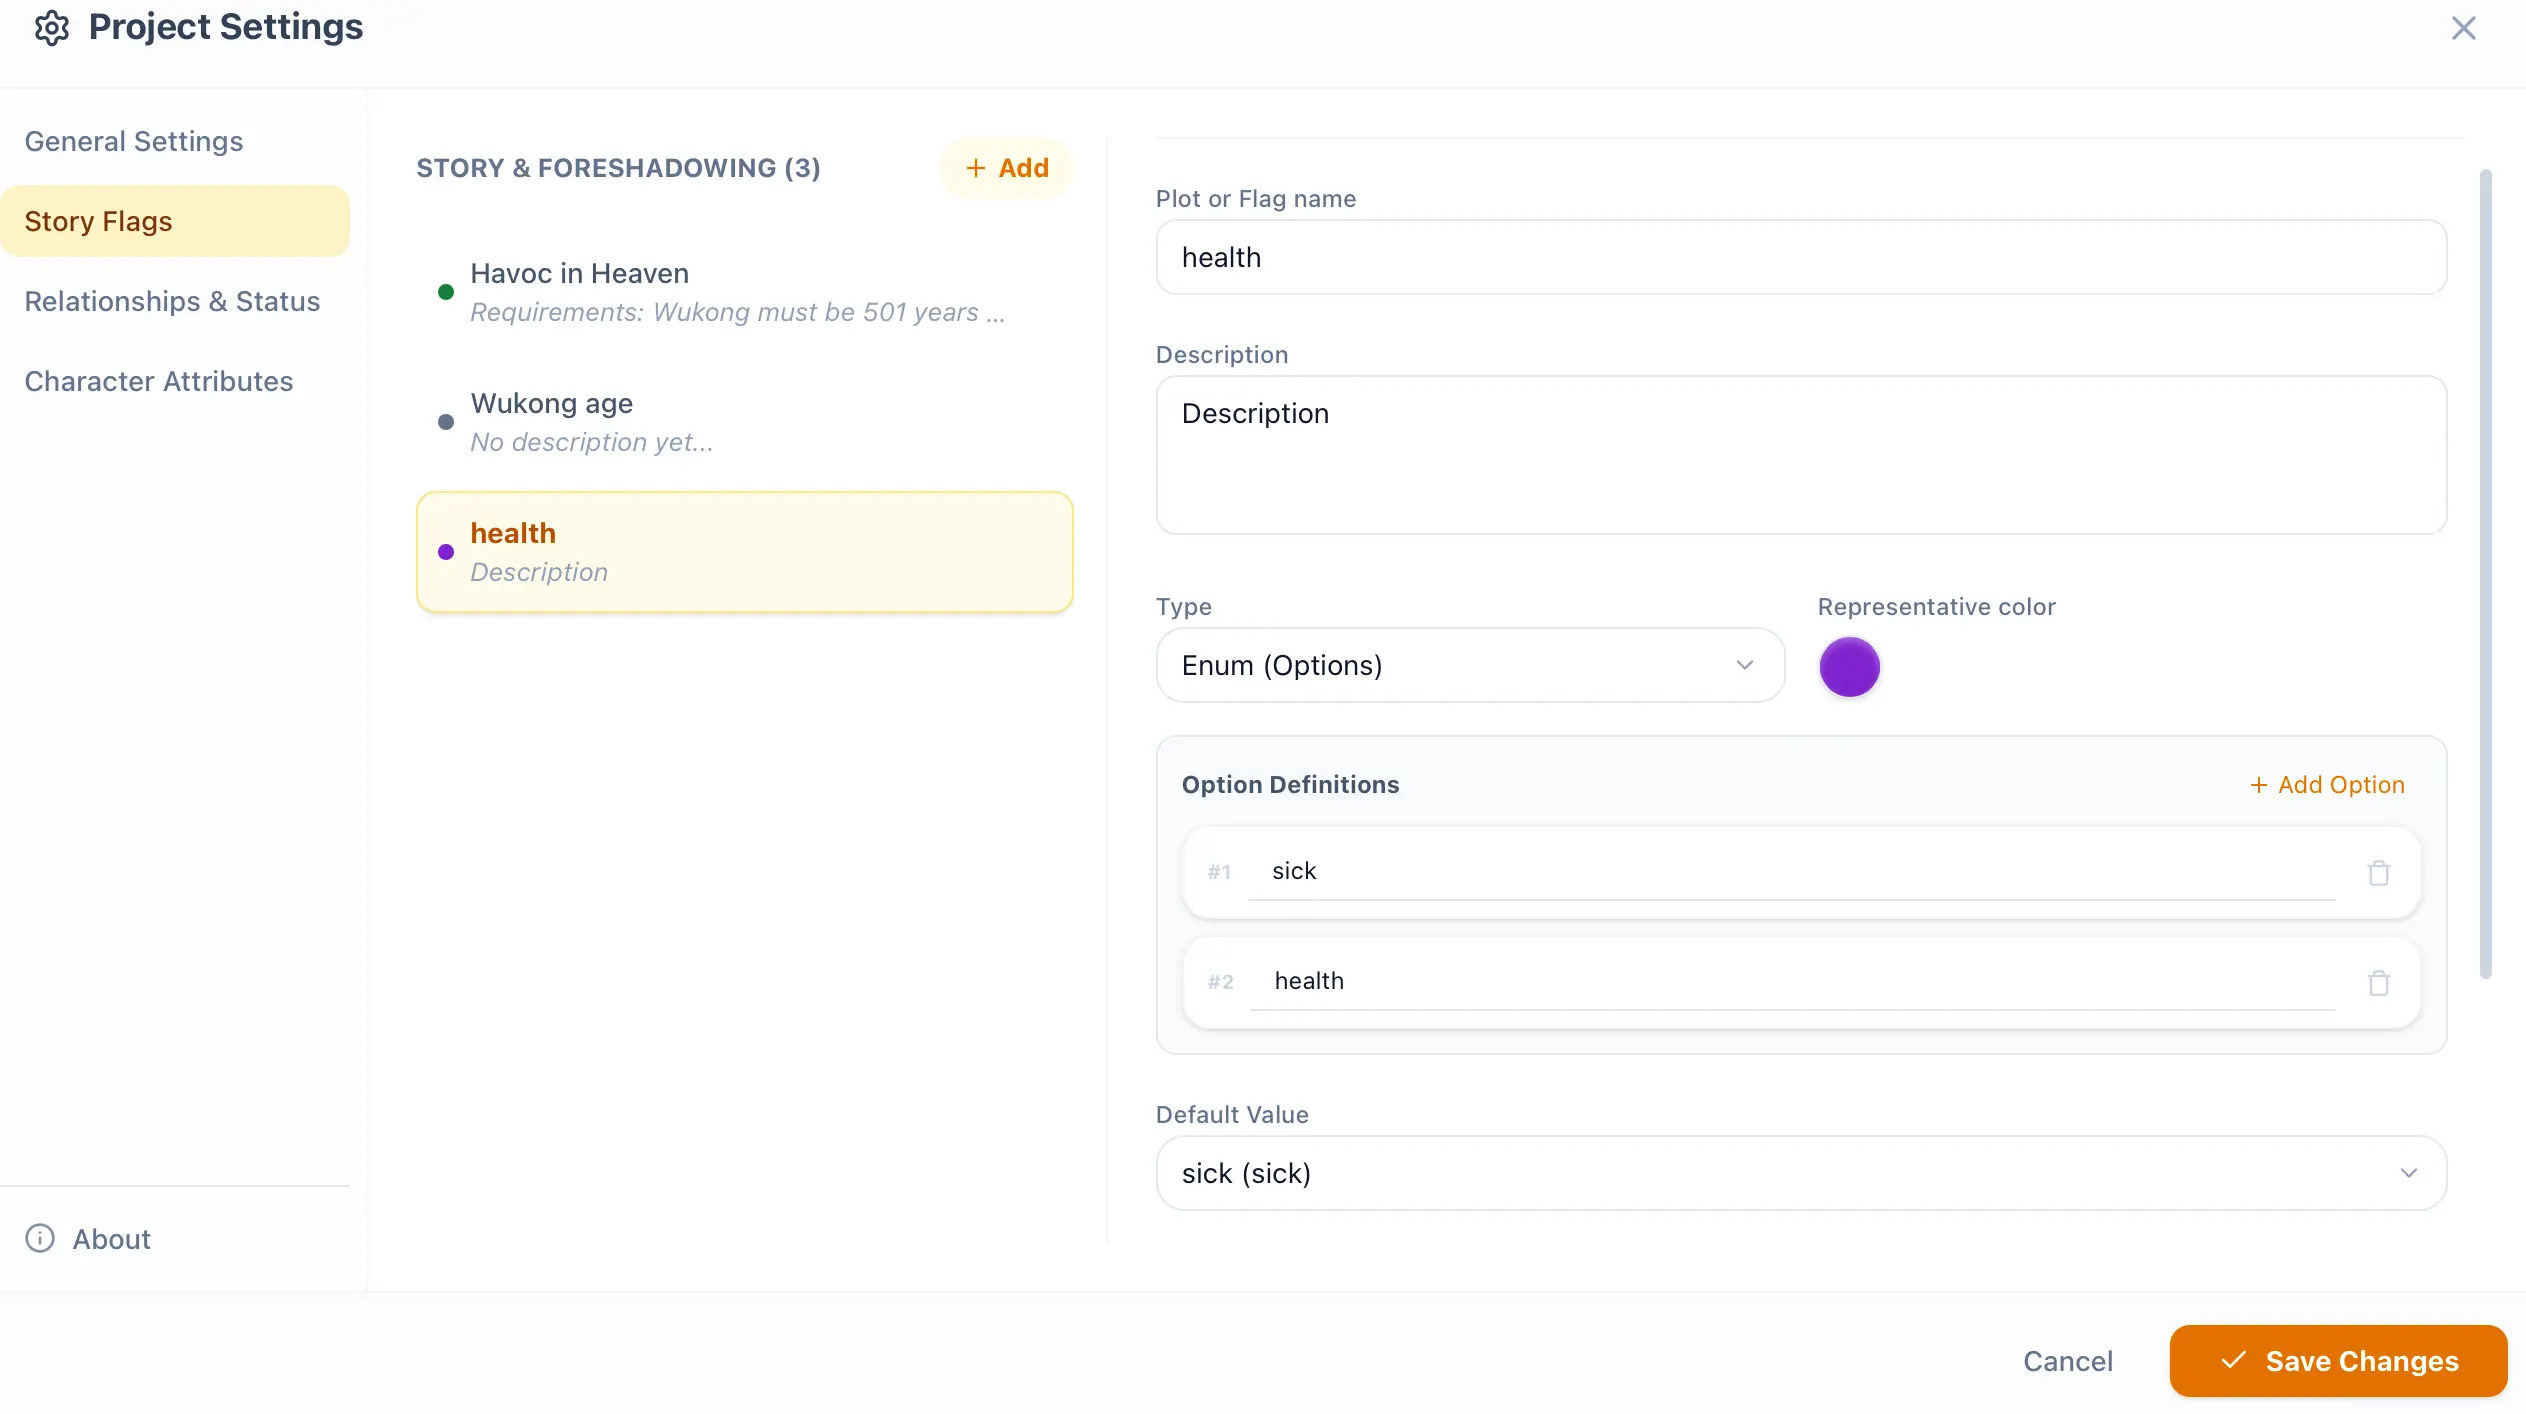
Set Plot Flag 3
Section titled “Set Plot Flag 3”For the third flag, I’ve set an Enum (Enumeration of multiple states) flag. I’ve configured two states: Healthy and Sick. You can certainly add more, but since this is just a tutorial, this will suffice (you can always add more later). I set the initial value to Sick, as shown below:
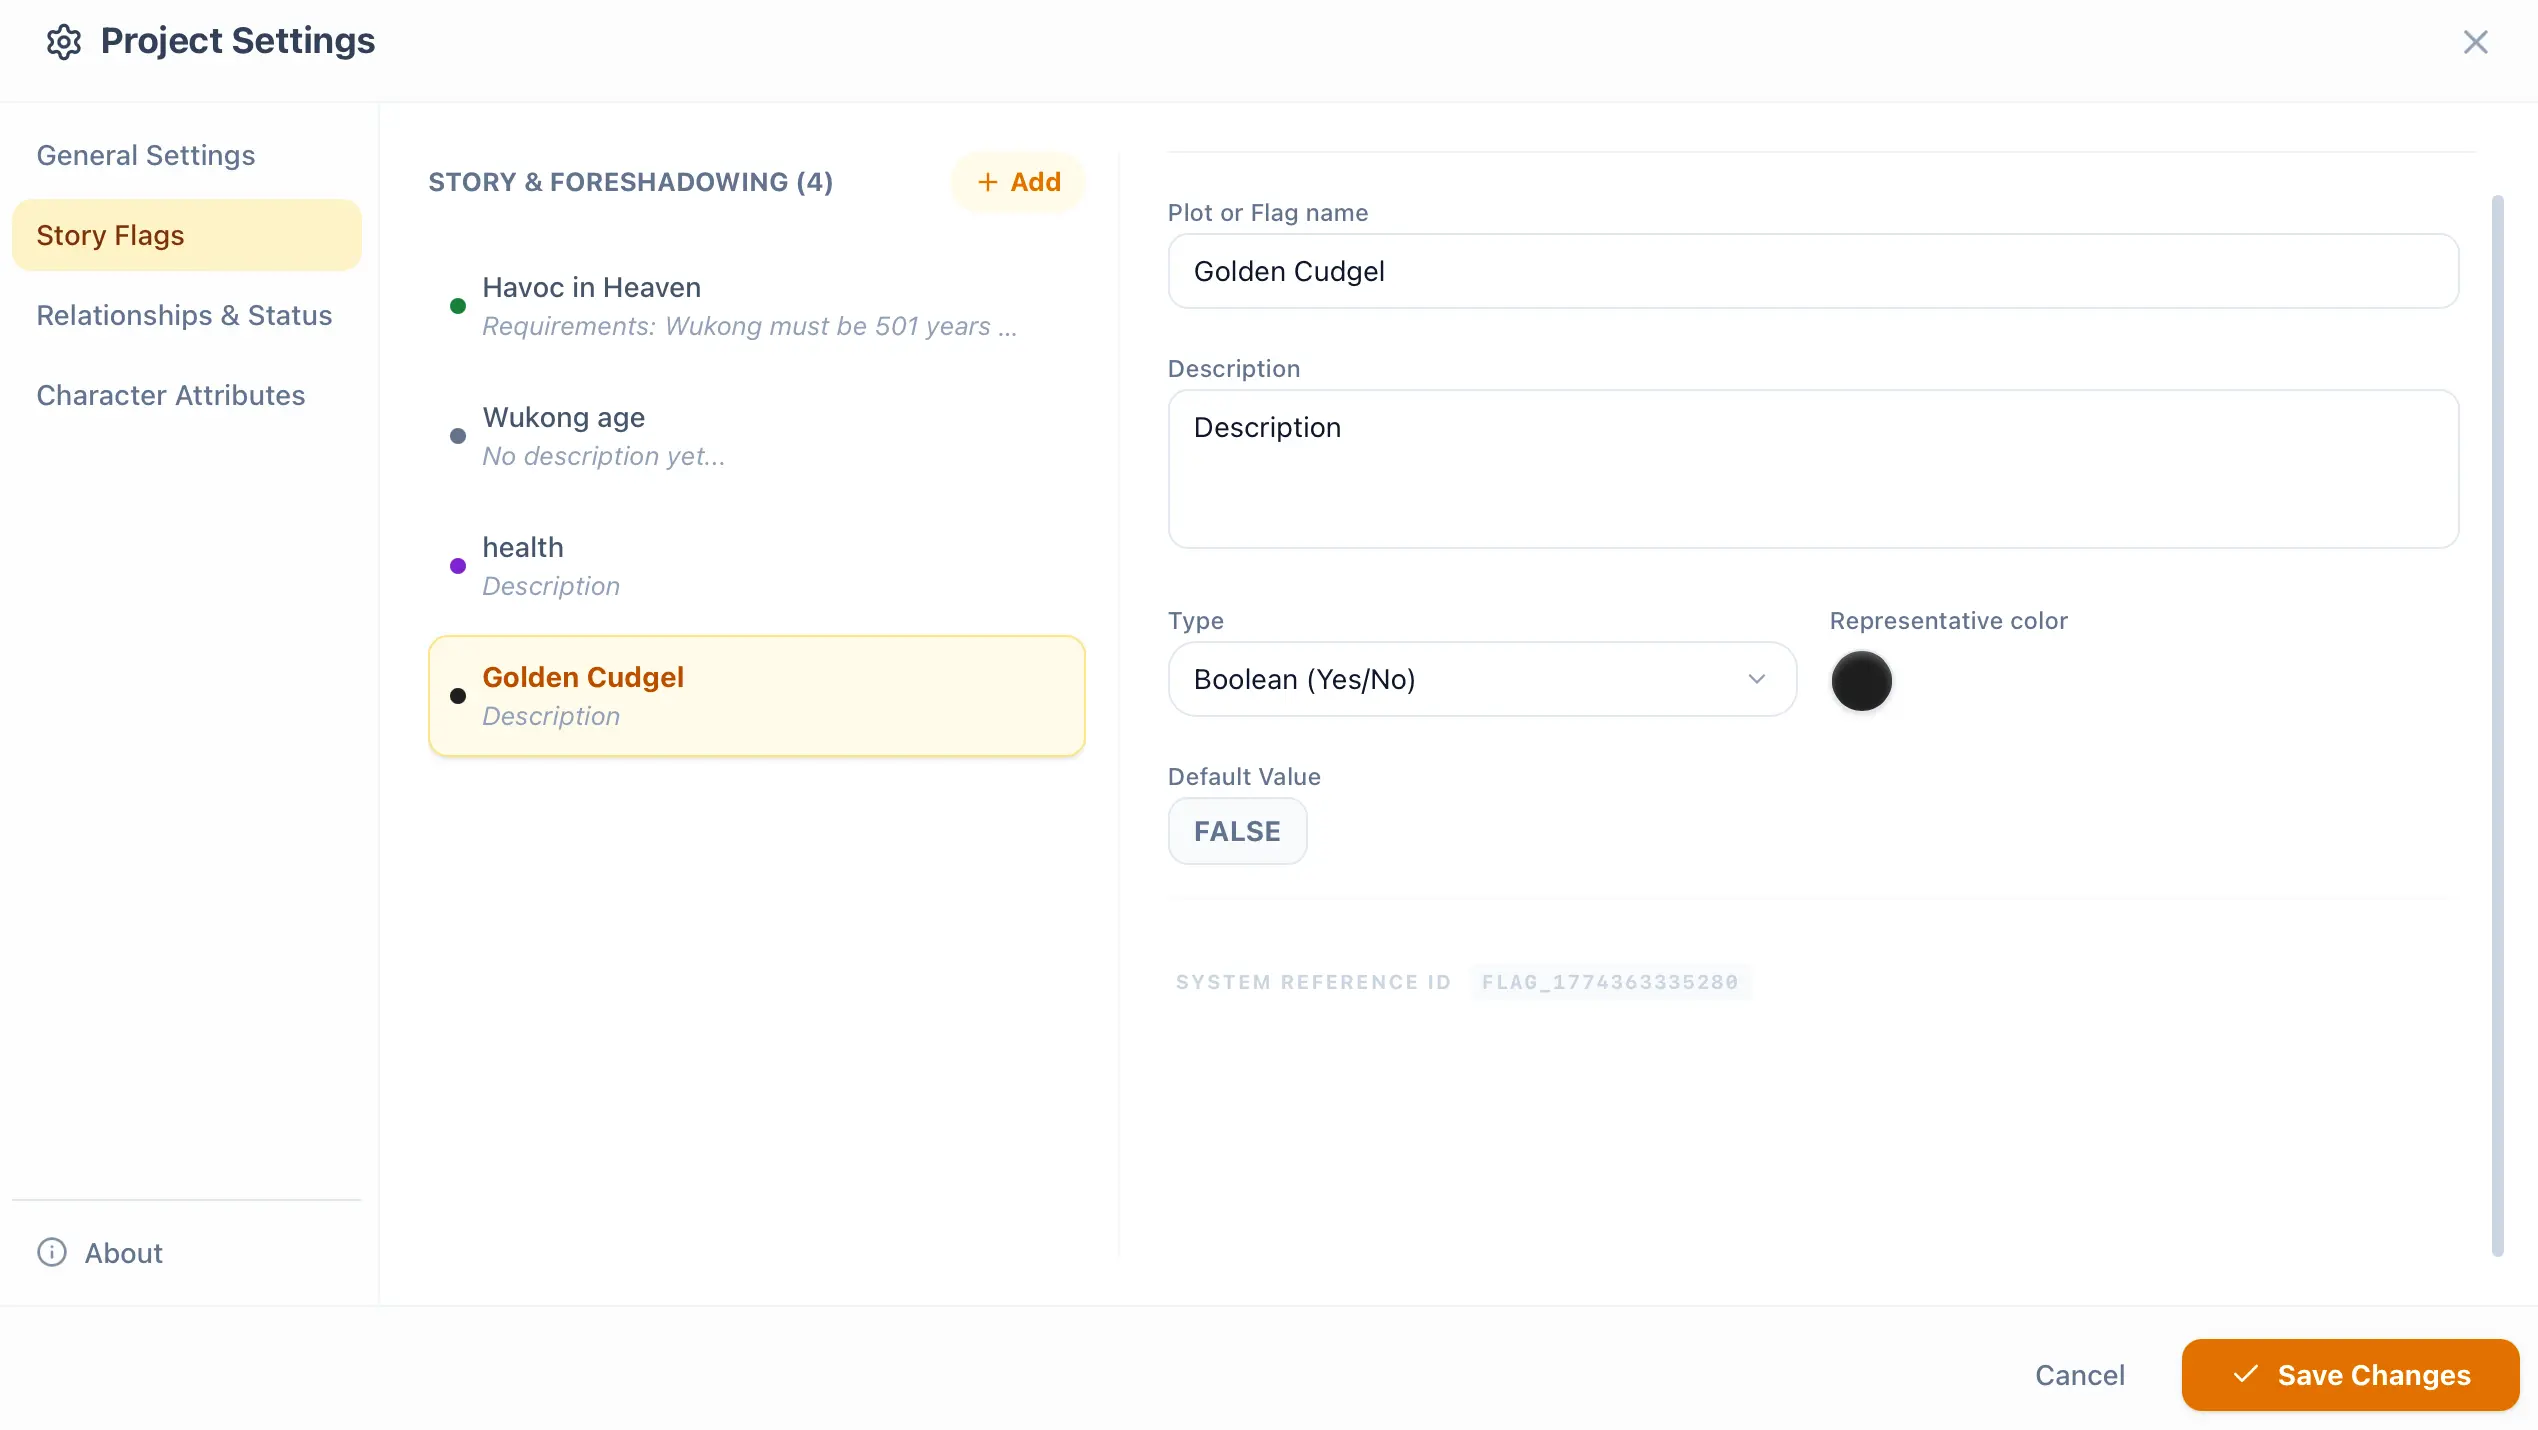
Set Plot Flag 4
Section titled “Set Plot Flag 4”For the fourth flag, I’ve again set a true/false flag to check whether a character possesses a specific item. I set it to false initially, as shown below:
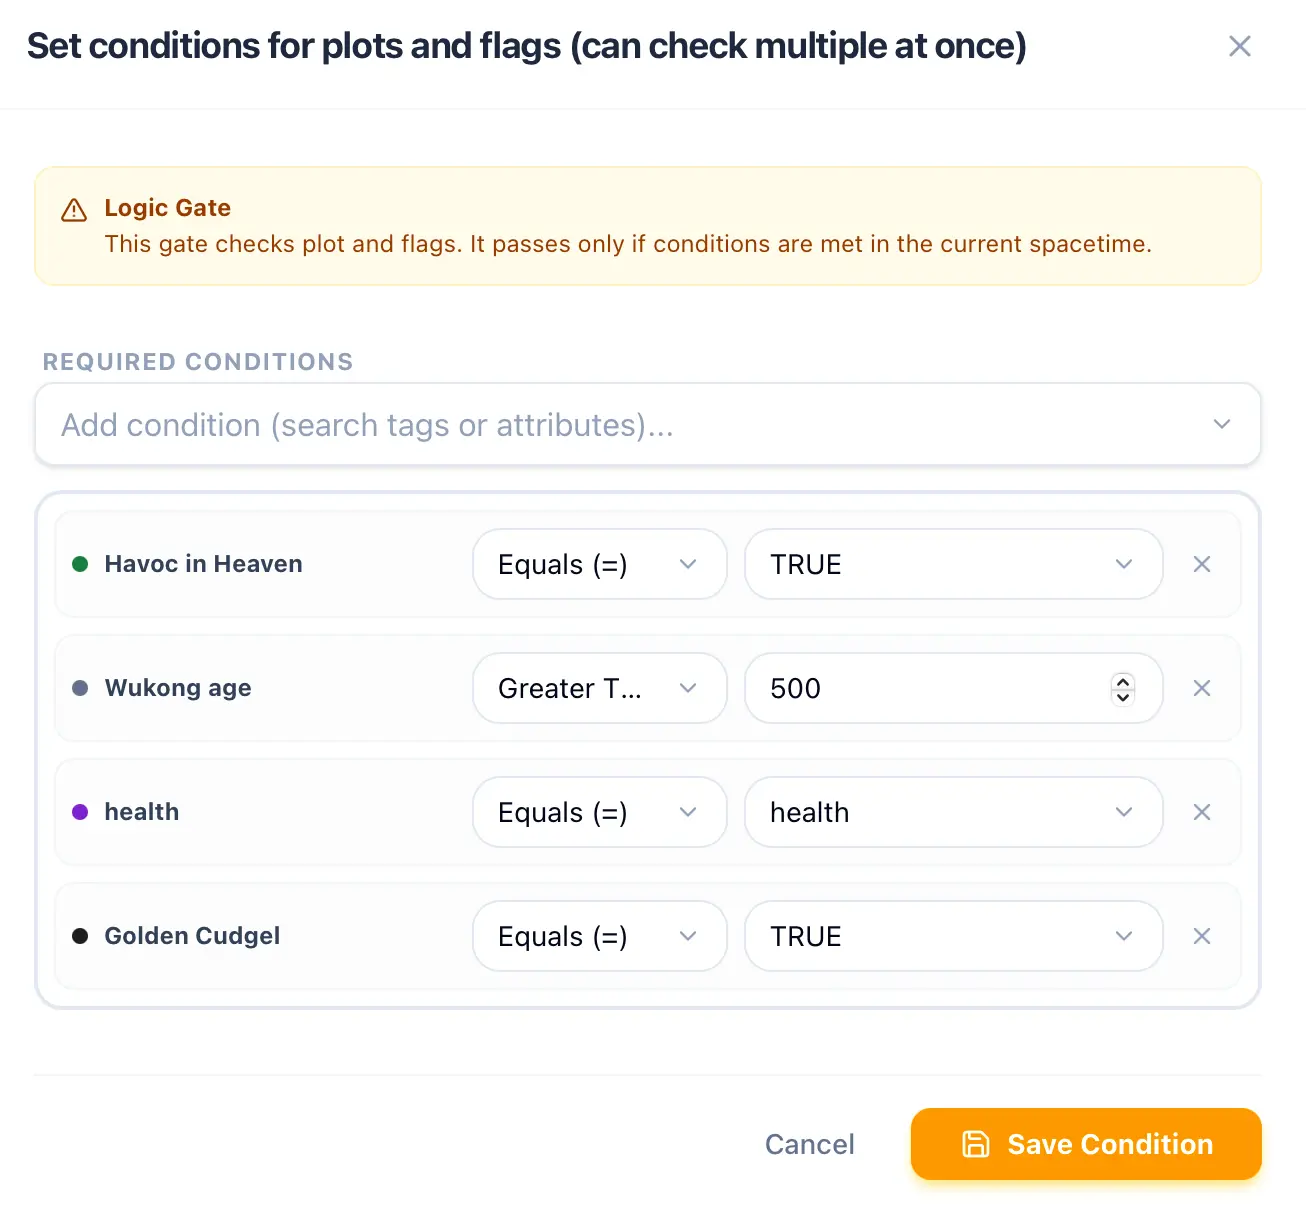
Logic Gates (Req)
Section titled “Logic Gates (Req)”Logic gates are used to verify whether plot flags meet specific conditions, as shown in the series of images below:
1. Enter Command to Plant Foreshadowing
Section titled “1. Enter Command to Plant Foreshadowing”First, type `/flag ` in the editor, or click the + button on the left of the editor block and select Set Foreshadowing.

2. UI for Setting Initial State
Section titled “2. UI for Setting Initial State”After entering the flag command, the UI will appear. We select the first flag and set it to false as well. Because the plot hasn’t reached that point yet, the foreshadowing hasn’t been revealed, as shown below:

Then, you will see the foreshadowing anchor appear in the editor, as shown below:
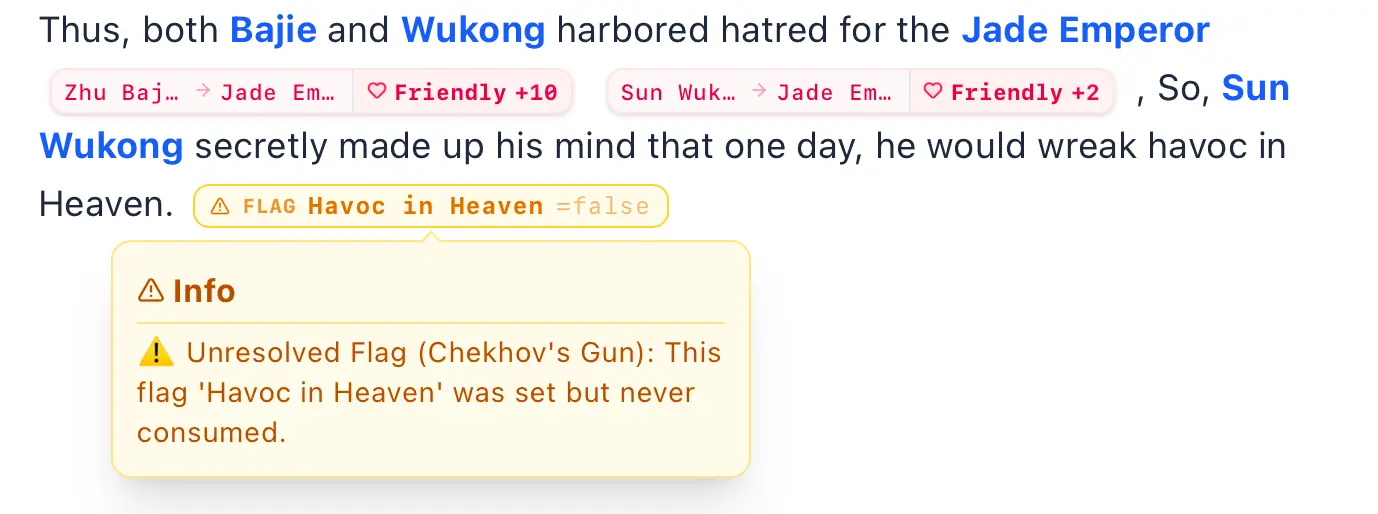
3. Causality Engine Warning Alert
Section titled “3. Causality Engine Warning Alert”The InkWeave button will then issue a warning. This indicates that we’ve planted our first foreshadowing, but since it hasn’t been resolved/revealed yet, InkWeave flags it as a warning. We’ve planted this foreshadowing in Chapter 1, right?
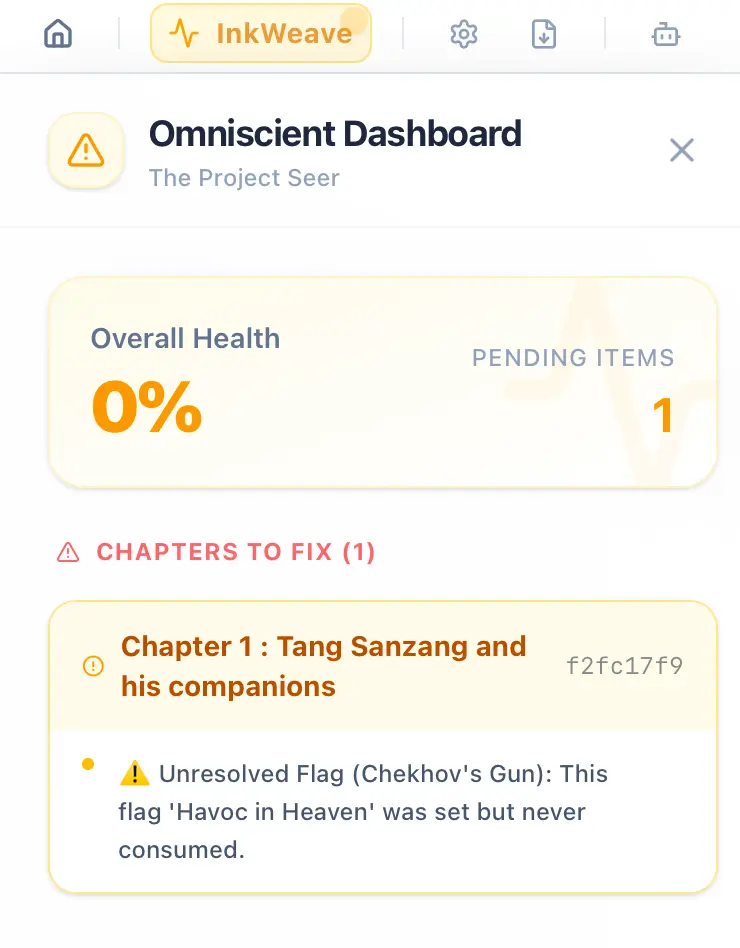
Please place all the flags we just configured consecutively and set their initial values according to the anchors shown in the screenshot. You will then see the InkWeave button issuing warnings and displaying exactly how many unresolved foreshadowings have been planted in total, as shown below:
4. Skip Chapters to Set Logic Gates
Section titled “4. Skip Chapters to Set Logic Gates”Next, we’ll add a new chapter in the file tree on the left side of the editor. Let’s assume it’s Chapter 15. Instead of creating Chapter 2 as we normally would, we intentionally skip ahead to Chapter 15, and then set a logic gate (Req) in Chapter 15.
The benefit of doing this is that if we plan to resolve the foreshadowing in Chapter 15, we can set the logic gate there first. Then, as we write Chapters 2 through 14 sequentially, InkWeave will constantly remind us that there’s an unresolved foreshadowing we need to reveal and resolve, as shown below:
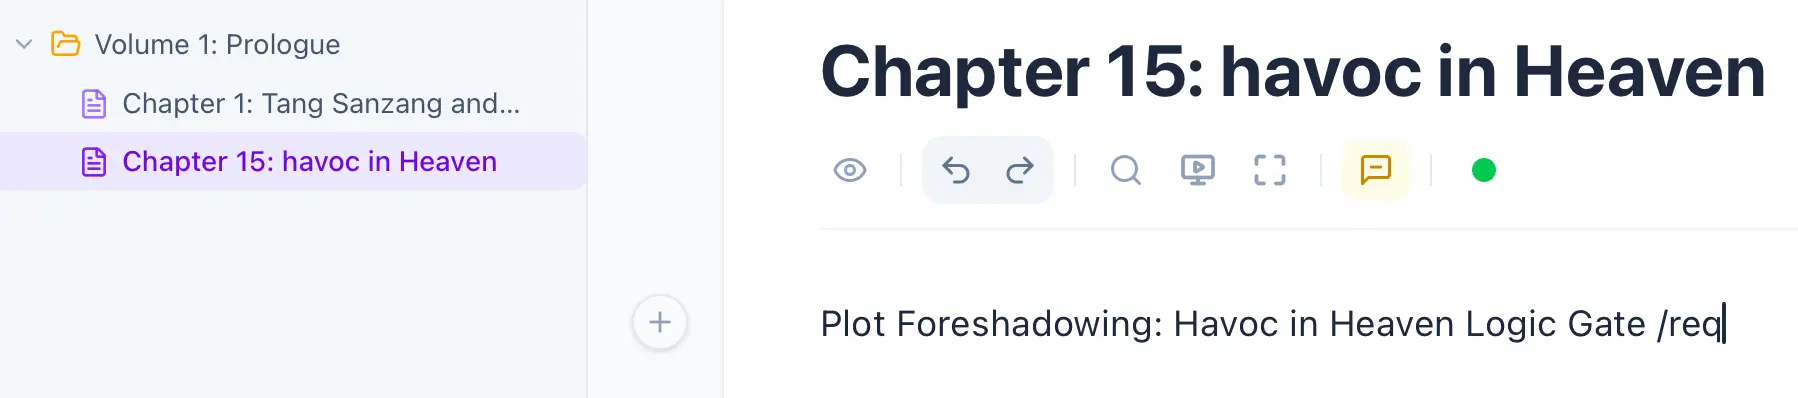
Do you see it? In the image below, the file tree on the left holds Chapter 1 and Chapter 15. The editor block in the middle shows the content of Chapter 15, which is the logic gate (Req) we just configured. You can type `/req ` in the editor, or click the + button on the left of the editor block and select Check Condition.
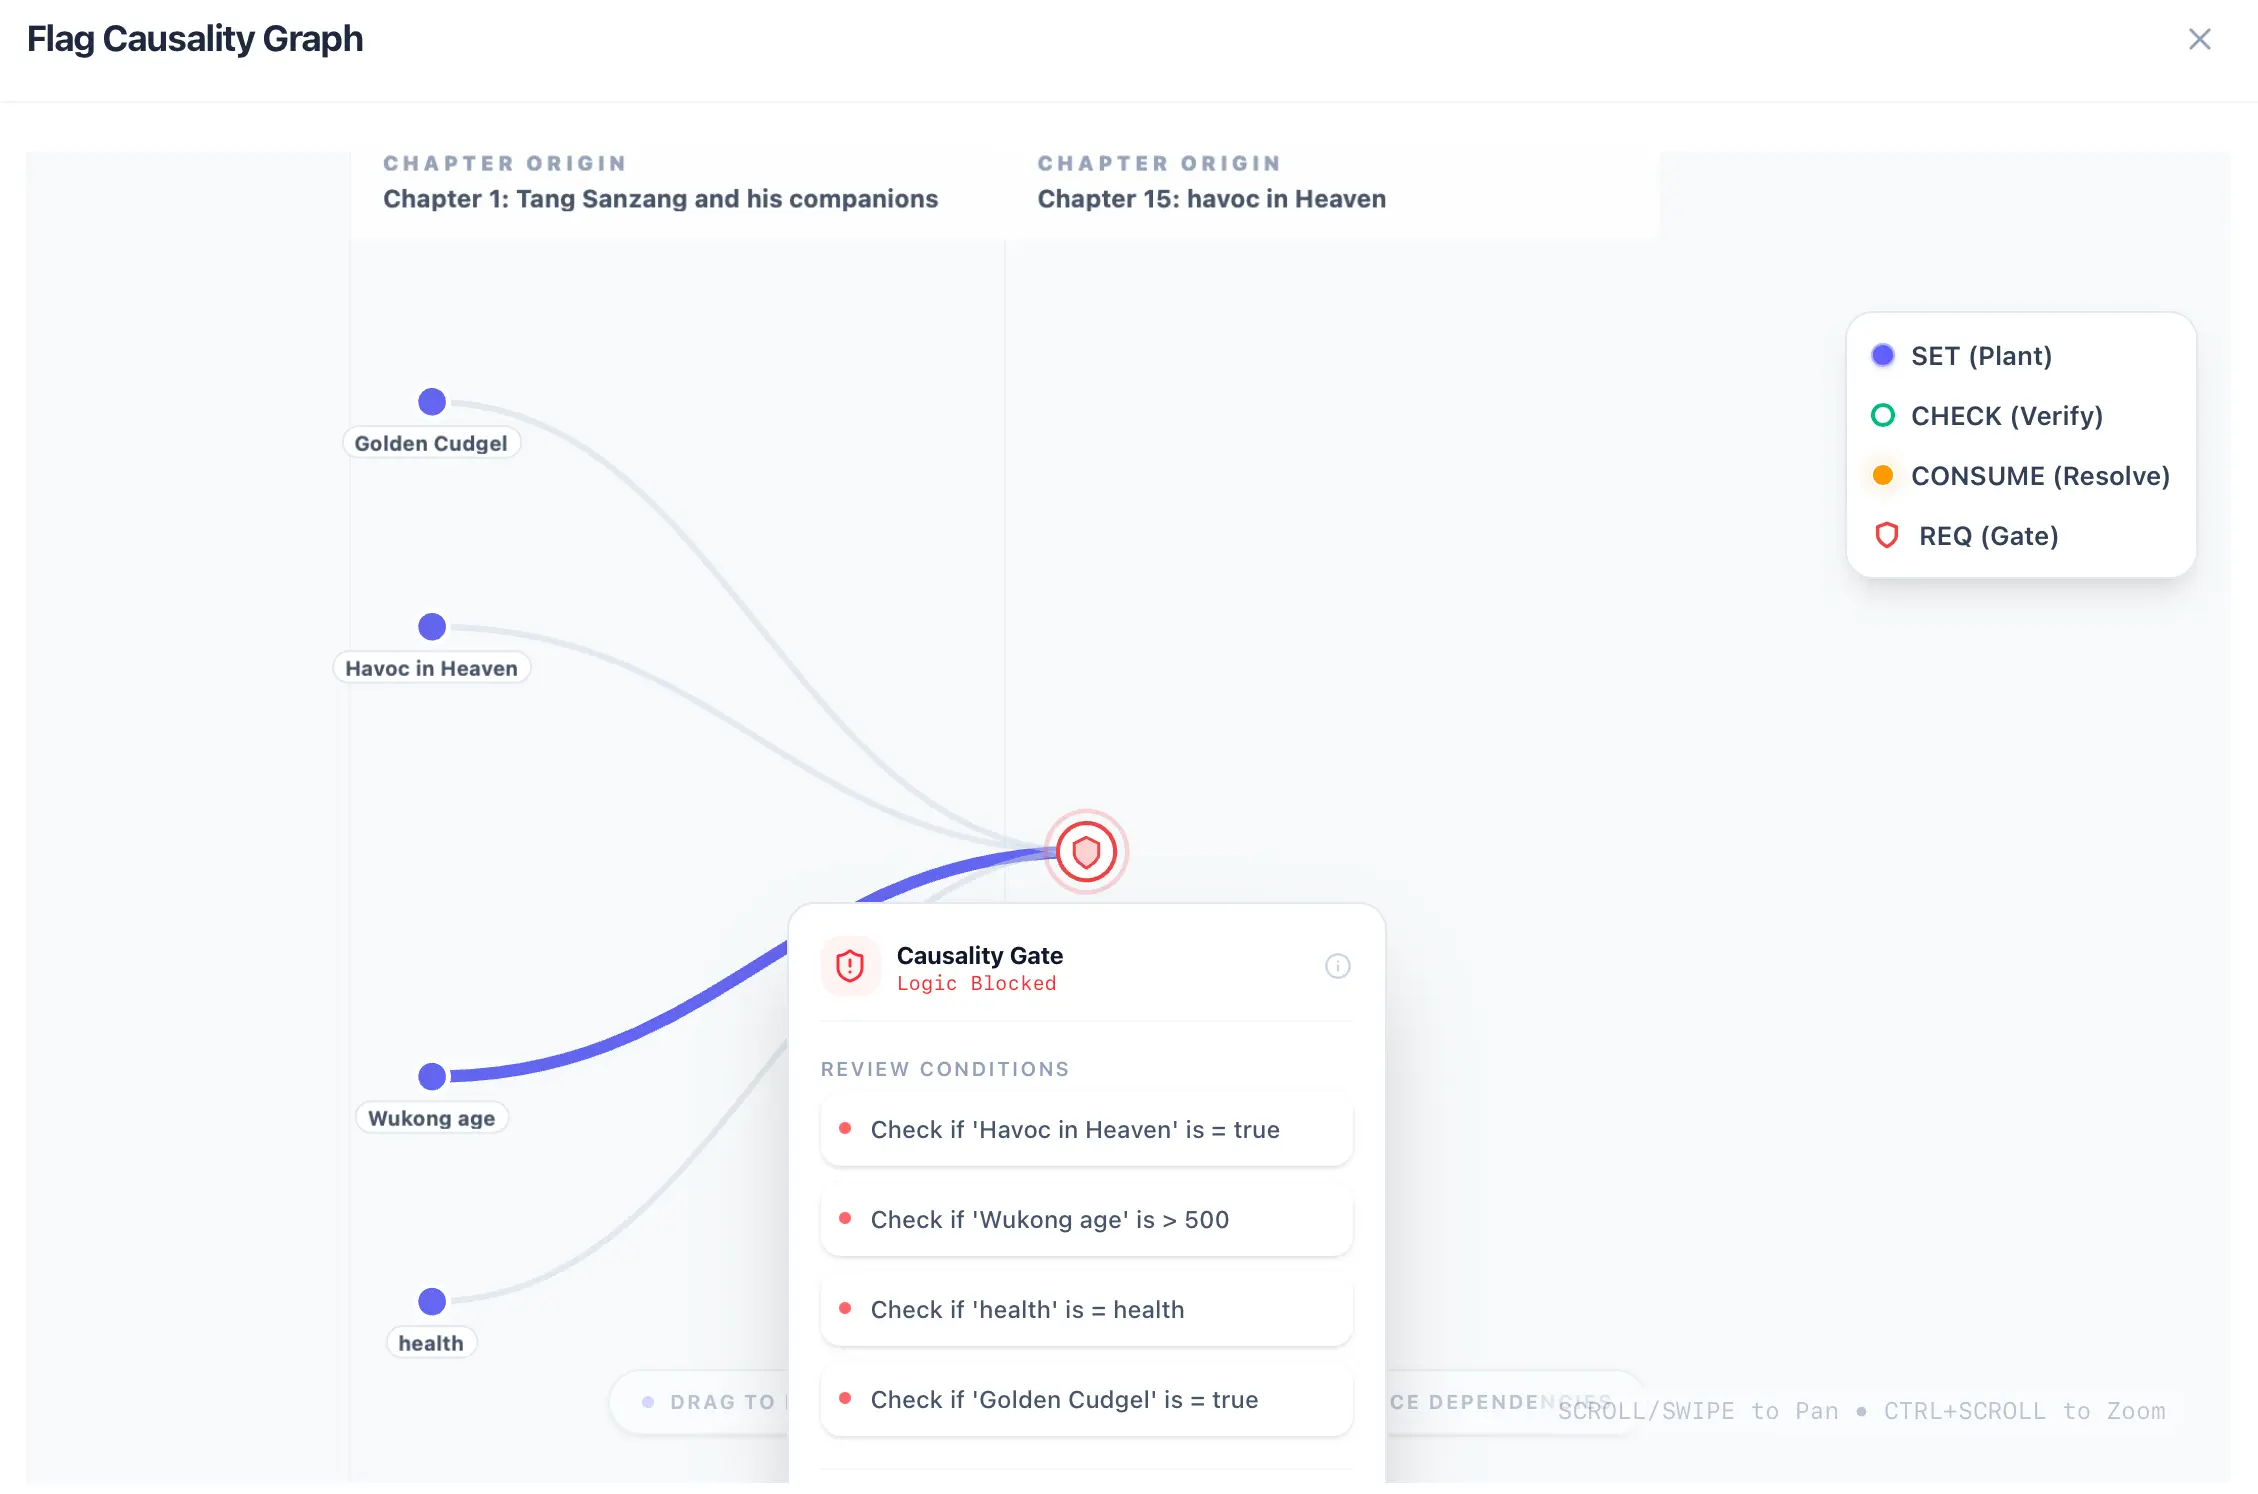
5. Logic Gate Operation and Visualization
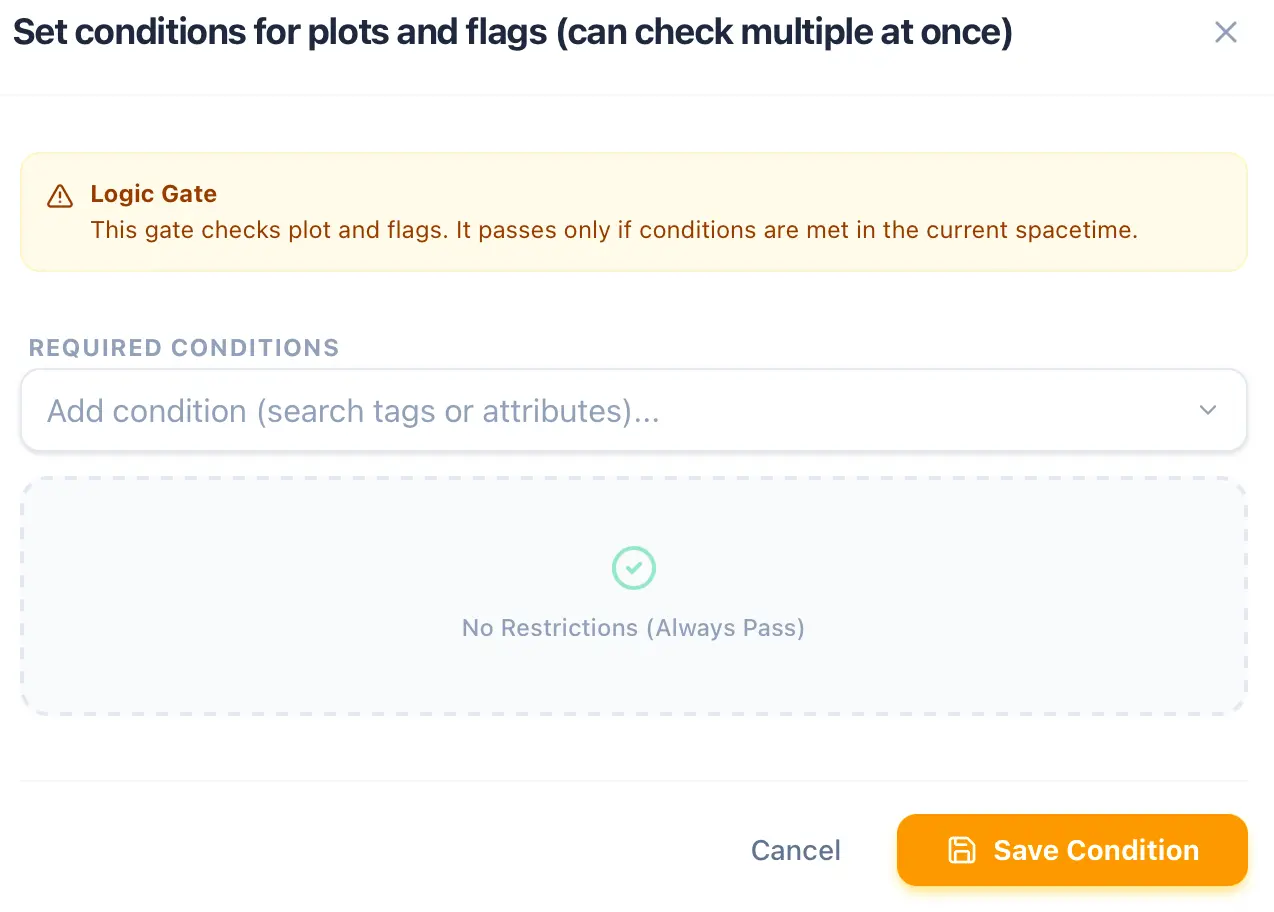
Section titled “5. Logic Gate Operation and Visualization”- Logic Gate UI:
- Configure the Logic Gate:
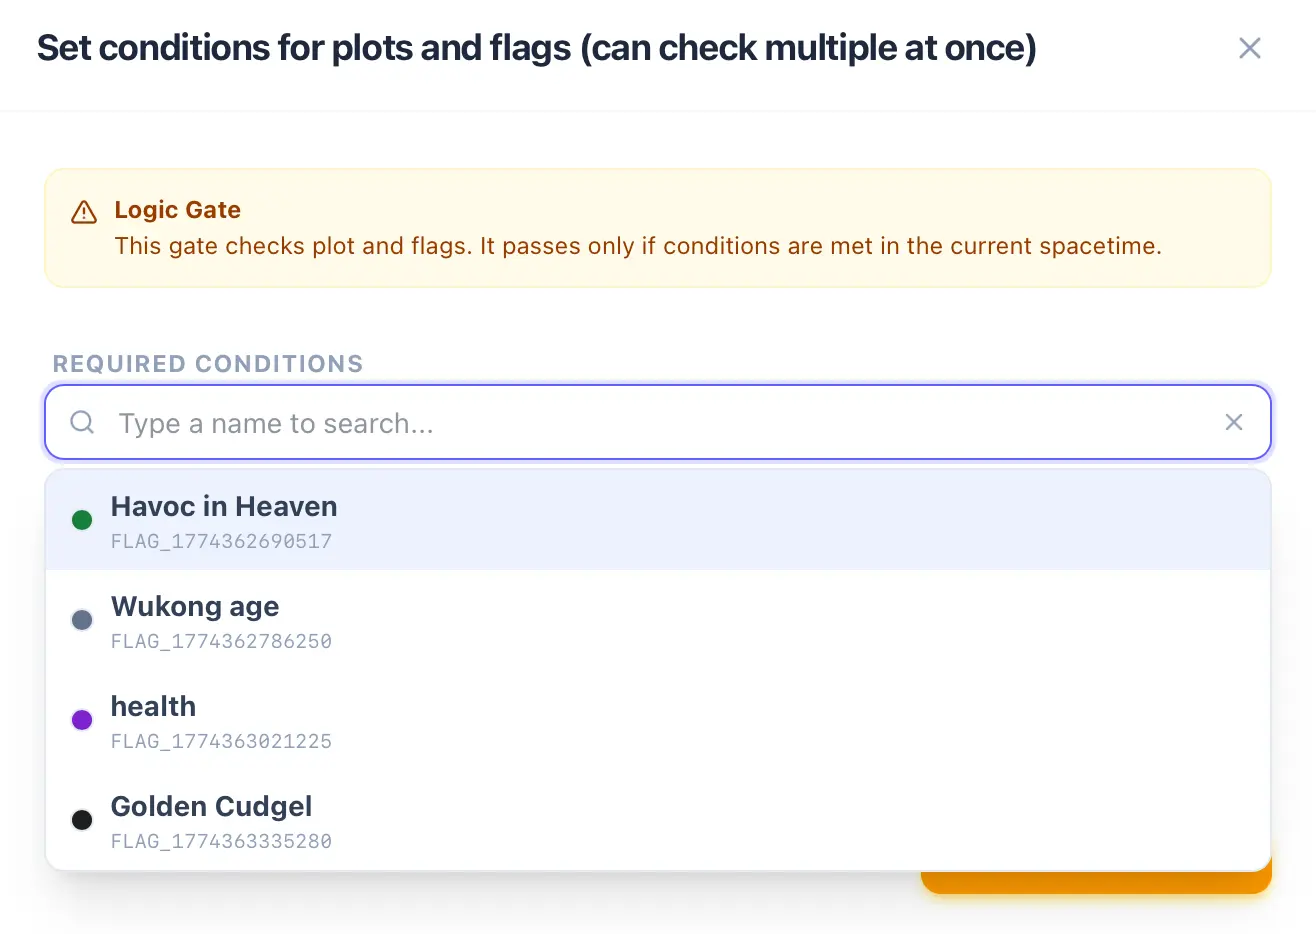
- Logic Gate Details Setup:
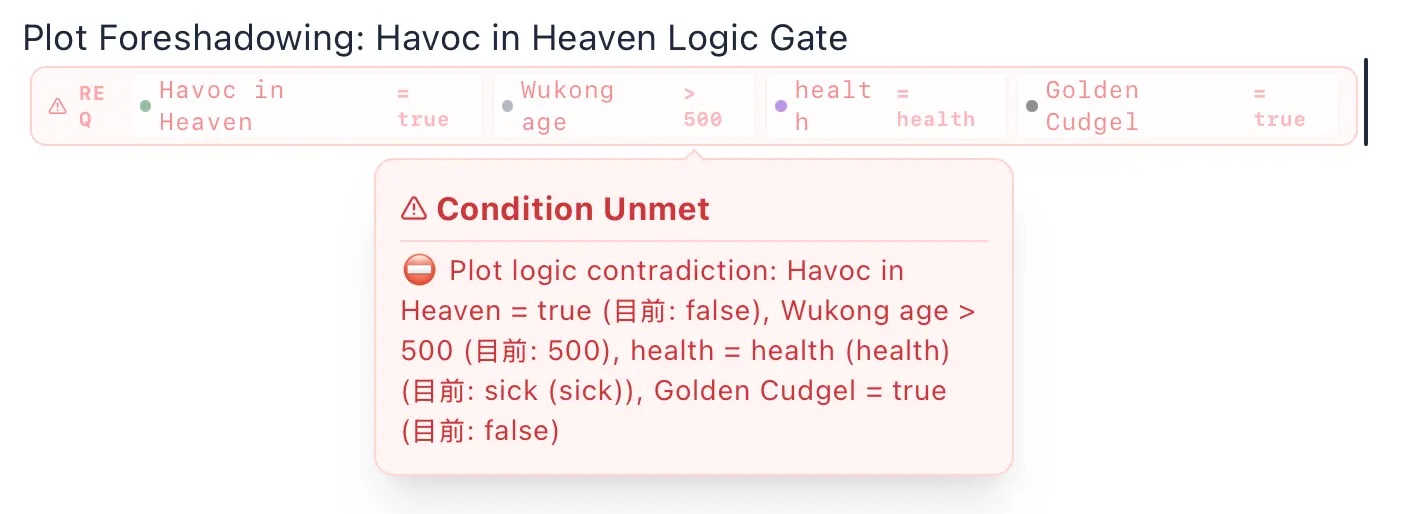
- Logic Gate Anchor Appears with a Warning:
6. Check Foreshadowing Status
Section titled “6. Check Foreshadowing Status”Next, go to the file tree and create Chapter 8, as shown below:

Now, let’s configure a new flag, but this time, instead of selecting ‘set’, we select check:
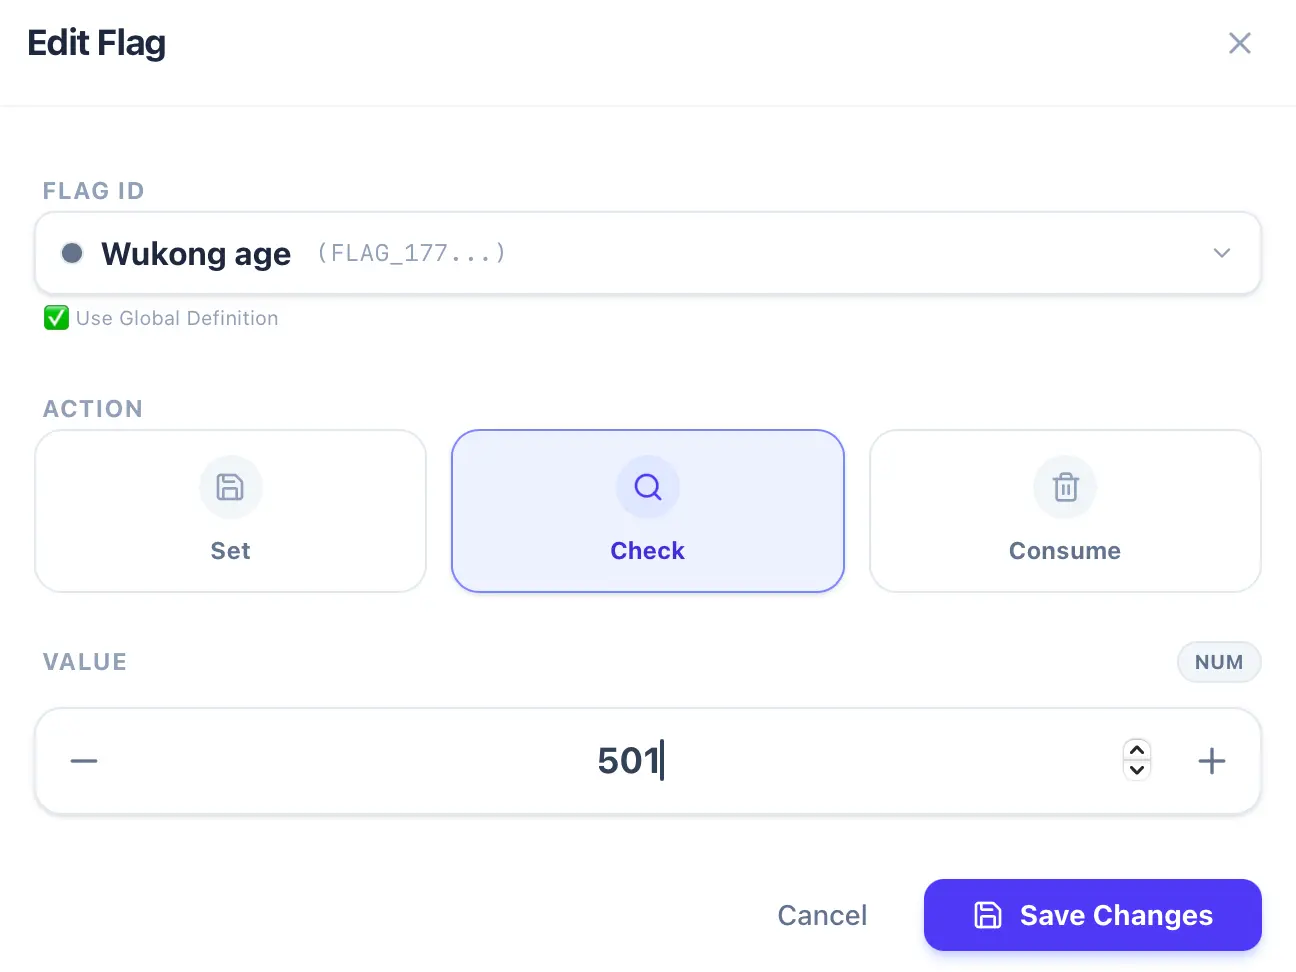
Then, deliberately input a value different from the initial value we previously assigned, so the check anchor can evaluate it. I enter 501, but the initial value was 500. Consequently, the flag’s check anchor will issue a warning telling you that the current value is 500, but the condition you entered is 501, which fails the check. The purpose of this feature is that while writing, you can always check your initial values (in case you forgot them) and instantly recall how you configured them originally. Now, go straight to the Character Inspector and open the Causality Graph. Do you see the check anchor? This anchor is purely for your own reference to perform a check; you can either keep it or delete it right after checking:

7. Fulfill Conditions and Consume Foreshadowing
Section titled “7. Fulfill Conditions and Consume Foreshadowing”Let’s assume we fulfill all the flags in Chapter 8. Remember our first flag? It was a foreshadowing name with an initial value of “false”. Now, let’s set it to “true” (Yes) to fulfill it, because our logic gate (req) expects it to be “true”, indicating that one of the logic gate’s conditions has been met. Once all the conditions of a logic gate are met, you can start writing the foreshadowed plot, and after the plot concludes, you can consume (resolve) the foreshadowing.
Therefore, do you remember that there was a consume option in the flag UI that we haven’t touched yet? After the chapter containing the req logic gate, you can type `/flag `, choose the foreshadowing condition, select “consume”, and click save. This officially wraps up the entire foreshadowing arc! Not only can we visualize the direction of the plot via the causality graph, but we can also review all our planted foreshadowings in the InkWeave menu button. Once you consume a foreshadowing, the warning in the InkWeave button will vanish.
In Chapter 8, near the check anchor text, we type `/flag ` and then:
- Set the first flag to true (Yes).
- For the second one (age), we set the age to 501 (because the req needs it to be 501).
- For the third one (health), we set it to Healthy.
- For the fourth one (checking if the character has the item), we set it to true.
As shown below:
Now, please click on the Causality Graph at the bottom of the Character Inspector. You will see that the req node has turned green! InkWeave’s req warning has also disappeared, though the foreshadowing hasn’t been technically consumed yet.
The Causality Engine achieves omnidirectional tracking and surveillance of People, Events, Time, Places, and Objects. You don’t need to take notes or write out outlines at all—the story and the causality graph serve as your outline. Every item you’ve ever traded, every relationship you’ve ever built, the entirety of your history is meticulously logged. Simply open the history log to review every single entry, and you can even click on a specific log to instantly jump right to its corresponding anchor!
Due to the Causality Engine, you’ll see a character’s relationship history dynamically change depending on the chapter. Suppose you establish a relationship with Character A in Chapter 1, Character B in Chapter 2, and Character C in Chapter 3. When you view the relationship history in Chapter 1, the Causality Engine is smart enough to only display Character A. In Chapter 2, it displays A and B (and absolutely not C). The Causality Engine precisely calculates relationships relative to your cursor’s position before and after a relationship anchor. If you place your cursor right before the anchor where you meet Character B in Chapter 2, and then click to view the relationship history, it will reflect that you still don’t know B, despite being in Chapter 2. The Causality Engine manages these boundaries with absolute strictness.
What InkWeave cares about is that even if you simply move your cursor by a single space, the Causality Engine is silently calculating in the background. Although you might not actively notice it, observing the Inspector will prove that the Causality Engine is evaluating and rendering the environment in real-time. Feel free to play around with it as much as you’d like, and give the flag consume operation a try yourself!
Trading Items: Character to Character, Character to Location
Section titled “Trading Items: Character to Character, Character to Location”Type `/trade ` in the editor or click the + button on the left of the editor block and select Transfer Item. Item transfer can be used for locations to transfer items to characters, characters to transfer items to locations, and characters to transfer items to other characters. This is quite simple; feel free to try it out yourself!
The purpose is that a character might leave an item at a location for another character to pick up, or a character might find an item at a location and take it, or characters can trade items directly. Just like in real life, both characters and locations are containers, but characters are the only containers that can move while also containing things.
Developers don’t like taking notes, but we really need to keep records, right? InkWeave focuses on one thing: if we must pause, let’s make that pause meaningful, rather than spending time on notes, settings, and spreadsheets. You no longer need spreadsheets or notes. Once you set an anchor, the note is formed, and the AVG Collision System helps you set those anchors. You can even just click that game-like AVG event button—InkWeave simplifies basic settings as much as possible. Creating characters, items, and locations is all done by simply highlighting text and choosing the entity type. To create all the anchors, just take a glance at the AVG Collision System; if a suitable event appears, just click it. It’s all very natural.
Finally, let’s introduce the Live Streaming System and AI
Section titled “Finally, let’s introduce the Live Streaming System and AI”Phew! We’ve finally reached the end, as shown in the image below:
Click that TV-like button, and you can start live streaming!

The live stream window looks like this (it will be blank at first because you haven’t triggered any AVG events yet; once you trigger an AVG event, you will…):
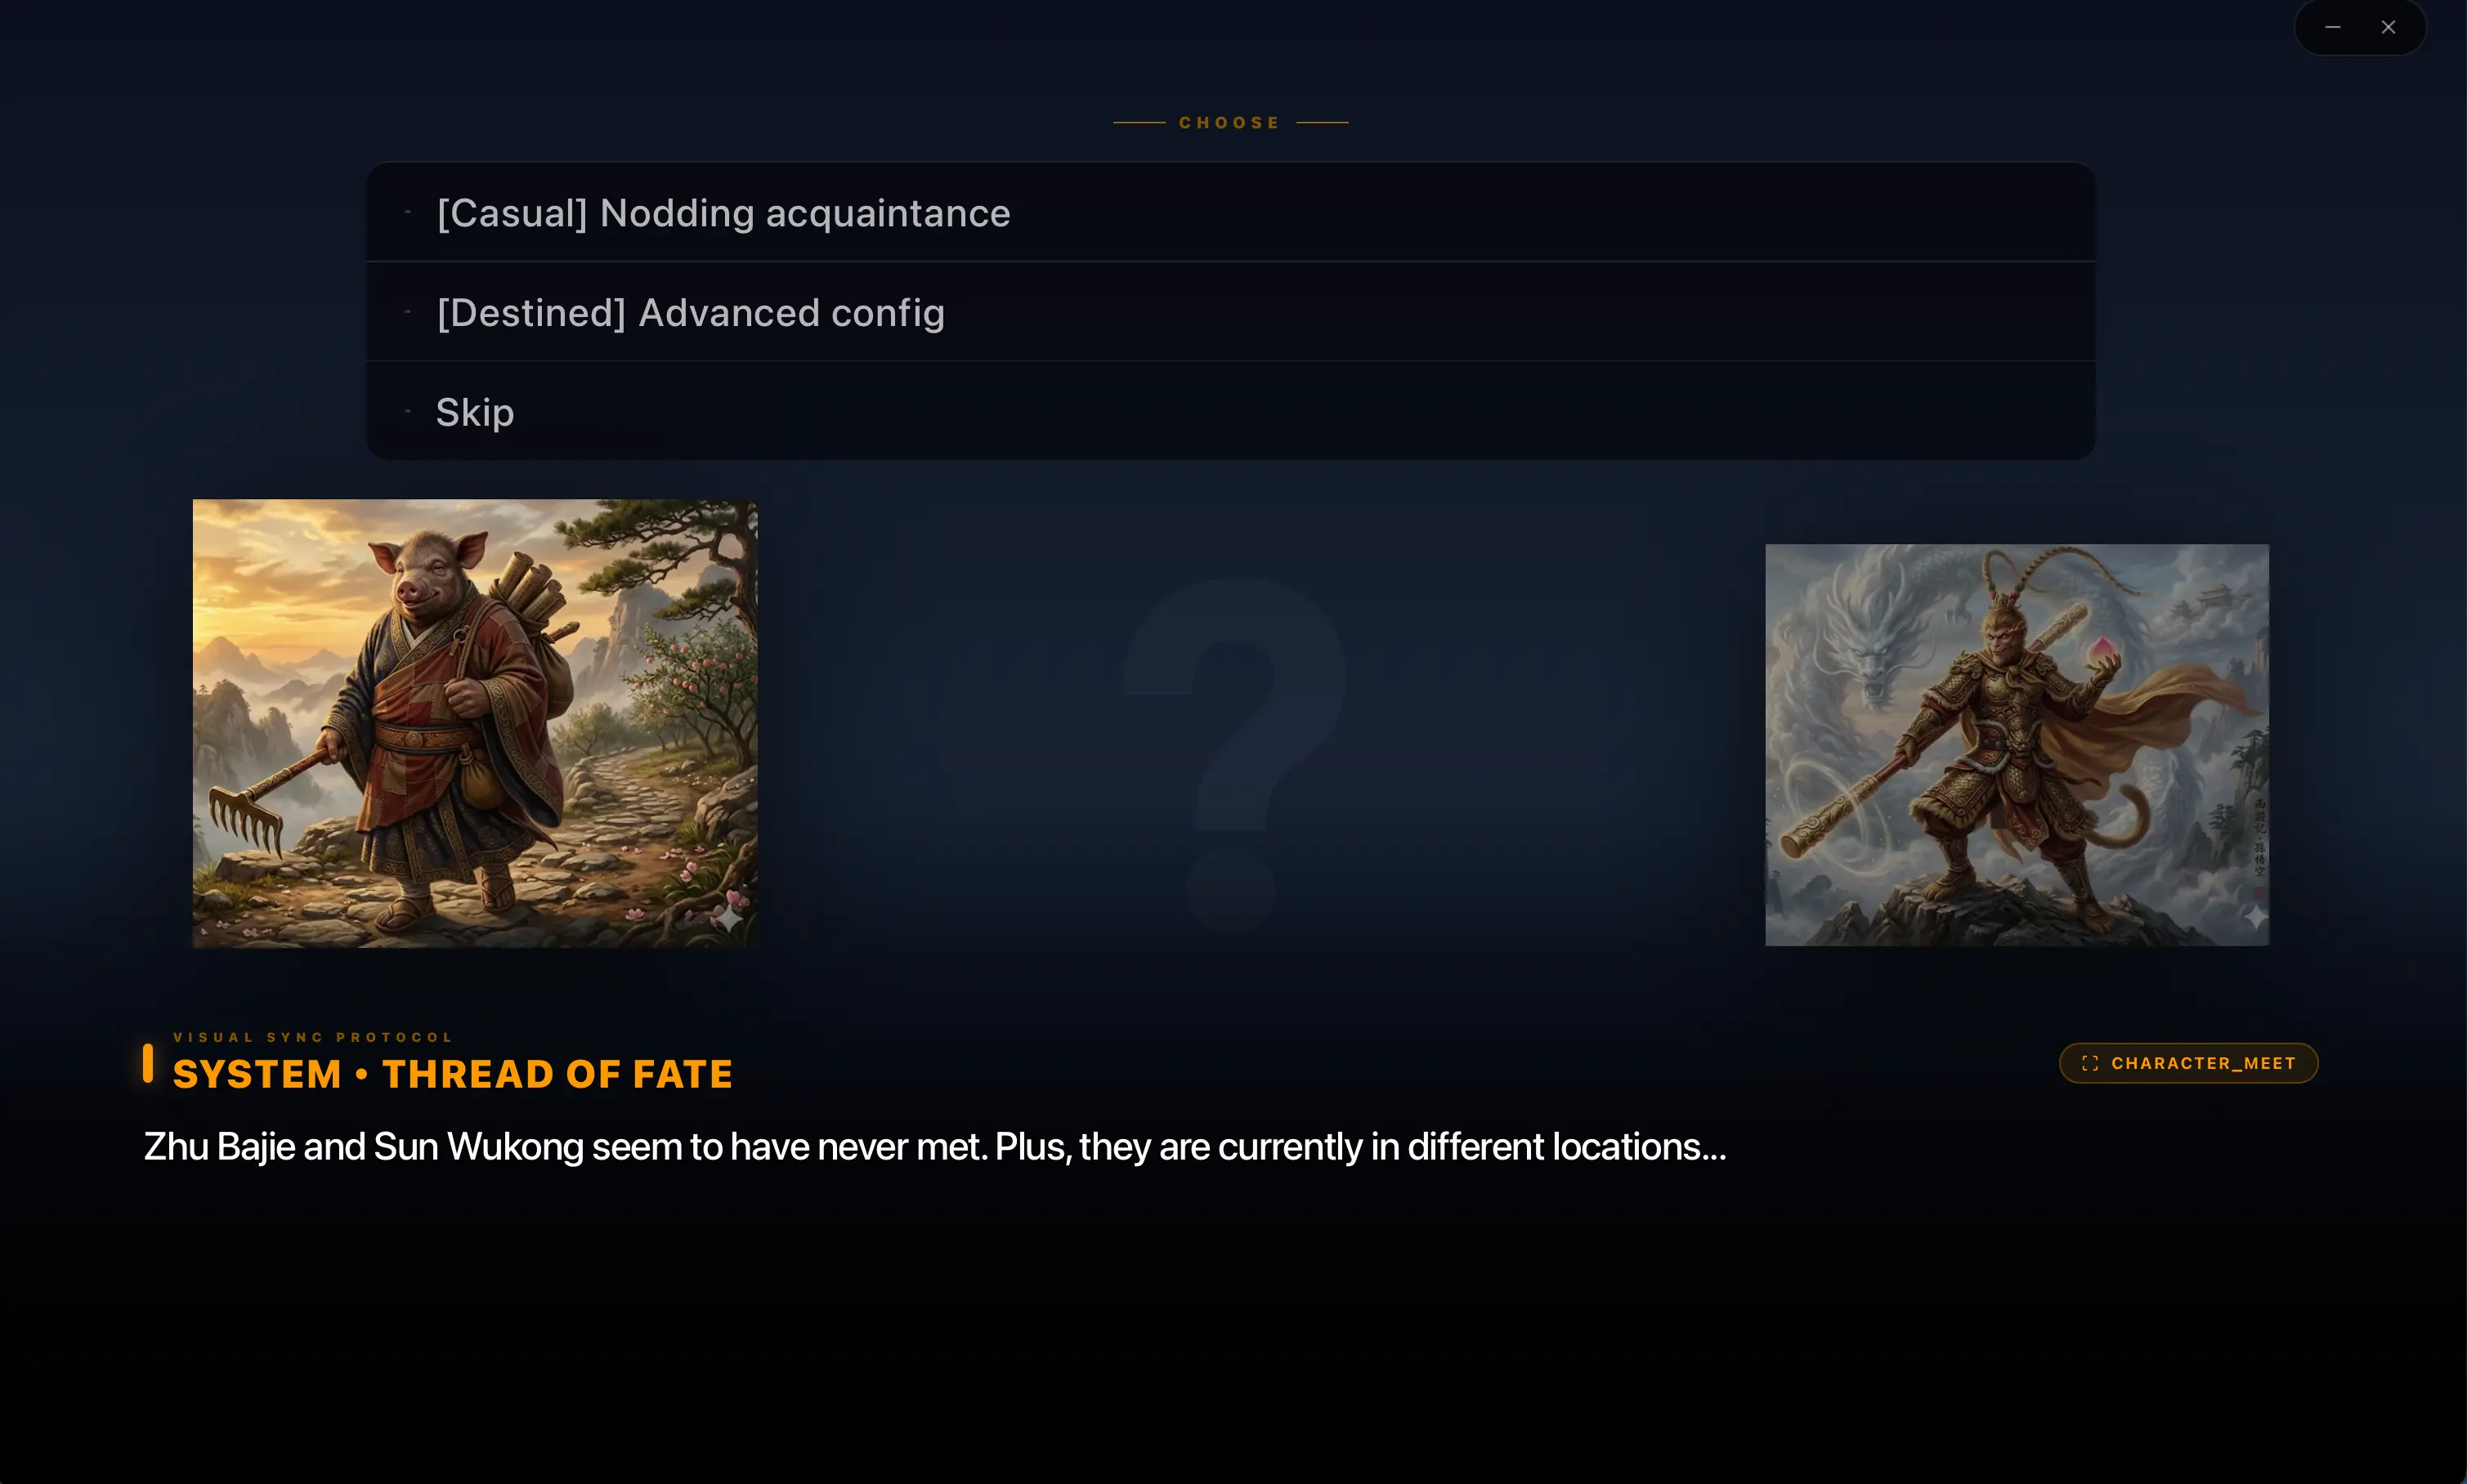
Is it the same as your AVG events? But even more beautiful, right? The live stream window will continuously change according to your AVG events. In the future, as a novelist, you can live stream without spoiling the plot! Viewers might curiously ask, “What exactly is your character doing right now?” Interaction via the live stream screen can help attract viewers to follow your work.
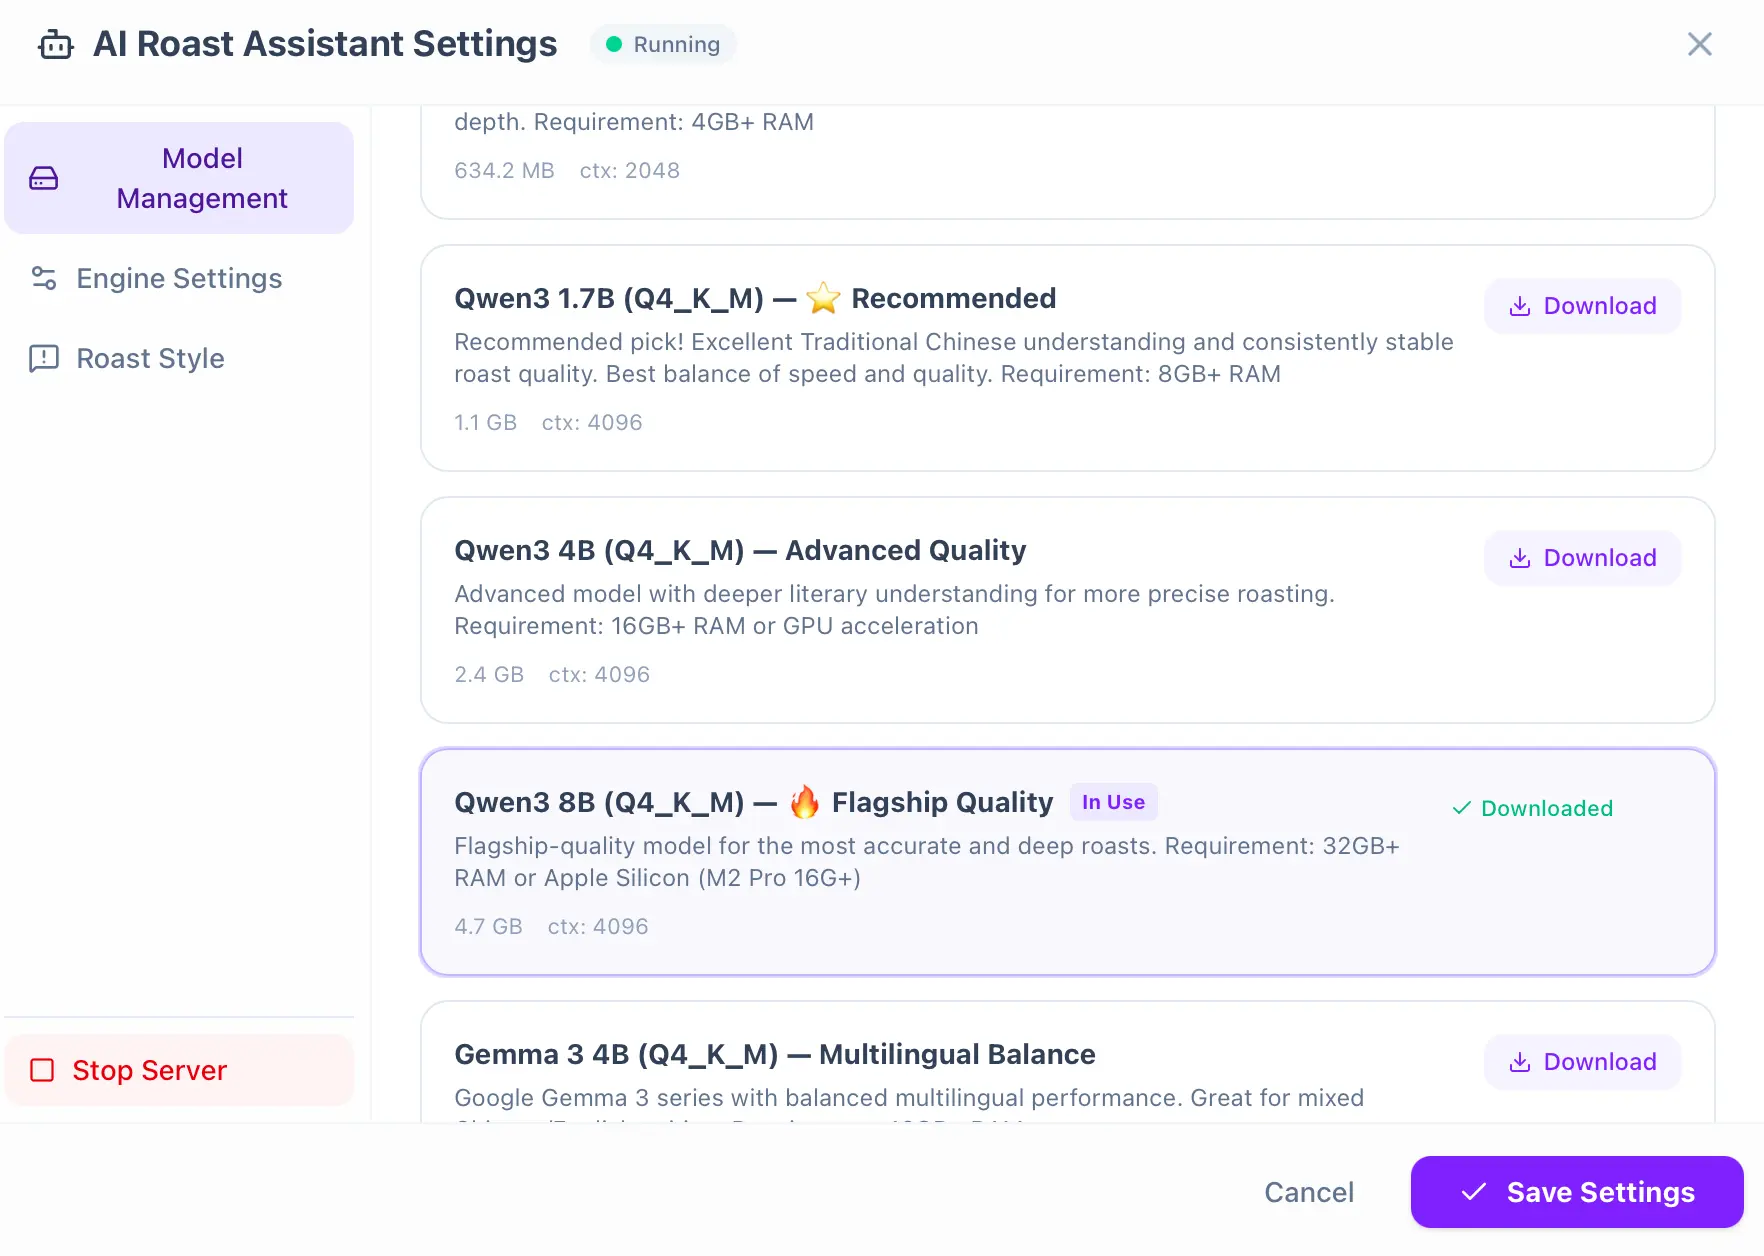
Not good with words? No problem, let AI help you
Section titled “Not good with words? No problem, let AI help you”As shown below, click that robot-like button:

Choose a suitable AI model. For Mac users, it’s recommended to choose a model with 8B parameters or higher, and it’s best if your RAM is at least 32G. My Mac is an M2 Pro with 16G, and choosing its 8B model is a bit slow (it takes about 20 seconds for the AI to start generating text), so you should choose a model with smaller parameters. For Windows users (although the Windows version is still in testing), if you don’t have a dedicated graphics card, please use a model with parameters as small as possible. On Mac, if the memory is large enough, its Unified Memory Architecture is very advantageous.
We value privacy highly, so our AI models run locally. This also means you have infinite tokens to use! As long as your computer can run it, we use the llama.cpp open-source framework, which has source code that anyone in the world can review and supervise, so you can use it with peace of mind. The model itself also lacks internet connectivity, so you don’t need to worry about your important data being leaked.
After the download is complete, click “Start Server” and then save the settings. You can try out the Roasting Style, but keep the engine settings at their default values.
Roasting Style:
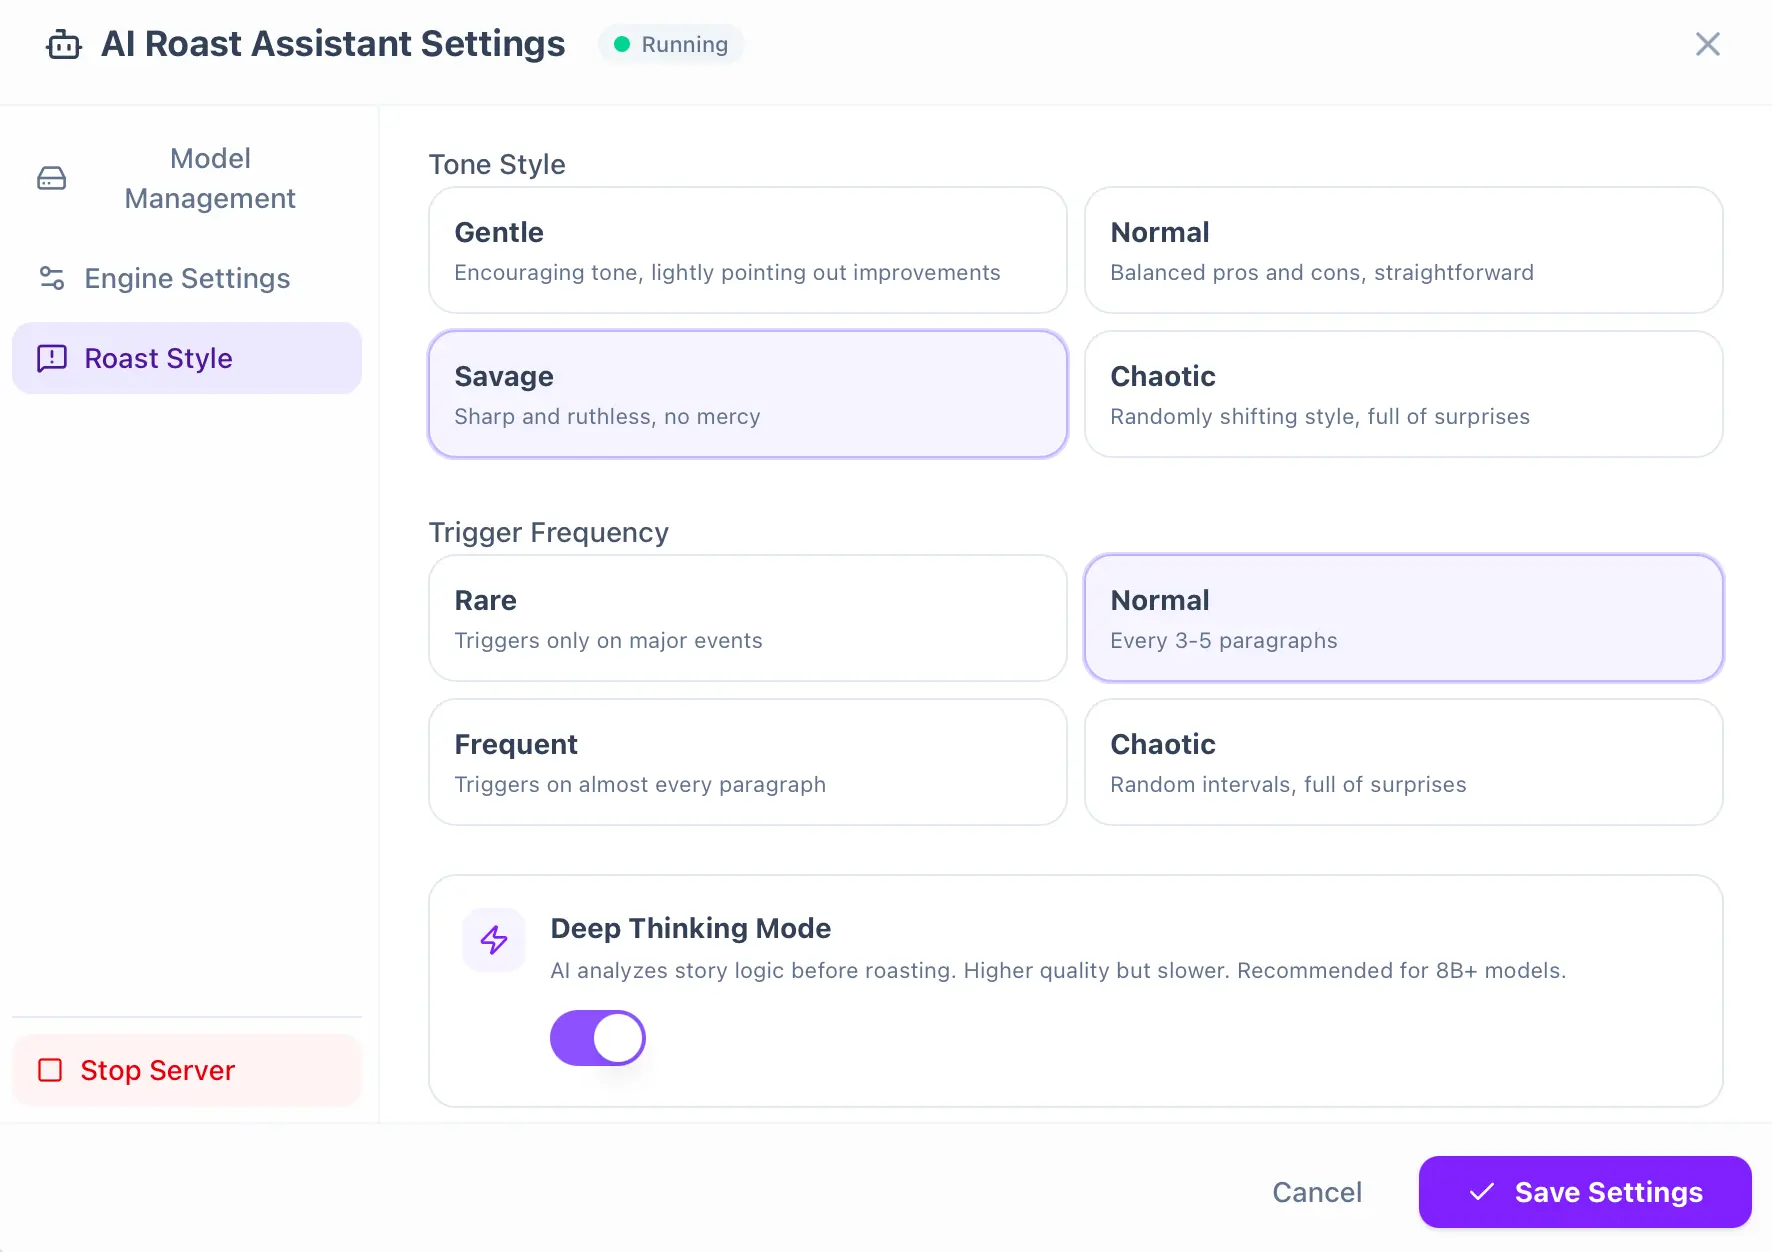
When you write a plot of about 100-200 words, it will automatically speak, and it will even appear in your live stream!

This concludes the introduction of InkWeave’s main features. You might discover even more little Easter Eggs along the way. We hope you enjoy using it!